A robot arm that has to pick something up first has to find it, and the usual way to find things is with a camera. This doc explains how a camera works, starting from nothing: what it records, what it loses, how a depth camera gets the lost part back, and the four numbers that describe a lens. The one-box doc then uses these basics to find a box on a table and measure it.
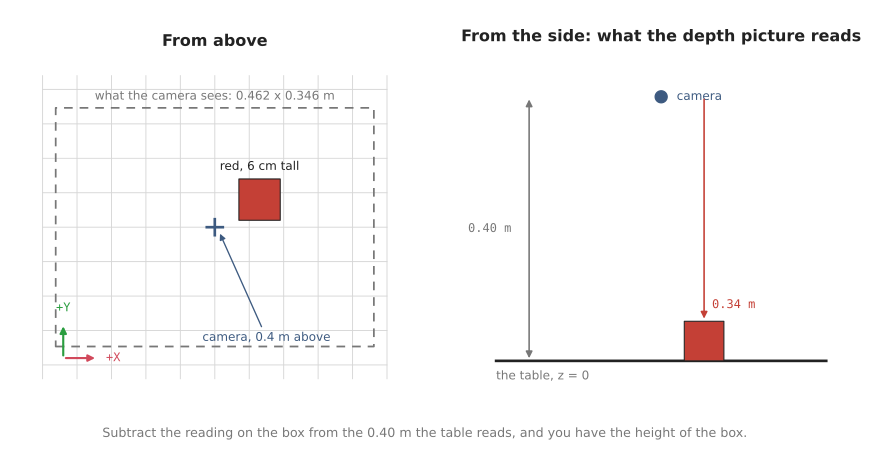
Every idea here is shown on one example, which the one-box doc uses too. A red box, a 6 cm cube, stands on a table, and a depth camera hangs 40 cm above the middle of the table, looking straight down. The table, the box and the camera are simulated in Gazebo, a robot simulator, so every picture in this doc is a real capture from that camera rather than a drawing.
Contents#
- What a camera is for
- How a camera makes a picture · A grid of pixels · Resolution: how many pixels · Field of view: how wide it sees
- What a picture loses
- Getting distance back: the depth picture · Where the 76,800 readings land · Depth is not distance
- The cameras used in these docs
- The lens as four numbers · What focal length is · Why the focal length is counted in pixels · fx and fy: across and down · cx and cy: the middle of the picture · The camera's own axes · Where 277 comes from
- Field of view and resolution are separate knobs
- Vocabulary
1. What a camera is for#
A camera is good at one part of finding the box straight away: it can see what is on the table. A photo of it shows a red box.
But an ordinary colour photo cannot finish the job. It can tell you that something red is over there, in that direction. It cannot tell you how far away it is — and without that, it cannot tell you where the box is, or how tall.
Sections 2 to 4 explain why, using nothing but what a camera physically does. Sections 5 to 7 then describe the camera used here as numbers, and the one-box doc uses those numbers to get the missing information back and measure the box.
2. How a camera makes a picture#
A camera is a box with a lens at the front and a flat sensor at the back.
Light bounces off everything in the room. Some of it passes through the lens and lands on the sensor. The sensor is covered in a grid of tiny light detectors, and each one records the colour of the light that reached it.
That grid of recordings is the picture.
A grid of pixels#
Each detector gives one square of the picture, called a pixel — short for picture element. A pixel holds one colour, and nothing else.
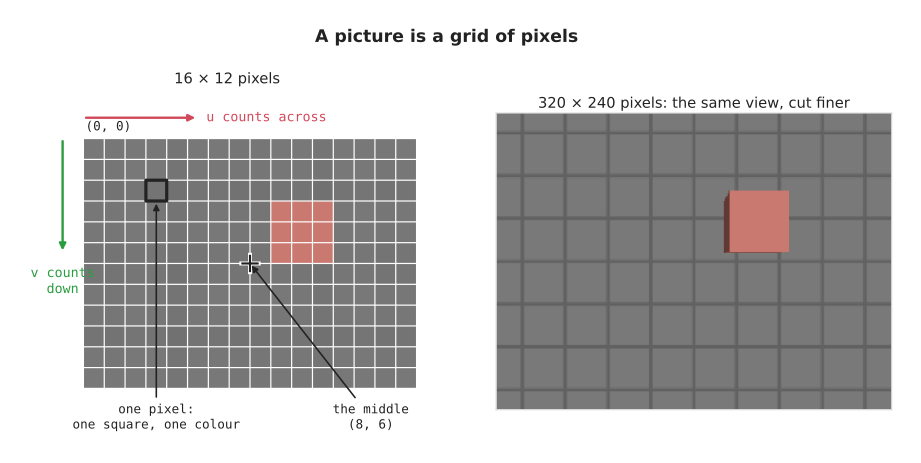
The left picture was taken with a camera only 16 pixels across and 12 down, so you can see every square. The red box is just a few red squares.
Pixels are numbered from the top-left corner:
ucounts across, left to rightvcounts down, top to bottom
So (0, 0) is the top-left pixel. The downward v is easy to trip over, because
on a graph y goes up. In a picture, it goes down.
A pixel is a small square, not a point. Pixel (3, 2) covers the square from 3
to 4 across and from 2 to 3 down, so its middle is at (3.5, 2.5). That half
pixel matters later.
Resolution: how many pixels#
Resolution is how many pixels a picture has, written width × height. The
camera in this doc is 320 × 240: 320 across, 240 down, 76,800 pixels in all.
The right picture above is the same view at 320 × 240. Nothing new came into
the shot. The same table was cut into many more, smaller squares, so the edges
come out sharp.
Field of view: how wide it sees#
Field of view is how many degrees across the camera takes in. It is set by the lens.
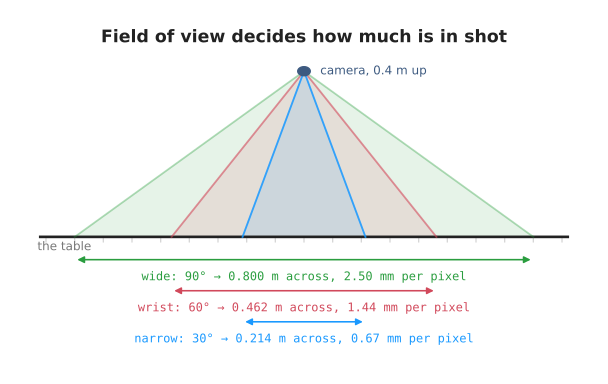
A wide lens takes in more of the table. A narrow lens takes in less, as if zoomed in. The camera in this doc sees 60° across. (The numbers under each lens come back in section 7.)
Resolution and field of view are two separate things. One decides how much of the world is in the picture. The other decides how finely it is cut up. That difference matters a lot when choosing a camera, and section 7 shows why.
3. What a picture loses#
Here is the most important fact about cameras.
Every pixel looks out along one straight line. Light reaching a pixel came from somewhere along that line — and the pixel has no way of knowing where.
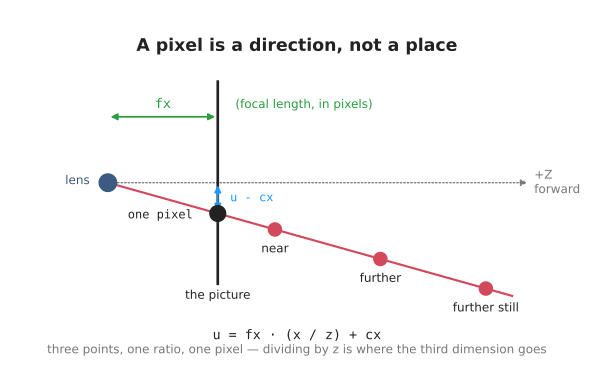
The picture shows three points on the same line out of the lens: one near, one further, one further still. All three land on the same pixel. No camera could tell them apart. (The formula at the bottom is explained in section 6.)
So a pixel does not tell you a place. It tells you a direction.
That is what people mean when they say a camera flattens the world. The world has three dimensions. A picture has two. The one that gets thrown away is distance.
That has everyday consequences:
- a big thing far away and a small thing close by can look exactly the same
- a colour picture cannot tell you how far away anything is
- so it cannot tell you where anything is, or how big
No clever code can fix this, because the distance was never recorded. The only way out is to measure it separately.
4. Getting distance back: the depth picture#
A depth camera measures the missing distance.
It takes a second picture, the same size as the colour one, through the same lens, at the same moment. But instead of a colour, each pixel holds a distance, in metres.
So you get one depth reading for every pixel. The camera in this doc is 320 × 240 pixels, so one depth picture holds 76,800 readings. In this scene, every one of the 76,800 came back with a number.
A camera that gives both pictures together is called RGB-D: red, green and blue for the colour picture, plus D for depth.
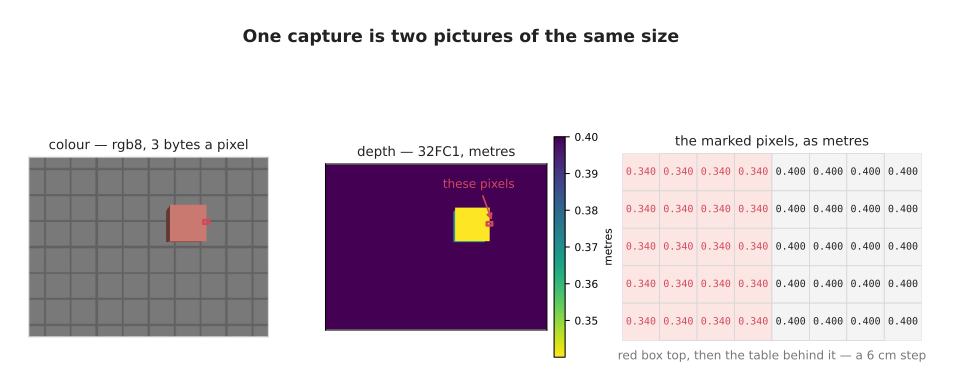
Look at the numbers on the right. They are the depth readings for a small patch
of pixels at the edge of the red box. On the box they read 0.340 m. On the
table just behind it they read 0.400 m. (The labels rgb8 and 32FC1 are the
names ROS gives these two pictures; the
one-box doc explains them.)
That 6 cm jump is the red box. No colour was needed to find it. The depth numbers alone say that something sticks up out of the table, and by how much.
Where the 76,800 readings land#
Here is where every reading landed, and what it read:
| Landed on | Readings | The top reads | Height above the table |
|---|---|---|---|
| the table | 74,176 | 0.400 m | — |
| the red box | 2,624 | 0.340 m | 0.060 m |
| all of them | 76,800 |
Most readings land on the table, and every one of those reads exactly 0.400 m.
The box gets 2,624 readings. Most of them land on its flat top, and all of those
read the same number: 2,352 readings of 0.340 m. The other 272 land on a thin
strip of the box's side, which the camera catches at its edge. They read a
little more, because the side is further down.
With only one box, finding its readings is easy: anything that reads less than
the table's 0.400 must be the box.
Subtract the box's top reading from the table's and you have its height:
0.400 - 0.340 = 0.060 m, which is 6 cm. That is half the job done, from one
picture.
The other half is where the box is. With the two pictures together, each pixel gives you a direction and a distance. A direction and a distance are enough to pin down a point in 3D, and the one-box doc turns that into arithmetic.
Depth is not distance#
One detail catches almost everyone.
Depth is measured straight ahead, along the way the camera points — not along the slanted line from the lens to the point.
That is why the table reads exactly 0.400 m everywhere, corners included.
The corners are clearly further from the lens than the middle is. But every
point on the table is 0.40 m in front of the camera, measured straight down.
Mix the two up and every point comes out slightly too far away, worst at the edges of the picture. Getting it right also keeps the maths simple later: the third coordinate of a point turns out to be just the depth reading.
5. The cameras used in these docs#
With those ideas in place, we can describe the cameras these docs use. There are two of them, and they have different jobs.
The first is a simulated camera, which takes every picture and gives every number in these docs. It is a depth camera in Gazebo, a robot simulator, so we can put it exactly where we want, and it gives both a colour picture and a depth picture for every shot:
| What | Value | Meaning |
|---|---|---|
| resolution | 320 × 240 | pixels across, pixels down |
| field of view | 60° across | how wide it sees |
| height | 0.40 m | how far above the table it hangs |
| pointing | straight down | at the middle of the table |
The table has a 5 cm grid printed on it, which makes it easy to see how much of it is in shot. The picture is kept small on purpose: 76,800 pixels are few enough that every number in these docs can be checked by hand, and every idea works the same way with more pixels. The one-box project also has a basic 80 × 60 camera in the same place, small enough to print every one of its pixels in a terminal.
The second is a real camera, the Raspberry Pi Camera Module 2, which these docs use whenever they show how things look on real hardware. It is a small, inexpensive camera that is often fitted to hobby robots, and its maker publishes every number we need in its hardware specifications. Its field of view across is 62.2°, which is very close to the simulated camera's 60°, so from the same height the two see almost the same patch of table. The big difference is how finely they cut that patch up, because the real camera has about 105 times as many pixels:
| What | Simulated camera | Raspberry Pi Camera Module 2 |
|---|---|---|
| resolution | 320 × 240 (76,800 pixels) | 3280 × 2464 (about 8.1 million pixels) |
| field of view | 60° across, 46.8° down | 62.2° across, 48.8° down |
| depth picture | yes | no, colour only |
The last row matters. The Raspberry Pi camera only records colour, so on its own it cannot measure how far away anything is, which is exactly what section 3 showed a colour picture loses. That makes it a good real example for everything about the lens and the pixels, but a real robot doing the job in the one-box doc would need a depth camera as well. Whenever these docs use the real camera, they also say what that camera can and cannot do.
6. The lens as four numbers#
To do arithmetic with a camera, we have to describe its lens and its sensor as numbers, and it turns out that four numbers are enough. This section explains what each of them means, starting with the one that needs the most background, which is the focal length.
| Number | What it means | Here |
|---|---|---|
fx, fy | the focal length, counted in pixels: how far the sensor sits behind the lens, which decides how zoomed in the camera is | 277.1 |
cx, cy | the middle of the picture, in pixels, where anything straight ahead lands | 160, 120 |
Together these four numbers are called the intrinsics, because they are intrinsic to the camera, meaning that they are part of the device itself. They do not change when the camera moves around the room, so a camera only has to measure them once.
What focal length is#
Section 2 described a camera as a box with a lens at the front and a flat sensor at the back. The focal length is the distance between those two: how far behind the lens the sensor sits, when the camera is focused on something far away. In the simplest camera of all, a pinhole camera, which is a dark box with a tiny hole in one side, the focal length is simply the distance from the hole to the back wall where the picture forms.
Real focal lengths are small, so they are measured in millimetres. A traditional camera with a "50 mm lens" has its lens about 50 millimetres in front of the film or the sensor. Small cameras have much shorter focal lengths than that, and the Raspberry Pi camera from section 5 is a good example. Its hardware specifications give its focal length as 3.04 mm, which means that its lens sits only 3.04 millimetres in front of its sensor.
The focal length matters because it decides how big things look in the picture. Light from a point in the scene travels in a straight line through the lens and lands on the sensor. When the sensor sits further behind the lens, that line has further to travel after the lens, so it lands further from the middle of the sensor. The diagram below shows the same box through two lenses. With twice the focal length, the top of the box lands twice as far from the middle, so the box looks twice as big. At the same time, the edges of the sensor now catch a narrower range of directions, so the camera sees less of the scene. That is what "zoomed in" means, and it is why a longer focal length always goes together with a narrower field of view.
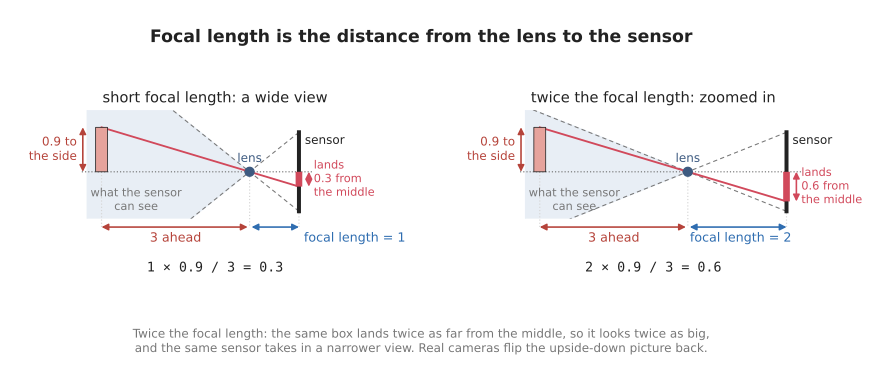
You may notice that the picture of the box lands upside down on the sensor. That happens in every camera, because the lines of light cross over at the lens, and the camera simply turns the picture the right way up before handing it over. The other diagrams in this doc draw the picture in front of the lens instead, at the same distance, where it is already the right way up. The triangles, and so the numbers, are the same either way.
The rule for where a point lands comes from the same triangles as the diagram. A point that is some distance to the side and some distance ahead lands on the sensor at:
distance from the middle of the sensor = focal length × (distance to the side / distance ahead)
The arrows in the diagram mark every number in this rule. The top of the box is 0.9 to the side and 3 ahead, so a focal length of 1 puts it 1 × 0.9 / 3 = 0.3 from the middle, and a focal length of 2 puts it 2 × 0.9 / 3 = 0.6 from the middle. Those are the two sums written under the two pictures.
Why the focal length is counted in pixels#
The rule above gives its answer in millimetres on the sensor, but a picture never tells us millimetres. All we can read from a picture is which pixel something landed on, such as "pixel 212 across", so the arithmetic we need has to connect a direction in the room with a pixel number. The millimetres on the sensor are only a step in between, and we never get to see them.
To turn millimetres on the sensor into pixels, we divide by the width of one pixel. The Raspberry Pi camera's specifications give its pixel size as 1.12 µm × 1.12 µm, where µm stands for micrometres, which are thousandths of a millimetre. So each pixel is 0.00112 millimetres wide, and a point that lands 1.12 millimetres from the middle of the sensor is 1,000 pixels from the middle of the picture. We can do the same division to the focal length itself, and that gives the focal length counted in pixels:
focal length in pixels = focal length in millimetres / width of one pixel in millimetres
                       = 3.04 / 0.00112
                       = 2,714 pixels
For this camera, the maker publishes both numbers, the focal length in
millimetres and the pixel size, in one table. For other cameras, the pixel size
is listed in the datasheet of the image sensor inside the camera, and it can also
be worked out by dividing the width of the sensor by the number of pixels across
it: the Raspberry Pi camera's sensor is 3.68 millimetres wide and 3,280 pixels
across, and 3.68 / 3,280 gives the same 0.00112 millimetres. Most cameras made for
robots skip all of this and report fx and fy directly, already counted in
pixels. A camera that does not report them can be measured instead, by taking
pictures of a printed checkerboard and letting a calibration tool work out fx
and fy from where its corners land.
With the focal length counted in pixels, the rule from the last part gives its answer in pixels straight away, and that is exactly the form this doc uses:
pixels from the middle of the picture = fx × (distance to the side / distance ahead)
This is why the arithmetic only needs to know how many pixels from the middle a given direction lands, and never needs the millimetres. The distance to the lens and the size of a pixel never matter on their own, only the result of dividing one by the other. Two cameras with different lenses and different pixels, but with the same focal length in pixels, take exactly the same picture. So a single number, in pixels, describes the lens and the sensor together, and it is the number that a camera reports with every picture.
For the camera in this doc, fx is 277.1 pixels. This means that a point which
is 0.1 metres to the side for every metre ahead lands 0.1 × 277.1 = 27.7 pixels
from the middle of the picture. The spot on the red box that the one-box
doc measures is 0.1894
metres to the side for every metre ahead, so it lands 0.1894 × 277.1 = 52.5
pixels from the middle. Our camera is simulated, so it has no real lens in
millimetres at all. It is described directly in pixels, which is all the
arithmetic ever needs.
fx and fy: across and down#
The focal length is kept as two numbers because a picture has two directions.
fx is the focal length counted in pixel widths, and it is used for positions
across the picture, from left to right. fy is the focal length counted in pixel
heights, and it is used for positions down the picture, from top to bottom. The
diagram below shows both on the camera in this doc, first seen from above and
then seen from the side.
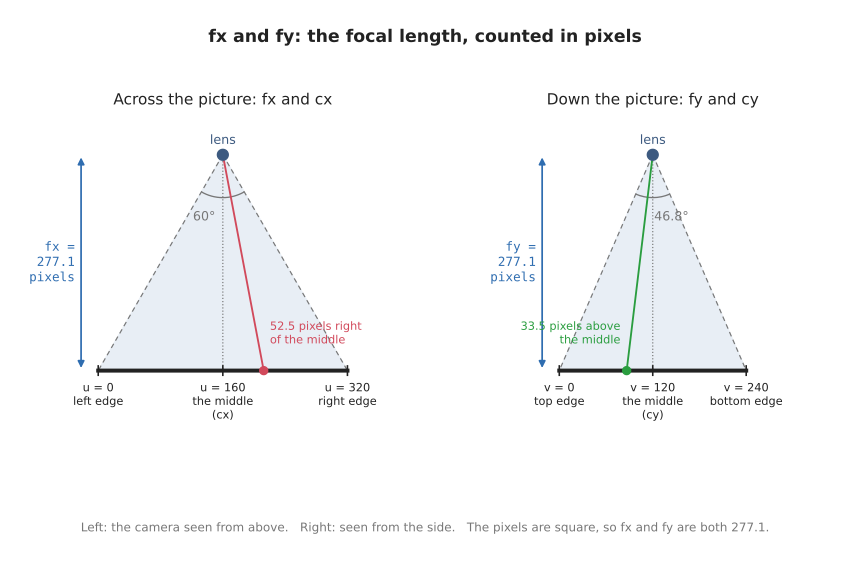
In the left half, the picture is 320 pixels wide and sits fx = 277.1 pixels in
front of the lens, and the lines from the lens to its two edges make the 60°
field of view. In the right half, the picture is 240 pixels tall and sits fy =
277.1 pixels in front of the lens. Because the picture is shorter than it is
wide, the field of view down the picture is only 46.8°. In both halves, the
coloured line is the line of sight to the spot on the red box, which lands 52.5
pixels to the right of the middle and 33.5 pixels above it.
fx and fy are the same here, and on nearly every camera, because pixels are
square, so a pixel's width and its height are the same. The Raspberry Pi camera
is one of them: its pixels are 1.12 µm by 1.12 µm, so its fx and its fy are
both 2,714 pixels. The two numbers are still kept separately because the ROS
message keeps them as two, and because a few cameras have pixels that are very
slightly taller than they are wide.
cx and cy: the middle of the picture#
The other two numbers, cx and cy, say where the middle of the picture is,
counted in pixels from the left edge and from the top edge. It is the pixel where
anything straight ahead of the lens lands, so every other position in the picture
is measured from there. Our picture is 320 by 240 pixels, so its middle is at
cx = 160 and cy = 120, and the diagram above marks it under each picture. On
a real camera these two numbers are usually close to the exact middle but not
quite on it, because the sensor is never perfectly centred behind the lens, and
that is why they are measured and reported rather than assumed. For the Raspberry
Pi camera, the exact middle of its 3280 × 2464 picture is at pixel (1640, 1232),
and calibrating a real one would give numbers close to those, but not exactly
equal to them.
The camera's own axes#
To say where something is relative to the camera, we need the camera's own axes. They are chosen to match the picture:
- X points right, the same way as
u - Y points down, the same way as
v - Z points straight ahead, out of the lens
With those axes, a point at (x, y, z) in front of the camera lands on this
pixel:
u = fx · (x / z) + cx
v = fy · (y / z) + cy
In words: how far to the side, divided by how far ahead, scaled up by the
focal length, then moved to the middle of the picture. It is the rule from the
last two parts, counted in pixels, with cx and cy added so that pixels are
counted from the edges of the picture instead of from its middle.
x / z is section 3 written as arithmetic. Twice as far away and twice as far
to the side gives the same ratio, so the same pixel. Dividing by z is
exactly where distance gets thrown away.
This is called projection: a 3D point in, a pixel out. It is what taking a picture does.
Where 277 comes from#
The focal length in pixels follows from the resolution and the field of view, and the left half of the diagram above shows why. Half the picture's width, which is 160 pixels, and the focal length make a right-angled triangle, and the angle of that triangle at the lens is half the field of view, which is 30°. So:
fx = (width / 2) / tan(field of view / 2)
   = 160 / tan(30°)
   = 277.1
The same formula works on a real camera, and it gives us a way to check the Raspberry Pi numbers from earlier in this section. Its picture is 3,280 pixels wide, and its specifications give its field of view as 62.2° across, so:
fx = (3280 / 2) / tan(62.2° / 2)
   = 1640 / tan(31.1°)
   = 2,719 pixels
That is within 0.2 per cent of the 2,714 pixels we worked out from the millimetres. The small difference is about what rounding in the published figures would cause: a focal length printed as 3.04 mm could really be anything from 3.035 to 3.045 mm, and 3.045 mm would give 2,719 pixels. So two separate sets of published numbers give the same focal length, which is a good sign that we have understood what it means.
A real camera reports this number with every picture, so nothing has to work it out. But the formula shows which way the trade goes: halve the field of view and the focal length roughly doubles. That is because seeing less of the world means that each degree of it is spread over more pixels.
7. Field of view and resolution are separate knobs#
Section 2 said these are different things. Here is why it matters: mixing them up is the most common way to choose the wrong camera.
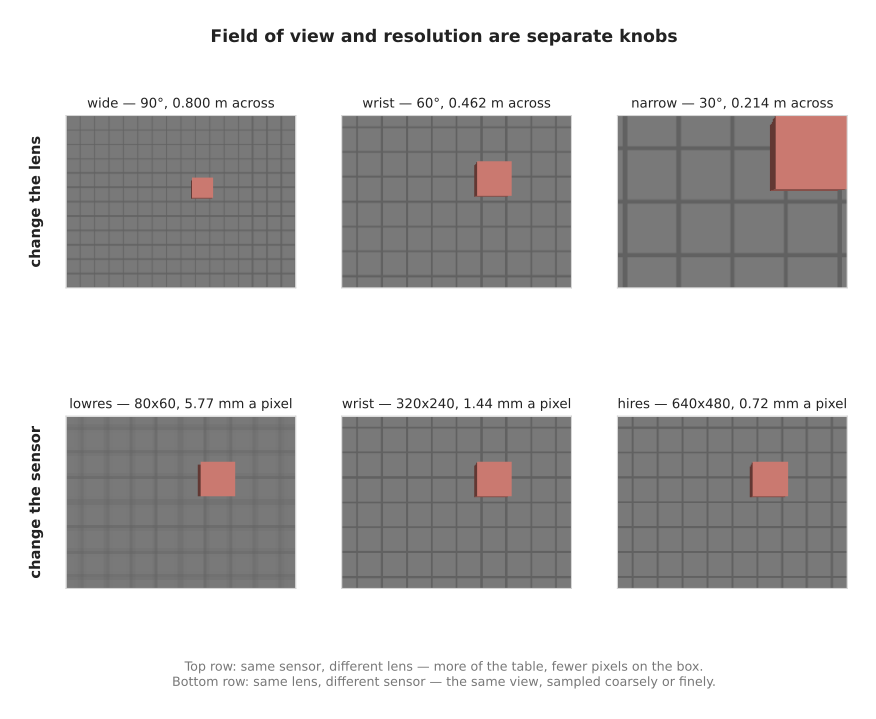
The top row changes the lens and keeps the sensor. From 40 cm above the table:
| Lens | Field of view | fx | Sees, across | One pixel covers |
|---|---|---|---|---|
| wide | 90° | 160.0 | 0.800 m | 2.50 mm |
| wrist | 60° | 277.1 | 0.462 m | 1.44 mm |
| narrow | 30° | 597.1 | 0.214 m | 0.67 mm |
The bottom row changes the sensor and keeps the lens:
| Sensor | Resolution | fx | Sees, across | One pixel covers |
|---|---|---|---|---|
| lowres | 80 × 60 | 69.3 | 0.462 m | 5.77 mm |
| wrist | 320 × 240 | 277.1 | 0.462 m | 1.44 mm |
| hires | 640 × 480 | 554.3 | 0.462 m | 0.72 mm |
All three sensors see exactly the same 46 cm of table. They only differ in how many pieces they cut it into.
The Raspberry Pi camera from section 5 shows the same thing on real hardware.
From the same 40 cm above the table, with its fx of 2,714 pixels, it sees 0.483
metres across, which is almost the same as the simulated camera's 0.462 metres.
But it cuts that view into 3,280 pixels instead of 320, so one of its pixels
covers only 0.15 millimetres of the table, which is about ten times finer than
the simulated camera's 1.44 millimetres.
The number that decides whether a camera can do a job is the last column: how many millimetres one pixel covers, at the distance you work at. If one pixel covers 1.4 mm, nothing 1 mm wide can be measured reliably. No code can fix that afterwards. With the Raspberry Pi camera's 0.15 mm, the same 1 mm feature spans about seven pixels, which is enough to measure it.
Two things follow that are easy to get wrong:
- A wide lens is not "more camera". It spreads the same pixels over more of the world, so everything in it is measured more coarsely.
- More pixels do not show you more. They cut the same view more finely.
And fx on its own tells you nothing. fx changes in both tables, for
different reasons. Always read it next to the resolution.
8. Vocabulary#
| Term | Full name | Meaning |
|---|---|---|
| pixel | picture element | one square of a picture, holding one value |
u, v | — | a pixel's position: across from the left, down from the top |
| resolution | — | how many pixels, as width × height |
| field of view | — | how many degrees across the camera sees |
| depth | — | distance straight ahead of the camera, not along the slanted line |
| RGB-D | red, green, blue, depth | a camera that gives a colour and a depth picture together |
| focal length | — | how far the sensor sits behind the lens |
| intrinsics | — | fx, fy, cx, cy: the lens and sensor, as four numbers |
fx, fy | focal length, in pixels | how far the sensor sits behind the lens, counted in pixel widths and heights; it decides how zoomed in the camera is |
cx, cy | principal point | the middle of the picture, in pixels |
| projection | — | 3D point in, pixel out. Taking a picture |
K | intrinsic matrix | the four numbers laid out as a 3 × 3 grid, as CameraInfo carries them |
| Gazebo | — | the robot simulator that takes the pictures in these docs |
Next: finding one box, which uses these basics to measure the box.
Also in this area: finding an object in a picture, the three ways a robot finds something — by its colour, with a depth picture, and with a trained model — and how to train a model on an object of your own.
Previous area: position, frames and transforms.