A robot arm is a chain of joints that turn. Each joint reports one number: how far it has turned. Everything the arm does is worked out from those angles. This doc answers one question: what do you need to know about angles to follow the rest of this book?
It is for someone who has never studied robotics and has forgotten most of the
trigonometry they learned at school. You do not need anything beyond it. Every
idea is shown on a robot arm, not on a textbook triangle. Every number is
printed by code/src/maths/angles.py, so you can run it and check.
The doc covers five tools. Each one answers a question an arm asks all the time:
- Degrees and radians. Which unit is the angle in?
- cos and sin. A link points at some angle. How far across and how far up does it reach?
- atan2. The gripper is at some point. At what angle is it from the base?
- The law of cosines. How far apart are the shoulder and the gripper, for a given elbow angle? And backwards: what elbow angle gives a certain distance?
- Wrapping. 350° and -10° point the same way. Which one should a joint use?
Contents#
- The arm used in this doc
- Degrees and radians
- cos and sin: how far across, how far up
- atan2: from a point back to an angle
- The law of cosines: the triangle two links make
- Wrapping angles, and joint limits
- All of it on one page
- Running it
- Where this is used next
1. The arm used in this doc#
This doc uses the same arm as the rest of the book, so the numbers carry across. The arm lies flat on a table, so every angle is measured in one plane.
- Link 1 is 3 m long. It is fixed to the base at joint 1, which we will also call the shoulder.
- Link 2 is 2 m long. It is fixed to the end of link 1 at joint 2, which we will also call the elbow.
- The gripper sits at the far end of link 2.
The angle of joint 1 is called q1. It is measured from the table's x axis. The
angle of joint 2 is called q2. It is measured from the direction of link 1, not
from the table. The usual pose is q1 = 30° and q2 = 60°. In that pose the
gripper is at (2.598, 3.5).
The frames and transforms doc draws this arm and
explains where (2.598, 3.5) comes from. This doc explains the tools that
calculation uses.
2. Degrees and radians#
You already know degrees. A full turn is 360°. A quarter turn is 90°.
Robot software almost never uses degrees inside its calculations. It uses
radians. Python's math.cos and math.sin expect radians. NumPy's
np.cos and np.sin expect radians too. So does nearly every robotics library.
A radian is defined by the arm itself. Take a link 1 m long and turn it. Its tip moves along a curve, called an arc. When the tip has travelled 1 m along that arc, the link has turned 1 radian.
That gives a useful rule. For any link:
distance the tip travels = link length × angle in radians
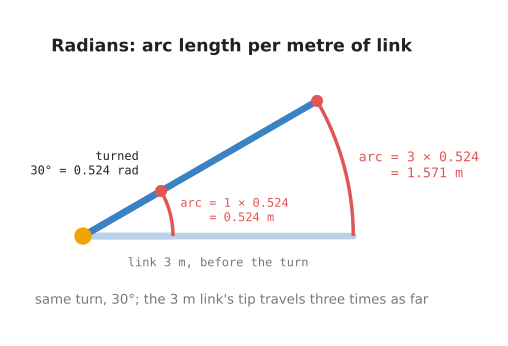
The picture turns two links by the same 30°. 30° is 0.524 radians. The 1 m link's tip travels 0.524 m. The 3 m link's tip travels three times as far, 1.571 m. The angle is the same. The longer link's tip moves further because it is further from the joint.
This rule matters for safety and speed. A joint that turns slowly can still swing the far end of a long arm quickly.
To convert, use math.radians() and math.degrees(). The file prints these:
| Degrees | Radians |
|---|---|
| 30 | 0.5236 |
| 90 | 1.5708 |
| 180 | 3.1416 |
| 360 | 6.2832 |
Read each row as the same turn in two units. 180° is π radians, which is 3.1416. A full turn is 2π.
The docs in this book write angles in degrees, because degrees are easier to
picture. The code always converts to radians before it calls cos or sin.
The most common bug in beginner arm code is passing degrees to math.cos. It gives no error. It gives
a wrong number. math.cos(90) treats 90 as 90 radians, which is about 14 full
turns plus a bit, and returns -0.448 instead of 0. The file prints both, so
you can see the difference. If an arm points in a strange direction, check the
units first.
3. cos and sin: how far across, how far up#
A link has a length, and it points at an angle. Most of the time you need
something else: how far across the table the far end is, and how far up. cos
and sin convert one into the other.
across = length × cos(angle)
up     = length × sin(angle)
That is the only job cos and sin do in this book.
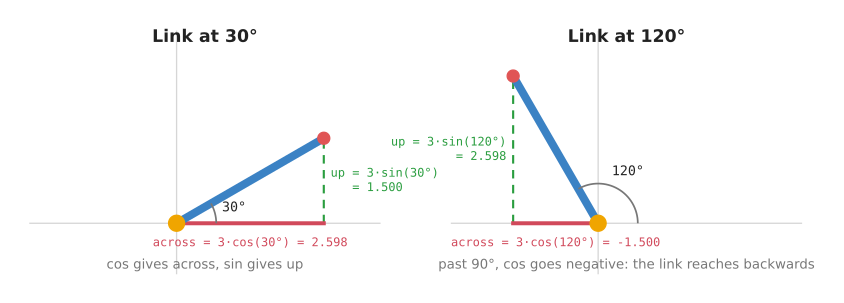
In the left picture link 1 points at 30°. It reaches 3 × cos(30°) = 2.598
across, and 3 × sin(30°) = 1.5 up. The link, the across line and the up line
form a right-angled triangle.
In the right picture the same link points at 120°. Now it leans backwards, past
the vertical. cos(120°) is negative, so "across" is -1.5. The minus sign
means "backwards, to the left of the joint". sin(120°) is still positive, so
the tip is still above the joint.
The file prints this table for the 3 m link at several angles. Each row is one angle. The last two columns are where the tip of the link ends up.
| Angle | cos | sin | Across | Up |
|---|---|---|---|---|
| 0° | 1.000 | 0.000 | 3.000 | 0.000 |
| 30° | 0.866 | 0.500 | 2.598 | 1.500 |
| 60° | 0.500 | 0.866 | 1.500 | 2.598 |
| 90° | 0.000 | 1.000 | 0.000 | 3.000 |
| 120° | -0.500 | 0.866 | -1.500 | 2.598 |
| 180° | -1.000 | 0.000 | -3.000 | 0.000 |
| 270° | 0.000 | -1.000 | 0.000 | -3.000 |
Three things are worth noticing in the table.
- At 0° the link lies flat along x. All 3 m are "across".
- At 90° it points straight up. All 3 m are "up".
cosandsinare always between -1 and 1. So a link never reaches further across, or further up, than its own length.
Two links#
With two links you do this twice and add. Link 1 points at q1. Link 2 points
at q1 + q2 from the table, because q2 is measured from link 1, which is
already turned by q1. So:
gripper_x = 3 × cos(q1) + 2 × cos(q1 + q2)
gripper_y = 3 × sin(q1) + 2 × sin(q1 + q2)
At q1 = 30°, q2 = 60°, link 2 points at 90°. That gives 2.598 + 0 = 2.598
across and 1.5 + 2 = 3.5 up. The gripper is at (2.598, 3.5).
This calculation, from joint angles to gripper position, is called forward kinematics. It has its own chapter: forward kinematics.
4. atan2: from a point back to an angle#
cos and sin go from an angle to a point. Robots often need the reverse. A
camera sees a cup at some spot on the table. Joint 1 has to turn to face it. At
what angle is the cup?
The function for this is called atan2. You give it the up distance and the across distance, in that order, and it gives back the angle:
angle = atan2(up, across)
Take the gripper at (2.598, 3.5). atan2(3.5, 2.598) is 53.4°. So the
gripper is 53.4° round from the table's x axis, seen from the base.
Notice that 53.4° is neither q1 (30°) nor q1 + q2 (90°). It is the direction
of the straight line from the shoulder to the gripper. The inverse kinematics
doc uses exactly this angle.
Why not plain atan#
School trigonometry teaches a function called atan, short for arc tangent.
It takes one number, up / across, and gives back an angle. It looks like it
should do the same job. It does not.
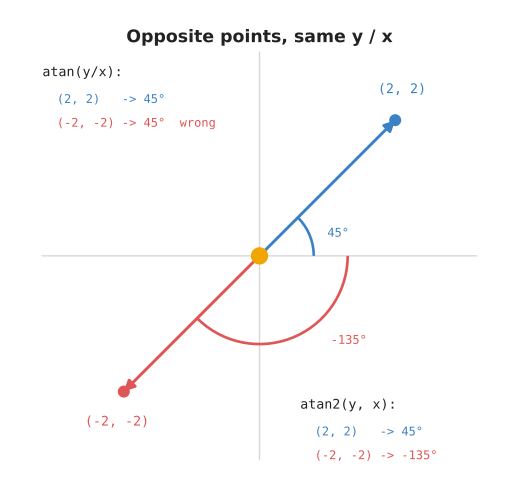
The picture shows two points in opposite directions: (2, 2) and (-2, -2).
Divide up by across for each one. Both give 1. The minus signs cancel. So
atan receives the same number twice, and it returns 45° twice. For (-2, -2)
that is wrong. It points the other way.
atan2 receives up and across separately. It can see both signs, so it knows
which quarter of the circle the point is in. The file prints this comparison.
Each row is one point:
| Point | atan(y / x) | atan2(y, x) |
|---|---|---|
| (2, 2) | 45.0° | 45.0° |
| (-2, -2) | 45.0° | -135.0° |
| (-2, 2) | -45.0° | 135.0° |
| (0, 1) | fails: division by zero | 90.0° |
atan is wrong for every point with a negative across, which is half of all
directions. It also fails outright when across is 0, because 1 / 0 has no
value. atan2 handles every case.
So in robot code, always use atan2(y, x). Note the order: y comes first.
5. The law of cosines: the triangle two links make#
Draw a straight line from the shoulder to the gripper. That line, together with the two links, makes a triangle.
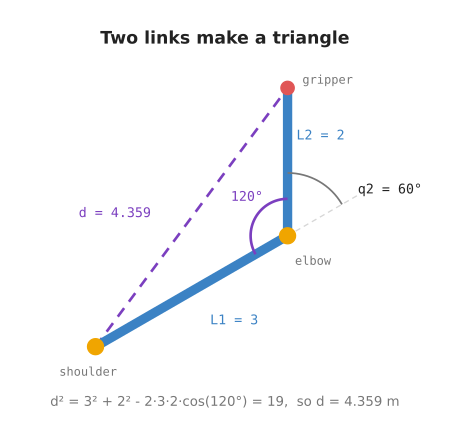
We know two sides of this triangle: the links, 3 m and 2 m. We know the angle
between them, at the elbow. The law of cosines gives the third side, d,
which is the distance from shoulder to gripper.
There is one trap. The angle inside the triangle is not q2. q2 is measured
from the line where link 1 would carry on, shown dashed in the picture. The
inside angle is what is left of a half turn:
inside angle = 180° - q2
With q2 = 60° the inside angle is 120°. Now the law of cosines:
d² = L1² + L2² - 2 × L1 × L2 × cos(inside angle)
d² = 9 + 4 - 12 × cos(120°)
d² = 13 - 12 × (-0.5) = 19
d  = 4.359 m
We can check this another way. The gripper is at (2.598, 3.5). Its distance
from the base is sqrt(2.598² + 3.5²), which is also 4.359 m. The two
methods agree.
Why this matters: going backwards#
The law of cosines is useful because it runs backwards. Suppose you want the
gripper at some point. You can measure d, the distance from the shoulder to
that point. Then you can solve for the elbow angle.
Because cos(180° - q2) = -cos(q2), the formula tidies up to:
cos(q2) = (d² - L1² - L2²) / (2 × L1 × L2)
q2      = acos(that number)
acos is the reverse of cos. You give it a cosine, and it gives you the angle.
The file tries several distances. Each row below is one distance, the cosine the formula gives, and the elbow angle that results:
| d (m) | cos(q2) | q2 |
|---|---|---|
| 4.359 | +0.500 | 60.0° |
| 5.000 | +1.000 | 0.0° |
| 1.000 | -1.000 | 180.0° |
| 4.000 | +0.250 | 75.5° |
| 6.000 | +1.917 | none: out of reach |
The first row gives back the 60° we started with. At 5 m, which is 3 + 2, the
elbow is straight: the arm is at full stretch. At 1 m, which is 3 - 2, the
elbow is folded right back on itself.
The last row is the important one. 6 m is further than the arm can reach. The
formula gives a cosine of 1.917. No angle has a cosine above 1, so acos has no
answer. Python raises an error if you try. That error is how the maths tells you
the target is out of reach. Real code checks the number is between -1 and 1
before calling acos.
This is the first step of inverse kinematics: finding joint angles from a
gripper position. The inverse kinematics doc
finishes the job, using atan2 for joint 1.
6. Wrapping angles, and joint limits#
Many numbers, one direction#
Turn a link 350° anticlockwise. Now turn another link 10° clockwise, which is -10°. They end up pointing the same way.
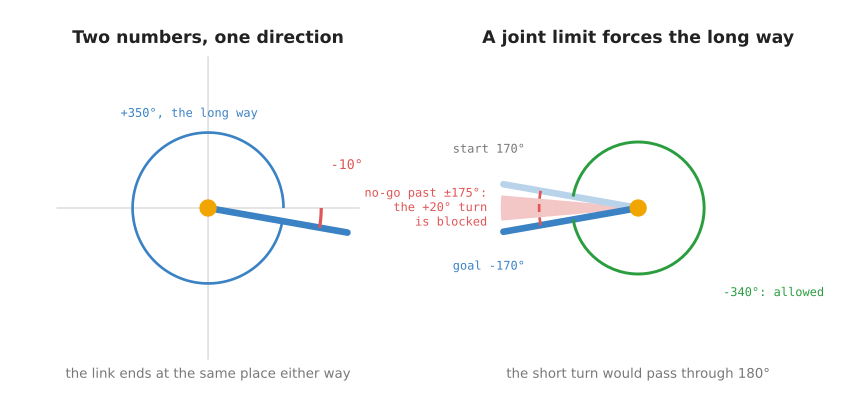
The left picture shows this. So do 710° and -370°. Every direction has endless names, each 360° apart.
Code usually picks one standard name for each direction. The common choice is an angle above -180° and up to 180°. Bringing an angle into that range is called wrapping it. In Python:
wrapped = (angle + 180) % 360 - 180
The % sign gives the remainder after dividing. The file wraps several angles.
Each row shows an angle and its wrapped form:
| Angle | Wrapped |
|---|---|
| 350° | -10° |
| -10° | -10° |
| 370° | 10° |
| 200° | -160° |
| -190° | 170° |
| 180° | 180° |
The last row needs a small fix in the code. The formula gives -180 for 180. Both point the same way, so the file keeps +180.
The shortest turn#
Wrapping answers a practical question: which way should a joint turn?
Say a joint is at 170° and must reach -170°. Plain subtraction says turn
-170 - 170 = -340°, almost a full turn clockwise. Wrap that difference and you
get +20°. The two angles are only 20° apart, across the 180° mark.
For a wheel, or for a joint that can spin forever, +20° is clearly better.
A joint limit changes the answer#
Most arm joints cannot spin forever. Cables run through them, and parts would collide. So each joint has limits: a smallest and a largest angle it is allowed to reach. Say this joint's limits are -175° and +175°.
The right picture shows what happens. The +20° turn would carry the joint through 180°, which is past +175°. That region is shaded as no-go. The joint must take the long way round instead: -340°.
The file prints the same conclusion:
turning +20 would carry the joint to 190 degrees, past its limit of +175, so it must turn -340 instead
This is why robot software treats joint angles and directions differently. A direction can be wrapped freely. A joint angle cannot, because the joint has to travel through every angle in between. When you plan a move, you check the path against the limits, not only the end point.
7. All of it on one page#
These are the five tools, in the order this doc met them. Each line says what goes in and what comes out.
degrees to radians:   radians = degrees × π / 180        math.radians(d)
arc the tip travels:  distance = link length × radians

angle to point:       across = length × cos(angle)
                      up     = length × sin(angle)

point to angle:       angle = atan2(up, across)         never atan(up / across)

two links, distance:  d² = L1² + L2² - 2·L1·L2·cos(180° - q2)
distance, elbow:      cos(q2) = (d² - L1² - L2²) / (2·L1·L2)
                      out of reach if that is above 1 or below -1

wrapping:             wrapped = (angle + 180) % 360 - 180
joint limits:         check the whole path, not only the end angle
8. Running it#
From the code/ folder:
pixi run python src/maths/angles.py
The file prints five sections, one per section of this doc, in the same order.
Change LINK1 and LINK2 at the top of the file, run it again, and watch the
reach limits in section 4 move.
The diagrams are drawn by docs/diagrams/maths.py. Run it from code/ with
pixi run python ../docs/diagrams/maths.py.
9. Where this is used next#
The next doc, vectors and matrices, treats each
link as an arrow and shows how a matrix turns a point. It uses the cos and
sin from section 3 inside a small table of numbers.
After that come frames and transforms, forward kinematics, which is section 3's two-link formula made general, and inverse kinematics, which is built from sections 4 and 5.