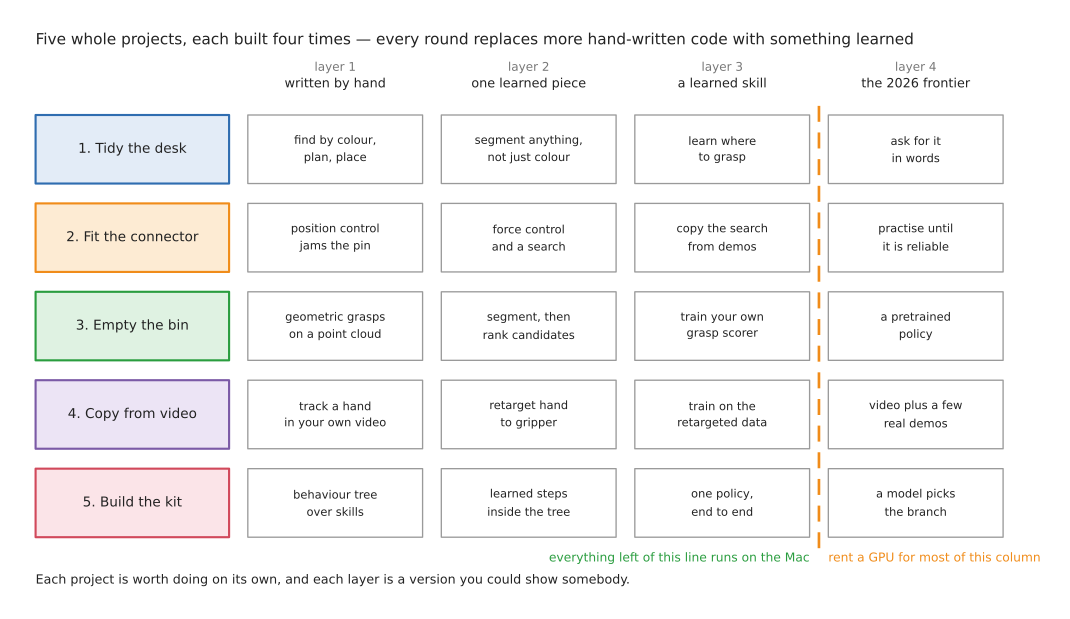
This document gives you five projects to build. Each one is a complete working robot system. You build each one four times over, and each time you replace more of your own code with something learned.
Everything runs in simulation. Almost everything runs on an ordinary Mac.
Why projects rather than exercises#
A common way to learn robotics is a list of small exercises. Move a joint. Plan a path. Detect an object. Each one takes an hour, and at the end you cannot build anything.
The problem with that approach is where robot bugs actually come from. Most of them happen where two parts meet. The camera says the mug is at one place. The planner moves the arm there. The gripper closes, and there is nothing in it. Now you have to work out which of the three was wrong, and the answer is usually a fourth thing, such as the camera and the arm disagreeing about where the table is.
An exercise that only moves a joint never shows you this. It has one part, so there is nowhere for the parts to disagree.
So every project here has a camera or two, a motion, a grasp, and a check on whether it worked. That is the smallest thing that can go wrong in an interesting way.
Why you build each project four times#
Each project is built in four versions, which this document calls layers.
Layer 1 is written by hand. You write every rule yourself. No machine learning anywhere.
Layer 2 replaces the perception with a model. The part that recognises things becomes a network. Everything else stays as it was.
Layer 3 replaces a skill with a policy. A behaviour you wrote by hand is replaced by one learned from demonstrations.
Layer 4 is whatever the field is currently excited about. Pretrained policies, language models, learning from video.
There is a reason to do it this way rather than jumping to layer 4. When you build the same task four ways, you can compare the four on a problem you understand well. You will have your own numbers. You will know which version broke, and why. That is worth far more than reading somebody else's benchmark, because you cannot check their benchmark and you can check yours.
It also means you always have something that works. Layer 1 of project 1 is a robot that tidies a desk. You can show that to somebody.
Why simulation only#
Everything that makes real robot hardware slow to learn from is absent in simulation. There is no wiring. There is no calibration. Nothing is dangerous. Nothing needs resetting by hand between attempts. You do not wait two weeks for a part.
Almost everything that makes the software hard is still there. You still have to work out why the planner cannot find a path. You still have to work out why the gripper jams. You still have to work out why the policy drifts away on the fourth attempt.
Those are the problems worth your time, and you can repeat them a hundred times in an evening.
Contents#
- The five projects
- The two simulators
- The tools, and why each one
- Project 1: tidy the desk
- Project 2: fit the connector
- Project 3: empty the bin
- Project 4: copy it from video
- Project 5: build the kit
- Where the cloud helps
- What this path leaves out
The five projects#
| Project | What it does | What it teaches | Simulator |
|---|---|---|---|
| 1. Tidy the desk | sorts a table of mixed objects into bins | the ordinary robot cell, end to end | Gazebo |
| 2. Fit the connector | pushes a plug into a socket it cannot see | contact, force, and why position fails | MuJoCo |
| 3. Empty the bin | picks objects out of a cluttered bin | perception, and grasping unknown things | Gazebo |
| 4. Copy it from video | learns a task from video of your own hand | learning without a robot | MuJoCo |
| 5. Build the kit | assembles five parts in order | long tasks, and recovering from failure | both |
Do them in order. Each one reuses code from the one before. By project 5 you are assembling parts using the grasping from project 1, the force control from project 2, and the perception from project 3.
The two simulators#
You will use two simulators. That is not wasted effort, because they do different jobs.
Gazebo simulates a robot system#
Gazebo is the simulator that ROS uses.
What it is good at. It simulates cameras properly, including the noise and the errors a real camera has. It talks to ROS 2 directly. Most importantly, it runs the same controller software that a real arm runs. The code you write against Gazebo is the code you would put on real hardware.
When to reach for it. When the thing you are testing is the plumbing. Topics, camera frames, controllers, launch files, how the pieces connect. Projects 1, 3 and 5 use Gazebo, because those are the projects where the system matters.
What it is bad at. Contact. Gazebo's physics is fine for an arm moving through the air and picking things up. It is not accurate enough for a peg going into a hole with half a millimetre of clearance.
MuJoCo simulates physics and policies#
MuJoCo was built by DeepMind for contact simulation and for machine learning.
What it is good at. Contact. It handles objects pressing and sliding against each other accurately. It is also very fast, which matters when a training run needs millions of attempts.
When to reach for it. When the thing you are testing is physics or a policy. Projects 2 and 4 use MuJoCo. You also have no real choice here, because nearly every robot learning tool expects MuJoCo underneath.
What it is bad at. Being a system. It has no ROS integration worth using on a Mac, and its camera models are simpler than Gazebo's.
Why learning both is worth it#
They fail in different ways, and that is useful.
If your setup works in Gazebo but misbehaves in MuJoCo, your contact settings are probably wrong. If it works in MuJoCo but falls apart in Gazebo, your problem is probably timing or message passing rather than physics.
Knowing which simulator to blame saves you days.
What this means on a Mac#
MuJoCo is easy. It has proper Apple Silicon builds and a native viewer. One thing
catches everybody: macOS requires drawing to happen on the main thread, so you start
the viewer with the mjpython command rather than python. If you would rather
avoid that, mjviser shows MuJoCo in a browser
instead.
Gazebo is harder, and you should know this before you lose an evening to it. It does work — this repository already runs it on this machine for the camera area. But Apple Silicon is not a platform Gazebo's developers test on. Two things follow.
First, install it with conda, not Homebrew. Gazebo's own instructions tell you to use Homebrew. For the version that works with ROS 2 Jazzy there is no ready-made Homebrew package, so Homebrew would compile the whole thing from source. That takes hours. The conda packages are already built, which is why this repo's camera area works.
Second, the window and the physics cannot run in one process on macOS. You start them as two separate commands. This has been a known problem since 2019. It is how Gazebo works on a Mac, not something you have broken.
The ROS 2 parts are better than their reputation. MoveIt 2, RViz2 and ros2_control
all have Apple Silicon builds, and the crashes that used to make them painful were
fixed during 2025 and early 2026. One setting is worth changing: use the Cyclone DDS
middleware rather than the default, which still has a bug on recent macOS.
The tools, and why each one#
Each tool is explained once here. The projects then say which ones they use.
If you meet a word you do not know, the glossary explains the terms used across this folder.
For each tool there are four things worth knowing: what it is, what it does for you, why it rather than the obvious alternative, and what it costs you.
Describing the robot: URDF and MJCF#
What they are. Two file formats that describe a robot. URDF, the Unified Robot Description Format, is what ROS and Gazebo use. MJCF is MuJoCo's own format. Both list the arm's links, its joints, and how they connect.
What they do for you. Every other tool reads one of these. The planner needs it to know how long the arm is. The controller needs it to know which joints exist. The simulator needs it to draw the arm.
Why you need to know both. Because the same arm has two descriptions, and they can disagree. A joint limit set in one and not the other will waste an afternoon. This repo's arm area builds a URDF up from nothing, which is the fastest way to understand what is in one.
What it costs you. Converting between the two formats is not automatic. Most people keep both by hand for the one arm they care about.
Ready-made robot models: MuJoCo Menagerie#
What it is. MuJoCo Menagerie is DeepMind's collection of models of real robots — a Franka Panda, a UR5e, a Kinova and many others — already written in MJCF.
What it does for you. It gives you a correct arm on the first day.
Why this rather than writing your own. A robot model has masses, inertias, joint friction and motor limits in it. Get any of them wrong and your arm will behave oddly in ways that look like bugs in your code. These models are tuned by the people who wrote the simulator. When something goes wrong, you then know it is your code.
What it costs you. Nothing. Use it.
Controlling the joints: ros2_control#
What it is. ros2_control is the standard ROS framework for driving robot joints. It sits between your commands and the motors.
What it does for you. It gives you controllers you would otherwise write. A joint trajectory controller takes a path and follows it smoothly. An admittance controller makes the arm soft and responsive to being pushed.
Why this rather than writing directly to the joints. Because of what happens later. The same controllers run on simulated and real arms without changes. If you write your own control loop against MuJoCo, none of it transfers. gz_ros2_control is the piece that runs these controllers inside Gazebo.
What it costs you. Configuration files, and a fair amount of them. Expect the first setup to take a day. ros2_control_demos has working examples, which is much faster than reading the documentation.
Planning motion: MoveIt 2#
What it is. MoveIt 2 finds a path for the arm from where it is to where you want it, avoiding obstacles.
What it does for you. Collision checking, inverse kinematics, path planning and execution, all together. Inverse kinematics means working out the joint angles that put the gripper in a particular place, which is harder than it sounds and which you do not want to write yourself.
Why this rather than anything else. There is no real competitor in open source. MoveIt is what the jobs ask for and what the tutorials assume. It also has Apple Silicon builds, which several alternatives do not.
What it costs you. MoveIt is fiddly to configure, and this is its main reputation. Start from its own tutorials and its ready-made robot configurations rather than from an empty folder.
Three pieces inside MoveIt worth knowing by name. OMPL provides the random planners, which are good at finding a way through awkward spaces and give a different answer every time. The Pilz industrial motion planner gives you straight lines and arcs that are identical on every run, which is how real factory controllers work and what you need if anyone ever has to certify the cell. Ruckig works out the speed along a path so the arm accelerates smoothly instead of jerking.
One more piece, for later projects. MoveIt Task Constructor builds a motion out of stages with alternatives, so you can say "try grasping from the top, and if that does not work, try from the side".
Sequencing the job: behaviour trees#
What they are. A behaviour tree organises a task as a tree of small steps. The tree is run over and over, perhaps fifty times a second. Each step reports one of three things: it succeeded, it failed, or it is still working.
What they do for you. They handle failure. A sequence node runs its children in order and stops when one fails. A fallback node tries each child until one succeeds, which is exactly the shape of "try the normal thing, and if that fails, try the recovery".
Why this rather than a state machine, or plain code. A state machine is easy with five states and unreadable with fifty, because the number of possible transitions grows with the square of the number of states. Plain code turns into nested conditionals that nobody can change safely. Behaviour trees stay readable at fifty branches, and you can add a recovery without touching anything around it. That matters more than it sounds, because most of the code in a working robot is about what happens when things fail.
Which one to use. BehaviorTree.CPP is the standard, and its Groot editor lets you watch the tree run live, which is the fastest way to understand them. py_trees is the Python version and is easier to start with.
Seeing: depth cameras and segmentation#
Turning depth into points. A depth camera gives you a picture where each pixel
is a distance. depth_image_proc turns that into a point cloud, which is a set of
3D points you can actually reason about. It is a standard ROS package and it is
already in this repository's dependencies.
Finding objects: SAM 2. SAM 2 is Meta's segmentation model. Segmentation means working out which pixels belong to which object.
What it does for you. It separates objects it has never been trained on. You do not collect data, you do not label anything, and you do not train.
Why this rather than writing colour rules. Colour rules are twenty lines you fully understand, and they break the moment the lighting changes or somebody adds a shiny object. SAM 2 handles objects you never described. The trade is that you cannot debug it when it is wrong. You will feel both sides of this in project 1.
What it costs you. Its instructions say Linux only. It does in fact run on Apple's Metal backend, and you build it with the optional CUDA step switched off. Stay on version 2: SAM 3 requires an NVIDIA card outright.
Tracking a hand: MediaPipe. MediaPipe finds hand positions in ordinary video. It runs on a laptop camera in real time and has Apple Silicon builds. Project 4 is built on it.
Contact tasks: robosuite#
What it is. robosuite is a set of manipulation tasks that run inside MuJoCo. Peg insertion, door opening, nut assembly and others.
What it does for you. Each task comes with a robot, the objects, a way of scoring success and a way of resetting. You do not build any of it.
Why this rather than building the task yourself. Contact simulation is harder to get right than it looks. Friction, contact stiffness and the size of the simulation time step all change whether the peg goes in. If you build the task yourself and it does not work, you will not know whether your controller is wrong or your physics is. robosuite's tasks are already tuned, so a failure is yours.
Why this rather than ManiSkill. ManiSkill has more tasks and better graphics. On a Mac it needs a manual Vulkan installation and runs physics on the processor only, and its own documentation contradicts itself about whether macOS is supported. robosuite simply works.
What it costs you. It requires a slightly older MuJoCo, so let it choose the version rather than forcing the newest.
Its companion: robomimic. robomimic provides datasets and careful baseline results on those same tasks. It is worth having because it tells you what a good score even looks like, so you know whether your result is bad or normal. Install it from GitHub; the version on PyPI has not been updated since 2023.
Learning: LeRobot#
What it is. LeRobot is Hugging Face's robot learning library. It holds the policies, the dataset format, the training loop and the evaluation tools.
What it does for you. Everything on the learning side. It has ACT and diffusion policy built in, it defines the dataset format that the rest of the field now uses, and it runs on Apple's Metal backend.
Why this rather than the original code for each method. The original repositories are dormant. ACT has had no commits since 2024 and diffusion_policy none since late 2024. The methods themselves are alive and maintained inside LeRobot. This catches people out: a quiet repository looks like a dead technique, and here it just means the work moved.
What it costs you. PyTorch's compile speedup does not work on Apple's Metal
backend, so training is slower than on an NVIDIA card. For the small policies in
this path that is fine.
The policy to start with: ACT. ACT predicts the next hundred commands at once rather than the next one. This matters because errors build up with every decision, so making a hundred times fewer decisions means a hundred times fewer chances to drift. LeRobot's own documentation calls it their recommended first policy, mostly because it trains in under an hour.
Making a policy reliable: HIL-SERL. HIL-SERL takes a policy that half works and improves it by practice, with you taking over when it is about to fail. Those take-overs become the training signal. It ships inside LeRobot. Its earlier version, SERL, has been retired by its own authors, so ignore tutorials that use it.
A pretrained policy you can actually run: SmolVLA. SmolVLA is a pretrained model that takes camera pictures and a sentence, and produces arm commands. It was deliberately built small enough for ordinary hardware. The larger models in this family need more memory than a consumer graphics card has, so on this path SmolVLA is the realistic option and the others are not.
Project 1: tidy the desk#
What you are building#
A table with about a dozen mixed objects on it: pens, mugs, small tools, boxes. Three bins beside it. The arm clears the table, putting each object in the right bin. It keeps going until the table is empty, and it does not stop when a grasp fails.
What is in the scene#
- One arm with a parallel gripper, which means two fingers that close together
- One depth camera above the table, looking down, which sees everything
- One camera on the wrist, which sees what the gripper is about to touch
- Three bins, and twelve objects
Two cameras rather than one, on purpose. The overhead camera tells you where things are. The wrist camera tells you whether the grasp is actually going to work. Finding out why you need both is part of the project.
Why start here#
This is the ordinary robot cell. A large share of real deployed robot work looks roughly like this, so it is the most directly useful thing in the document.
It also means that after layer 1 you have a robot that tidies a desk, which is something you can show people.
Layer 1: written by hand#
Find objects by colour and by how far they stand above the table. Fit a box around each one. Pick a grasp straight down at the middle of the box. Plan to it with MoveIt. Close the gripper. Drop the object in whichever bin your colour rule chose. A behaviour tree runs the sequence and retries when a grasp fails.
This will work very well on the objects you tuned it for. It will fall over as soon as you add a shiny one, because the colour rule was never about the object, it was about the light.
Tools: Gazebo, depth_image_proc, MoveIt 2, ros2_control, a behaviour tree.
Layer 2: one learned piece#
Replace the colour-and-height rule with SAM 2.
Nothing else changes. The planner, the controller and the behaviour tree all carry on exactly as before. That is the lesson of this layer. You have swapped twenty lines you completely understood, which broke under new lighting, for a downloaded model that handles objects you never described and that you cannot debug when it is wrong.
This trade is what most of this folder is about, and here you get to feel it rather than read about it.
Tools added: SAM 2.
Layer 3: a learned skill#
Your grasp is still straight down at the middle of the object. That is why it drops the mug, and why it knocks the pen instead of picking it.
So learn where to grasp. Record every grasp you attempt and whether it held. Train a small model that scores possible grasps, and let it choose.
The important part is where the training data comes from. You make it yourself, by trying. Every attempt in simulation is a labelled example. A few thousand attempts overnight give you a dataset that nobody had to annotate, and a model small enough to train on this machine.
Tools added: LeRobot for the training loop, or plain PyTorch.
Layer 4: the frontier#
Put a language model on top, so that the instruction becomes "put the tools away and leave the mugs out". The model picks which part of the behaviour tree to run for each object. The tree still does the work.
Read directed by language first. The interesting failure is the model confidently asking for something the arm cannot reach, which is exactly the problem the research in that section is about.
Who does this for a living#
This is what the 3D vision companies sell. Photoneo, Zivid and Keyence all ship systems that do roughly layer 2.
At the largest scale, Amazon's item-stowing system is this same pattern, measured over half a million real attempts. Its paper says exactly which parts are learned and which are ordinary code, which makes it the best free description of a production robot anywhere.
How to tell you are done#
The table clears on its own, twenty times in a row. You can say which layer fixed which failure.
Project 2: fit the connector#
What you are building#
A plug and a socket. The arm picks up the plug and pushes it into the socket. The clearance is tighter than the arm can reliably repeat, and the socket is not quite where the model says it is.
What is in the scene#
- One arm, with force readings at the wrist
- One wrist camera, to find the socket
- A plug in a fixture, and a socket board a few millimetres from where it should be
That last point is the whole project. If the socket were exactly where you expected, this would be easy.
Why this project#
This is the task where moving to the right position is not enough. It is also the best place in robotics to compare programmed and learned methods honestly, because both have strong published results on exactly this problem.
Commercially it is the most valuable thing in this document, because contact-rich assembly is where the unsolved industrial problems are.
Layer 1: written by hand, and it fails#
Find the socket with the camera. Plan to it. Push.
The plug jams, and the forces climb alarmingly. Do this first and watch it properly, because the failure is not a bug. It is exactly what a position controller is built to do: it sees an error it cannot remove, so it pushes harder, and then harder again.
Tools: MuJoCo, robosuite.
Layer 2: force control#
Stop commanding a position. Command a stiffness instead.
That means telling the arm how hard to resist being pushed, rather than where to be. Come in soft, so a small misalignment shoves the arm aside instead of jamming the plug. Then search in a small spiral until the force readings say the pin has dropped into the hole. Then push.
This is the most reusable idea in contact robotics. Once you have felt it work, the difference between commanding a position and commanding a stiffness stops being abstract.
Then measure it. Run twenty attempts at each of several stiffness values and plot success against stiffness. You will find a window. Too stiff and it jams like layer
- Too soft and it cannot push the plug home.
Tools added: a compliant controller. cartesian_controllers is worth reading for how this is structured in ROS, even while you prototype in MuJoCo.
Layer 3: a learned skill#
Collect fifty demonstrations of the search and train an ACT policy on the contact part only. Leave the approach planned as it was.
Confining the policy to the part that actually needs it is the design decision worth taking away here. It is what the deployed systems do, and it is why they can still be checked.
Tools added: LeRobot.
Layer 4: the frontier#
Take the policy from layer 3 and improve it by practice, stepping in when it is about to fail. Your take-overs become the training signal.
This is the recipe that four separate research groups arrived at independently in one year, on four unrelated tasks. That makes it the best-evidenced method in this folder.
Tools added: HIL-SERL, inside LeRobot.
Who does this for a living#
Every major robot vendor sells force control. FANUC ships force sensors and fitting functions. ABB has two separate options, one for machining and one that searches for the right location during assembly. KUKA has a force-torque package.
Micropsi's MIRAI is the interesting learned case. It uses a trained visuomotor skill to cope with parts not being where they should be, while leaving force control underneath to handle the actual contact. That split is worth noticing, because it is the same split as your layers 2 and 3.
On the research side, IndustRealKit trained insertion entirely in simulation and transferred it to a real arm, reaching between 83% and 99% across 600 trials.
How to tell you are done#
You have a plot of success against stiffness from layer 2, and a success rate for each of the four layers over at least fifty attempts each.
Project 3: empty the bin#
What you are building#
A bin holding thirty mixed objects, piled on top of each other. The arm empties it onto a conveyor, without damaging anything, and without giving up when an object is wedged in a corner.
What is in the scene#
- One arm with a narrow gripper that can reach between objects
- One depth camera above the bin
- One wrist camera for the approach
- Thirty objects of different shapes, overlapping
Why this project#
Bin picking is the task that learned perception turned from a research problem into a product. It is therefore the clearest demonstration of what machine learning has actually bought robotics.
It is also where perception becomes genuinely hard rather than a formality, because objects hide each other.
Layer 1: written by hand#
Take the point cloud. Find pairs of roughly parallel surfaces that the gripper could close on. Score each pair by how square-on the approach is and how far it is from other objects. Pick the best one the arm can reach.
This geometric grasp finder is about a hundred lines, and it works.
Writing it yourself is also the only option here, and you should know why before you go looking for a shortcut. Every open learned grasp model needs an NVIDIA card, because they all contain compiled CUDA code. The GraspNet baseline does, Contact-GraspNet does, AnyGrasp does and is a licensed binary as well. There is no download that will do this on a Mac.
Tools: Gazebo, depth_image_proc, MoveIt 2.
Layer 2: one learned piece#
Add SAM 2, so you know which points belong to which object. Then rank your grasp candidates per object rather than across one undifferentiated cloud.
On a cluttered bin the improvement is large and immediate, because most bad grasps in layer 1 were the gripper trying to close across two different objects.
Tools added: SAM 2.
Layer 3: a learned skill#
Train your own grasp scorer, exactly as in project 1 but with real clutter.
The interesting part is again the data. You generate it by trying. A few thousand attempts overnight is a labelled dataset that nobody annotated.
This is the same idea as MimicGen at a smaller scale: using ordinary programming to manufacture the data that training needs. For anyone without a budget for graphics cards, it is the most practically useful idea in this document.
Layer 4: the frontier#
Fine-tune SmolVLA on the data you collected, and compare it against your hand-written pipeline.
Be honest about the result. The hand-written pipeline may well win. No published paper anywhere reports a head-to-head of a general pretrained policy against one of these pipelines, so you would be asking a question nobody has answered.
This is the one layer in the project that wants a rented graphics card.
Who does this for a living#
This is the most commercially settled task in the document, beyond the vision companies already named in project 1.
The published numbers are strong. AnyGrasp reported clearing bins of over 300 unseen objects at 93.3% success, at more than 900 picks an hour. Note that AnyGrasp ships as a licensed binary and is not open source despite appearing to be, which tells you something about this market.
How to tell you are done#
Picks per hour and success rate for all four layers, on the same thirty objects, with the bin emptied at least ten times.
Project 4: copy it from video#
What you are building#
You record a video of your own hand doing a simple task on a table. Pushing a block into a marked square, or stacking two cups. The arm then learns to do the same task.
No teleoperation rig. No demonstrations driven through the robot.
What is in the scene#
- Your phone or laptop camera, for recording yourself
- In simulation: one arm, one wrist camera, a parallel gripper, and the blocks
Why this project#
This is the clearest bet in the field right now.
Robot demonstrations are the thing everybody is short of, and collecting more of the same kind has stopped helping. Video of humans doing things is effectively unlimited. So a great deal of current research is about closing that gap.
Building a small version yourself teaches you why it is hard in a way no paper will. It is also the project here most likely to be genuinely new to whoever you show it to.
Layer 1: written by hand#
Record thirty attempts at the task. Track your hand through each one with MediaPipe, which gives you the position of each finger joint in every frame. Plot the trajectories.
Nothing is learned yet, and you have already met the first real problem. The coordinates of your hand have nothing to do with the robot's coordinates. Different origin, different scale, different units.
Tools: MediaPipe.
Layer 2: retargeting#
Map the hand onto the gripper. The pinch between your thumb and forefinger becomes how far the gripper is open. Your palm becomes the wrist. Then replay that retargeted path in MuJoCo with no feedback at all.
It will miss. Why it misses is the lesson.
Your hand and the gripper are shaped differently, so the same motion does not put the fingers in the same place. Your camera never measured depth accurately. And nothing ever closed a loop, so a small error at the start stays wrong for the whole motion.
Retargeting is the hard, unglamorous core of this whole research direction. dex-retargeting is worth reading to see how it is done properly.
Tools added: MuJoCo.
Layer 3: a learned skill#
Train a policy on the retargeted paths rather than replaying them. A policy can correct as it goes, where a replay cannot.
Evaluate it honestly. Expect a low number. This is genuinely hard, and a low number here is a correct result rather than a mistake on your part.
Tools added: LeRobot.
Layer 4: the frontier#
Now mix in a handful of proper demonstrations collected in simulation, and find out how few of them it takes to rescue the policy.
That ratio — how much human video one robot demonstration is worth — is exactly what the research community is currently trying to establish. You would be asking a live question rather than a settled one.
Who does this for a living#
Nobody is selling this yet, which is part of why it is here.
The research line is active and almost nothing has been released. UMI is where this idea comes from and is worth reading before you build. Grabette is the one thing you can actually buy: a €490 handheld recorder with cameras and a gripper sensor, which lets you collect training data with no robot present.
If your goal is consulting work, being able to say you have built a video-to-policy pipeline, however small, is unusual.
How to tell you are done#
A success rate for layer 3, and a curve showing how it improves as you add real demonstrations in layer 4.
Project 5: build the kit#
What you are building#
A tray holding five parts, assembled in a fixed order. Place the base. Fit the board. Drive two fasteners. Clip the cover. Put the finished unit in an output tray.
If a step fails, the cell recovers and carries on instead of stopping.
What is in the scene#
- One arm, with force readings for the fastening
- One overhead camera, to find the parts in the tray
- One wrist camera, for each fitting step
- Five parts, and an output tray
Why this project last#
Long tasks are where learned methods are weakest and programmed ones are strongest. Having built the other four projects, you are now in a position to demonstrate that rather than take it on trust.
This is also the project that most resembles real industrial work.
Layer 1: written by hand#
A behaviour tree over the skills you already built in projects 1 to 3, with a recovery branch for every step.
Most of the code you write here will be about what happens when something fails. That is true of every real robot system, and it is the main thing this layer teaches.
Tools: Gazebo, MoveIt 2, MoveIt Task Constructor, a behaviour tree.
Layer 2: one learned piece#
Feed the tree with learned perception, so the parts no longer have to start in known positions.
The tree itself does not change at all. Same lesson as project 1's layer 2, now at a scale where it matters more.
Tools added: SAM 2.
Layer 3: a learned skill, and it will fail#
Replace the whole tree with a single policy trained end to end. Evaluate it.
It will do much worse, and the failures will cluster near the end of the task rather than spreading evenly through it. That clustering is compounding error: small mistakes early put the arm somewhere the training data never covered, so later steps get worse. Seeing it in your own numbers is the fastest way to understand why the programmed methods have not gone away.
The published evidence agrees with you. FurnitureBench found that behaviour cloning completes none of its full assemblies except the very simplest one.
Tools added: MuJoCo, LeRobot.
Layer 4: the frontier#
Put a language model above the behaviour tree. It picks which part of the tree to run next, and replans when a step reports failure. Compare it against the fixed tree from layer 1.
For a task whose order is genuinely fixed, the tree should win. Understanding why is worth more than the layer itself: the tree is the same every run, it costs nothing to run, and you can prove what it will do.
Who does this for a living#
This is ordinary industrial assembly, and it is done with behaviour trees and programmed skills essentially everywhere.
The interesting question is not who does it but who is trying to replace it. That is Physical Intelligence, Figure and Toyota Research Institute, none of whom can yet do a twenty-step assembly reliably from end to end.
How to tell you are done#
A completion rate for the full assembly at each layer, and a breakdown of which step the failures happen at.
Where the cloud helps#
Almost all of this runs on the Mac. That is worth defending. A loop you can run twenty times in an evening teaches you far more than a cloud job you run twice.
Rent a graphics card for these. The layer 4 fine-tunes in projects 3 and 4. Any NVIDIA-only perception model, such as FoundationPose, if you decide you want full pose estimation. Anything using Isaac Lab, which needs CUDA and will not run on Apple Silicon at all — though this path avoids it, because MuJoCo teaches the same things.
Do not rent for these. Every layer 1 and layer 2 in this document. Training an
ACT policy on a small task, which takes an hour rather than a day. Your own grasp
scorer in projects 1 and 3, which is the whole point of generating the data yourself.
Any amount of Gazebo, MoveIt or ros2_control work, none of which is limited by
compute.
The habit worth building. Develop locally at small scale until the pipeline is correct. Only then rent something to run it at full size. The most common way to waste cloud credit is debugging in the cloud.
What this path leaves out#
Real hardware, and therefore calibration. Everything here is simulated, so you will not have met the problem of making a model agree with reality. If you later buy a cheap arm, expect that to be the surprise.
Two arms. Coordination is a genuinely different problem and has its own folder. Do this path first, because almost every two-arm method is a single-arm method with a coordination problem added on top.
Reinforcement learning from scratch. It needs a simulator, a reward function and a budget for compute, and the field itself is using it less each year as a first step. Project 2's layer 4 teaches the use that actually matters, which is practice applied to a policy that was demonstrated first.
Isaac Lab and the NVIDIA stack. Excellent, widely used, and needs hardware you do not have. MuJoCo teaches the same lessons. MuJoCo Warp, where the fast version of MuJoCo is heading, is NVIDIA-first as well: it runs on a Mac for reading and debugging, not for training. If you want a simulator with a real Apple graphics backend, watch Genesis.
Back to the overview. For the methods themselves, see programmed methods and learned methods. For where the field is going, see what is changing, and why.