This page answers one question: how does a robot turn a picture of its finger pad into facts about what it is touching? To answer that, it explains the sensors that make such a picture, what a model learns to read from it, how that model is trained, and where it helps a robot arm.
It is written for a reader who has already read the overview of this chapter and the first chapter of this book, especially how a model learns. You do not need to know anything about touch sensors. However, you should know what a digital picture is: a grid of small squares called pixels, each with a number for its brightness.
Contents#
- What it is
- The sensor that makes the picture
- What goes in and what comes out
- How it works inside
- How it is trained
- Well-known models and tools
- Where this is going
- Where to read next
1. What it is#
A touch sensing model takes a small picture of a contact and says where the contact is, what shape it has and how hard it presses.
Here is an everyday example of the same skill. Close your eyes and pick up a pen, and your fingertip skin bends around the pen. From how it bends, you know the pen is round, you know roughly where it sits on your finger, and you know how hard you are pressing. In other words, you did not need to see it.
A robot finger with a tactile sensor gets a similar signal, where "tactile" means to do with touch, and the sensor reports how its soft surface has bent. So a touch sensing model is the part that turns that raw signal into the facts you would have known with your eyes closed.
2. The sensor that makes the picture#
Before a model can read a tactile picture, something has to make one. Most of the models on this page work with one kind of sensor, called a vision-based tactile sensor. This is a small camera that films the inside of a soft pad.
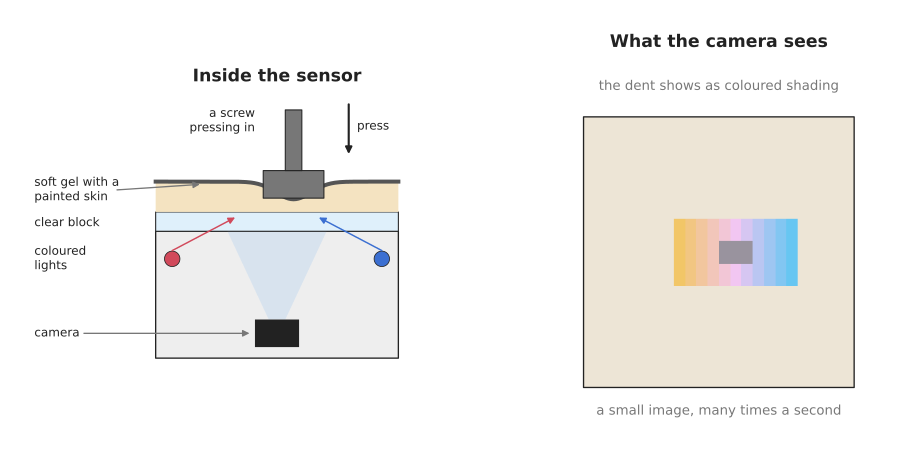
The left half of the picture shows the inside of the sensor. The right half shows the kind of picture its camera takes when a screw presses into the pad.
So the sensor has four parts, and they are listed below from the outside in.
- A soft pad made of a clear rubbery material called gel. It is a few millimetres thick.
- A thin painted skin on the outside of the gel. The paint stops the camera from seeing through to the object, so the camera sees only the shape of the skin.
- Small coloured lights around the edge. Each one shines across the gel from a different side.
- A small camera underneath, looking up at the skin.
Once an object presses into the pad, the skin bends. A slope that faces one light looks bright in that light's colour, while a slope that faces away looks dark. So the camera picture shows the shape of the dent as coloured shading.
The best-known sensors of this kind are GelSight, first built at the Massachusetts Institute of Technology (MIT), and DIGIT, a low-cost design from Meta. Another kind, TacTip from the Bristol Robotics Laboratory, uses a soft skin with small pins on the inside, and the camera watches the pins move. The frameworks book lists what you can buy, with prices, in tactile sensing at the contact .
Some sensors are not cameras at all, and two other designs are common. For example, a pressure array is a grid of small pressure sensors, each giving one number, and a magnetic skin such as AnySkin has tiny magnets in soft rubber, with a chip underneath that measures how the magnets move. Both of those still produce a grid of numbers, so the same kind of model can read them.
3. What goes in and what comes out#
Now that the sensor is described, here is what passes in and out of the model. The input is one tactile picture, or a short run of them. For a camera-based sensor, that picture is an ordinary small colour image, while for a pressure array it is a grid of pressure numbers.
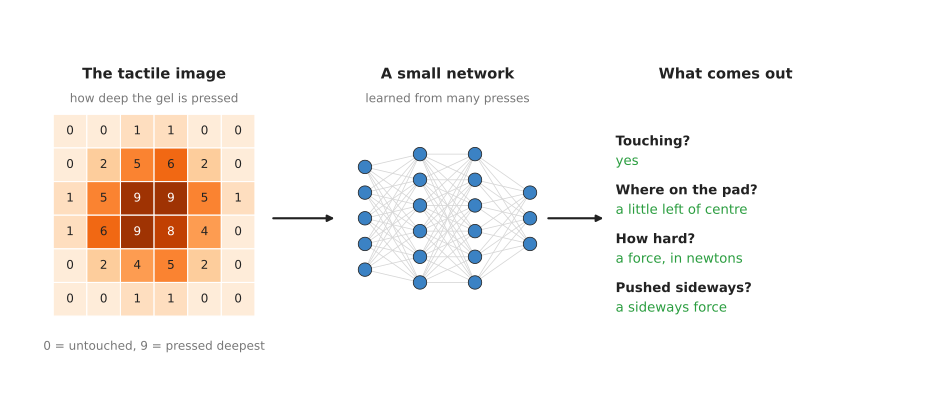
The picture shows a simplified tactile image as a grid of numbers, where each number says how deep the gel is pressed at that spot. The network reads the whole grid and gives back the answers.
The outputs a robot arm needs most are these:
- Contact or no contact. Is the pad touching anything at all?
- Where on the pad the contact is. Is the object in the middle of the pad, or near the edge?
- The shape of the contact. Is it a flat face, an edge, a corner or a round surface?
- The force. How hard is the pad pressed straight in? This is called the normal force. How hard is it pushed sideways? This is called the shear force.
- A height map. For each pixel, how deep is the dent? This gives a small 3D shape of the part of the object that touches the pad.
Some models give only one of these answers, while others give several at once.
4. How it works inside#
The last section listed the answers, and this section says how the model reaches them. There are two ways to get from the picture to the answers: the first uses no learning, and the second does.
4.1 Without learning: the shape from the shading#
Because the coloured shading in the picture follows a simple rule, the depth can be worked out without any learning at all. The brighter a spot is in the red light, the more that spot's slope faces the red light, and the same holds for each colour. So with three lights you can work out the slope at every pixel, and if you add up the slopes across the picture you get the depth of the dent. This method is called photometric stereo, where "photometric" means measuring light, and "stereo" here means using more than one view of the light.
However, the method needs a calibration before it can be used. You press a small ball of known size into the pad and record how each slope looks. After that, it works for any shape.
GelSight's own software ships a small network that does almost this job, with the same calibration on a ball, and section 6.1 recommends it for shape on a gel sensor.
4.2 With learning: a network reads the picture#
Instead, a neural network can learn the same thing, and more besides. The network used is usually a convolutional neural network (CNN), which is the kind of network the seeing models chapter uses for ordinary photos. It slides small filters across the picture, looks for simple patterns such as edges, and then combines them into larger patterns.
The steps are:
- The camera takes a tactile picture.
- The model subtracts a picture of the same pad with nothing touching it. What is left is only the change caused by the contact.
- The CNN reads the change and builds up a set of numbers that describe it.
- A small last part of the network turns those numbers into the answers: contact or not, where, what shape, how much force.
In practice you rarely train the whole of such a network yourself. You take the first part from a model somebody else has already trained, and you train only step 4 on your own presses, which is what section 6.2 recommends. Two models later in this page are first parts of that kind, trained on tactile pictures rather than on photographs. Section 6.4 covers Sparsh, and section 6.5 covers T3, which keeps one shared middle section and a small separate part for each sensor and each task.
A sensor that gives only a handful of numbers rather than a picture has nothing for a CNN to slide a filter across. There the whole model is a small one you fit yourself on those few numbers, and section 6.3 recommends that for a magnetic skin or an array.
4.3 Seeing the sideways push#
The shading shows how deep the pad is pressed, but it does not show well how hard the pad is pushed sideways. So for that, many gel sensors have a grid of small black dots printed on the gel.
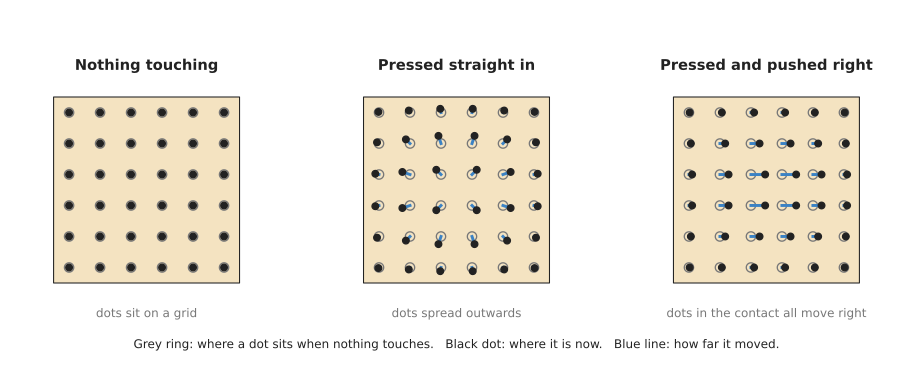
The picture shows the same grid of dots three times. When nothing touches, the dots sit on their grid. When something presses straight in, the dots near the contact spread outwards a little. When something presses and also pushes sideways, the dots in the contact all move the same way.
A model can track each dot from one picture to the next. Then how far and in which direction the dots move tells it the sideways force. This is the signal the force and slip page uses to catch an object starting to slide.
5. How it is trained#
The last section described the model, and this section says where its examples come from. A touch sensing model learns from examples, and each example is a tactile picture together with the right answer. So the hard part is getting those right answers.
For contact shape and height maps, people use the photometric stereo method from section 4.1 to make the answers. Instead, they may press objects of known shape, such as balls, cylinders and cubes, into the pad at known places.
For force, people mount the tactile sensor on top of a separate force sensor. Then they press many objects into it at many angles and record both at once, so the force sensor gives the right answer for each tactile picture. Thousands of presses is a normal size for such a set.
A newer way needs no answers at all, and it is called self-supervised learning. The model is given a very large number of tactile pictures with no labels. Then it learns by solving a made-up puzzle: parts of each picture are hidden, and it must guess what was hidden. Because it can only do that well by learning what tactile pictures are like in general, the puzzle teaches it something useful. Afterwards, a small extra part is trained on a few labelled examples for the task you actually need. Where the data comes from explains this idea in more detail.
There is a second route to large amounts of data, and that is simulation. A tactile simulator draws the picture the sensor would take for a given object and contact. Two of them are free to use: TACTO and Taxim. However, the pictures are not quite the same as real ones, so a model trained only on simulated pictures usually needs some real ones too.
6. Well-known models and tools#
This area has far fewer models than the camera side of robotics, and the sensor you own decides which of the few you can use at all. So this section is organised by hardware. A camera-behind-gel sensor such as GelSight Mini or DIGIT, a magnetic skin such as AnySkin, and an array of pressure elements inside a bought hand each lead to a different answer. For the arrays, and for any sensor nobody has published a model for, the answer is that you train a small model of your own on a few hundred presses, and here that is the usual case rather than the exception.
Read the table one row at a time. The left column names the model and says whether a
developer starting today would reach for it. The right column holds everything else, and
it opens with the sensor the model needs, because that is what decides most of this
choice. After that it gives what the model is best at, how big it is, its licence, and
the one case that should make you choose it. A cell says not stated where nobody has
published the figure. Where the licence is yours, the model comes out of your own
training run, so no licence restricts it.
| Model | What decides it |
|---|---|
| 6.1 GelSight's depth network, most used in 2026 | It needs a camera behind a gel. It is best at a height map of the dent, pixel by pixel. It has 8,834 numbers, counted from its own source, and the licence is GPL-3.0. Pick it when you want shape from a gel sensor. |
| 6.2 An image backbone of your own, most used in 2026 | It needs any sensor that gives a picture. It is best at contact place, shape and force from a few thousand presses. ResNet-18 has 11,689,512 numbers, a figure published by torchvision. The model comes out of your own training run, so the licence is yours. Pick it when the answer you need is not one anybody published. |
| 6.3 A small model on a magnetic skin, most used in 2026 | It needs AnySkin, eFlesh, or any taxel array. It is best at force and shear from fifteen numbers. It is smaller than a photograph, and the licence is yours. Pick it when your sensor is a skin or an array. |
| 6.4 Sparsh, worth betting on | It needs a DIGIT, a GelSight'17 or a GelSight Mini. It is best at starting from few labels on those three sensors. There is a small backbone and a base one, and their parameter counts are not stated. The licence is CC BY-NC 4.0, with no commercial use. Pick it when you own one of those three, and sell nothing. |
| 6.5 Transferable Tactile Transformers (T3), worth betting on | It works with thirteen camera-based sensors. Its strength is that you do not have to train from scratch when the sensor changes. Its size is not stated, and the licence is MIT. Pick it in the same case as section 6.4, when you sell something. |
6.1 GelSight's own depth network, inside gsrobotics#
This is most used in 2026 by anyone with a GelSight sensor, because it ships with the
sensor and answers the question people buy the sensor for. Size xs, with 8,834 numbers
counted from the four layer sizes in the repository's own source, a laptop, and GPL-3.0 for
the code and for the trained numbers that come with it. It turns one tactile picture into a
height map, and it is the part of
gsrobotics, GelSight's own software
development kit, called Reconstruction3D.
The one idea is that the learning replaced the calibration and not the physics. Section 4.1's method stands: work out the slope of the gel at each place from the colours, then add the slopes up across the picture to get the depth. What used to be done by pressing a ball of known size into the pad and recording how each slope looked is now done by a very small network, and the adding up is still arithmetic.
Inside, the network's input is not a picture. It is five numbers describing one pixel: that pixel's red, green and blue values, and how far across and how far down the picture it sits. Its position is in there because the coloured lights are not equally bright everywhere on the pad, so the same shade of red means a different slope at the rim than in the middle. The output is two numbers, the slope across and the slope down. Those five numbers pass through three small layers of sixty-four and out, and the whole thing is run once for every pixel that the kit has decided is inside the contact. Then a classical step integrates all those slopes into a height by solving Poisson's equation, which is the standard way of finding the one surface whose slopes are the slopes you measured.
Compare section 6.2, where a convolutional network reads the whole picture and each of its filters looks at a patch of neighbouring pixels. Here nothing ever looks at a neighbour. Each pixel is judged entirely on its own colour and place, and the only thing that joins the pixels together is the Poisson step at the end. That is why the network can be so small and why it still produces a smooth surface: a pixel the network gets wrong is outvoted by the pixels around it when the slopes are added up, because the only height map that comes out of that step is a real surface.
On an arm this choice decides one thing and no more. If you want shape, nothing you train on a few thousand presses will beat this, because it is solving a problem about light, which has an exact answer, rather than a problem about touch, which does not. The moment you want a different answer, the force, the place on the pad, or whether the object is starting to slide, this has nothing to say, and you are in section 6.2 or section 6.4.
So you would pick this rather than fine-tuning a backbone of your own, which is section 6.2, because the shape is already solved and the trained numbers come in the box. Two costs are about this tool and not about its size. Its GPL-3.0 licence, read from its own licence file and recorded in the frameworks book's licence table, obliges you to publish the source of anything you link it into. And the trained numbers were learned on GelSight's own gel and lights, so another maker's sensor needs its own training set. What most often goes wrong is the zero: the first fifty pictures record what the untouched pad looks like, so if anything is touching it then, every later height map is measured from the wrong surface.
from utilities.gelsightmini import GelSightMini
from utilities.reconstruction import Reconstruction3D

camera = GelSightMini(target_width=320, target_height=240)  # the size in default_config.json
camera.select_device(0)
camera.start()

depth = Reconstruction3D(image_width=320, image_height=240, use_gpu=False)
depth.load_nn('./models/nnmini.pt')      # the trained numbers that ship with the kit

# The first fifty pictures record the untouched pad. Do not touch it during these.
for _ in range(50):
    depth.get_depthmap(image=camera.update(dt=1 / 25), markers_threshold=(0, 70))

# markers_threshold hides the printed dots, whose darkness is not a dent in the gel.
height_map, contact_mask, slope_x, slope_y = depth.get_depthmap(
    image=camera.update(dt=1 / 25), markers_threshold=(0, 70))
print('height map size and range:', height_map.shape, height_map.min(), height_map.max())
gsrobotics opens the sensor, which the computer sees as an ordinary camera, loads the trained numbers, runs the network over every pixel, integrates the slopes, and masks out the printed dots. What you supply is the meaning. The height map is in the repository's own units, so if you need millimetres you press something of a known thickness and work out the scale, and deciding how many touched pixels count as "touching something" is yours. GelSight publishes 25 frames per second for the Mini, which makes one picture 40 milliseconds and sets how fast you can act.
6.2 An image backbone of your own, fine-tuned#
This is also most used in 2026, and it is where most people end up, because the answer they need is rarely one somebody has published. Size s, ResNet-18 having 11,689,512 numbers as torchvision publishes, a laptop to run it and a small card to train the head, and the licence is yours, because the trained model comes out of your own run. The fine-tuning page explains the three ways to do this, and keeping the backbone fixed is the cheapest.
The one idea is that a network which has looked at a million photographs has already learned what edges, corners and shading look like, and a dent in a gel is made of edges, corners and shading. So you keep that network and only teach it the last step.
Inside, the model is in two parts with a clear seam. The backbone is every layer except the last, a convolutional stack whose numbers were fitted to photographs by somebody else, and you keep those numbers exactly as they came. The head is the last layer, and you throw the original one away, because it was built to name a thousand kinds of object. In its place goes a layer that gives the numbers you actually want, such as where on the pad the contact sits and how hard it presses, and that layer is the only thing your presses train. The input is not the raw camera picture either: step 2 of section 4.2 subtracts a picture of the untouched pad first, so what the backbone reads is a picture of the change.
Compare section 6.1, whose network reads five numbers about one pixel and knows nothing about that pixel's neighbours. Every filter in this backbone looks at a patch of neighbouring pixels, and the layers stack those patches up from edges into corners and from corners into larger shapes. That is exactly what lets this answer "where on the pad" and "how hard altogether", which are properties of the whole contact. Section 6.1 can only answer "how deep, here", one pixel at a time, with the Poisson step gluing the answers together afterwards.
On an arm the difference shows up when you want an answer nobody has published. Take a screw resting on the pad, and the question of whether it is sitting straight or cross-threaded. No published touch model answers that, and section 6.1's height map does not either, because a height map is not a judgement. Here you press a hundred good screws and a hundred crooked ones, label them, and train the last layer, and the sensor now answers the question your cell actually asks.
So you would pick this rather than Sparsh in section 6.4 for two reasons that have nothing to do with accuracy. Sparsh forbids commercial use and a torchvision backbone does not. And Sparsh works with three named sensors, while this works with any sensor that produces a picture, including a pressure array, which is a small picture of numbers. What you give up is that the backbone learned from photographs, so it has never seen a tactile picture and needs more of your presses to make up for that. What most often goes wrong is that the blank picture is taken once at startup and the gel then warms up, so every later subtraction is measured from a pad that no longer looks like that.
import numpy as np
import torch
from digit_interface import Digit
from torchvision.models import ResNet18_Weights, resnet18

sensor = Digit('D20001')                        # the serial number on the sensor
sensor.connect()
blank = sensor.get_frame().astype(np.float32)   # the pad with nothing touching it

# A backbone pretrained on ordinary photos, with a new head of three numbers: where
# on the pad the contact sits, across and down, and how hard it presses.
net = resnet18(weights=ResNet18_Weights.DEFAULT)
net.fc = torch.nn.Linear(net.fc.in_features, 3)
net.eval()

frame = sensor.get_frame().astype(np.float32)
change = (frame - blank) / 255.0                # step 2 of section 4.2
x = torch.from_numpy(change).permute(2, 0, 1).unsqueeze(0)   # colour first, then one batch
with torch.inference_mode():
    across, down, force = net(x)[0].tolist()
digit-interface gives you the frames, named by the serial number printed on the
sensor's back, so the camera, the lights and the video stream are not your problem. Two
warnings come with it: its licence is Creative Commons Attribution-NonCommercial 4.0,
read from the repository's own licence file, and the repository is a public archive that
nobody will fix. A GelSight needs no such library, because it appears as an ordinary
camera and OpenCV's cv2.VideoCapture reads it. Torchvision hands you the backbone with
its trained numbers downloaded, and replacing net.fc is the whole of "train a new
head".
What you supply is the training, because the code above only runs the network. Section 5
says how to get the right answers, and you also have to take blank again before each
grasp rather than once at startup. What you decide is which three numbers the head gives,
and when a worn gel means the model must be checked again.
6.3 A small model on a magnetic skin#
This is most used in 2026 on any sensor that is not a camera, and it is the cheapest route into touch that exists. Size xs, a laptop, and the licence is yours, because the model comes out of your own fit; the two open skin designs, AnySkin and its successor eFlesh, are both MIT, read from their own licence files. A magnetic skin is a rubber sheet with tiny magnets in it over a board of magnetometers, which are the chips a phone uses to find north. Five of them give fifteen numbers, three per chip. The frontier chapter's section on touch sensing records the manufactured versions and their prices.
The one idea is that the hard part has already been done by the hardware. The sensor hands you fifteen numbers rather than a picture, so there is nothing left to summarise, and the model is only a conversion from those fifteen numbers into the answer you want.
Inside, that means there are no layers and no filters at all. The model in the code below is ridge regression, which is one matrix: each answer it gives is a weighted sum of the fifteen inputs, and fitting it is a single calculation with an exact answer rather than a training loop that steps towards one. The penalty in the word "ridge" keeps the fitted weights small, so one chip that happens to be noisier than the others cannot come to dominate the answer. Compare section 6.2, where the whole purpose of the early layers is to boil a picture of tens of thousands of pixels down to a few hundred numbers before anything decides anything. Here that boiling down happened in the physics of the sensor, because five magnets under a rubber sheet is already a summary, so the only thing left to learn is which combination of the fifteen means which force.
What that buys is the cheapest and most inspectable model in this chapter. It fits in milliseconds from a few hundred presses, it needs no graphics card ever, and the fitted weights are fifteen numbers per answer that you can print and check against what you expect a press in that place to do to that chip. What it costs is shape. Fifteen numbers tell you how hard and in which direction something presses, and they cannot tell an edge from a corner, because the information was thrown away before the model saw anything. The reading also moves as the skin warms up, so a fresh untouched reading has to be taken often, and every skin is a little different, so a model fitted on one is not safe on the next without a reference press.
On an arm, this is the choice when you need coarse touch in many places rather than fine touch in one. A gel sensor gives one rich picture behind one fingertip, and section 6.1 can tell you the shape of what that one fingertip is on. A skin gives a coarse answer over a whole palm. If the question is which of five places on the palm is taking the load as a box settles, this answers it and section 6.1 cannot, because section 6.1 only ever sees the pad its own camera sits behind.
So you would pick this rather than a gel sensor and section 6.1 when you want force and shear at many places on a hand, and when a replaceable part matters: the electronics stay on the robot and the skin slips over them, so the part that wears out is the cheap part.
import numpy as np
from anyskin import AnySkinBase
from sklearn.linear_model import Ridge

# Five magnetometer boards, three numbers each, over the port the skin is plugged in on.
skin = AnySkinBase(num_mags=5, port='/dev/ttyACM0', temp_filtered=True)

# The untouched reading, averaged over 100 samples. Retake this often, not once.
baseline = np.mean([skin.get_sample()[1] for _ in range(100)], axis=0)

# Your own recording: for each press, the fifteen numbers and where it was pressed.
presses = np.load('skin_presses.npy') - baseline   # shape (number of presses, 15)
places = np.load('skin_places.npy')                # shape (number of presses, 2), in mm

model = Ridge().fit(presses, places)   # fifteen numbers in, a place on the skin out

_, reading = skin.get_sample()         # get_sample gives a timestamp and the numbers
print('pressed at, in mm:', model.predict((reading - baseline).reshape(1, -1)))
The library does the serial port and the message framing, and with temp_filtered=True
it drops each chip's temperature reading, so the fifteen numbers are the ones you want
and nothing else. Ridge is ordinary linear regression with a penalty that keeps the
fitted numbers small, which is the right first model for fifteen inputs and a few hundred
presses.
What you supply is the two recordings, and that means a rig: you have to press the skin at places you know, which in practice means mounting it under the robot and letting the arm's own position be the answer. What you decide is how often to retake the baseline, and whether a straight line is enough, because a press near the edge of the skin behaves differently from one in the middle.
6.4 Sparsh, from Meta#
Sparsh is worth betting on rather than most used, because one model that works across many sensors is the direction the field is going, and this one is held back by its licence and by a measured failure rather than by its idea. Size not stated for both the small and the base backbone, a big card to train a head on one, and CC BY-NC 4.0 for the code and the weights alike, which forbids commercial use. It is a family of self-supervised touch models from Meta's Fundamental AI Research group with Carnegie Mellon University and the University of Washington, published in October 2024. It supports DIGIT, GelSight'17 and GelSight Mini, and the repository also carries TacBench, six tasks that include force, slip, object pose, grasp stability and recognising textiles. The grasp stability task runs on the recordings of Calandra and colleagues, 2017, who put a GelSight on each finger of a gripper, collected more than 9,000 grasping trials, and showed that camera and touch together predict a grasp better than either alone. That 2017 result is the one everything else on this page assumes, and its recordings are still the way to measure a model of your own without collecting anything.
The one idea is that the front part of the model should be trained on touch rather than on photographs, and that this can be done without a single label. You gather a very large number of tactile pictures, you hide part of each one, and you train the model to put back what you hid. A model that can do that has had to learn what contacts look like in general, and nobody had to mark anything.
Inside, the arrangement is the same two parts as section 6.2, a backbone with a small head on top, and the difference is entirely in where the backbone's numbers came from. Section 6.2's backbone was fitted to photographs, by being asked to name the object in each one. This one was fitted to more than 460,000 tactile pictures by the hiding game above, and Sparsh is really that game tried with several recipes. The two its paper found best are DINO, which trains two copies of the network to agree about a picture that each of them sees differently, and I-JEPA, which predicts the hidden part of a picture as internal numbers rather than as pixels. What that changes in practice is what the earliest layers are tuned to notice: a smooth coloured gradient across a dent, the printed dots, the rim where a contact stops, rather than fur, printed text and sky.
What that buys is labels. Your own presses now only have to teach the small head, so the difference is a few hundred labelled presses instead of a few thousand, and the paper reports its self-supervised start beating training end to end for one task and one sensor by 95.1 per cent on average across TacBench. What it costs is that a backbone fitted to three sensors' pictures only knows those three. A study in September 2026 reports a frozen classifier on Sparsh scoring 6.86 per cent on a sensor it was not trained on, rising to 87.09 per cent once a tenth of the new sensor's recordings are labelled. That is the number to remember before buying a sensor, and it is why section 6.5 exists.
On an arm the difference appears when you count the presses you can afford to label. With a DIGIT and a hundred labelled presses, this reaches a usable answer where section 6.2's photograph backbone does not. With any other sensor the advantage is gone, and section 6.2 is the honest choice again, because a backbone that was fitted to the wrong gel is no better a starting point than one fitted to photographs. This is also the one entry on this page whose own labelled recordings are released, so you can measure a model before you own a sensor at all.
So you would pick this rather than the backbone of your own in section 6.2 to save labels. Two costs that remain are about this repository rather than about its size. Its own pretraining used eight A100 80GB graphics cards, so only the head on top is realistically yours to train. And the repository is a public archive, read only since February 2025, so nothing in it will be fixed.
# The normal and shear field, live, on one GelSight Mini. The video id comes from
# `ls -l /dev/video*`, because the sensor appears to the computer as a webcam.
python demo_forcefield.py +experiment=downstream_task/forcefield/gelsight_dino \
    paths=${YOUR_PATHS} paths.output_dir=${YOUR_PATH}/checkpoints/ \
    test.demo.gelsight_device_id=0

# Train a head of your own on your own labelled presses, backbone frozen.
python train_task.py --config-name=experiment/downstream_task/${EXPERIMENT} \
    paths=${YOUR_PATHS} wandb=${YOUR_WANDB}
The repository gives you the backbone, the training loop, and readers for its own
recordings, which it releases for the force, slip and pose tasks. What you supply is a
paths file saying where your data and checkpoints live, the downloaded weights, and,
past the demo, your own labelled presses in the layout its readers expect.
6.5 Transferable Tactile Transformers (T3)#
This is also worth betting on, and it is the better bet of the two for most readers, because its licence does not stop you using it. Size not stated, a big card to fine-tune it, and MIT for the code, read from the repository's own licence file, with the weights and the dataset hosted away from it. T3 comes from MIT's Computer Science and Artificial Intelligence Laboratory, published in June 2024. It was trained on a dataset the authors published, Foundation Tactile, which gathers over 3 million tactile pictures from 13 sensors and 11 tasks into one format.
The one idea is that what differs between two gel sensors is shallow. The lights are a different colour, the gel is a different thickness, the camera sits at a different distance; but a dent is a dent. So give each sensor a small piece of its own to absorb its quirks, and let everything deeper be shared between all of them.
Inside, that gives three kinds of part rather than two. At the front there is one small encoder per sensor. In the middle there is one shared trunk, which is a transformer, meaning a network that cuts its input into pieces and lets every piece look at every other piece at every layer. At the back there is one small decoder per task. During training, a batch of pictures from any of the thirteen sensors goes through that sensor's own front piece and then through the one shared trunk, so the trunk is fitted to all thirteen sensors at once while each front piece only ever sees its own. Compare Sparsh in section 6.4, which is a single backbone trained per sensor family, with nothing inside it set aside for a sensor's quirks. Here those quirks have a named home, and that home is small.
What the idea buys is a sensor change that does not restart the training. Its paper reports zero-shot transfer working for some sensor and task pairings, which is exactly the problem the September 2026 study measured on Sparsh. What it costs is maturity. It is one research group's repository rather than a maintained library, the weights and the dataset are hosted away from the code, and the size of the shared trunk is not published. Its strongest published result is a task success rate 25 per cent higher than a tactile encoder trained from scratch, on inserting multi-pin electronics, so treat it as evidence that the idea works rather than as a number for your own job.
On an arm the difference arrives the day you change the sensor, which happens more often than people expect, because gels wear out and makers discontinue them. With section 6.2 or section 6.4 a new sensor means a new training run on fresh presses of your own. Here you start from the front piece belonging to the sensor nearest to yours and keep the trunk, so what you retrain is the small part rather than the whole thing.
So you would pick this rather than Sparsh in section 6.4 for three reasons. Its licence is MIT, so you may use it in a product. It covers thirteen sensors rather than three, so an unusual sensor has a better chance of being one of them. And it was built for the sensor change above, which Sparsh was not.
git clone https://github.com/alanzjl/t3 && cd t3 && pip install -e .

# Fine-tune on your own sensor and task, with the shared middle section frozen so
# only the small sensor and task parts learn.
python scripts/train_nn.py network=finetune_exp_cls datasets=[your_dataset] \
    train.finetune_from=/path/to/checkpoint.pth train.freeze_trunk=true
The repository gives you the arrangement, the training loop and the readers for Foundation
Tactile. What you supply is a file in its configs/datasets/ folder describing your own
recordings, and the downloaded checkpoint. What you decide is which existing sensor part
your sensor is closest to, because starting from a part trained on a similar gel is the
whole reason to use this rather than section 6.2.
6.6 How to choose#
Start from the sensor, not from the model. If you own a gel sensor with a camera behind it, use section 6.1 for shape, because nothing you train will beat it at that job. If you own anything else, or need an answer that is not a height map, fine-tune a backbone of your own with section 6.2 on a few thousand presses. Those two cover most readers.
Four things change that.
- You want force or slip rather than shape, and you own a DIGIT, a GelSight'17 or a GelSight Mini. Then section 6.4 reaches a usable answer from far fewer labelled presses, as long as you sell nothing.
- The same, but you sell something, or your sensor is an unusual one. Then section 6.5, which is MIT and was trained across thirteen sensors.
- Your sensor is a skin or an array of elements rather than a camera. Then section 6.3, and expect force and shear rather than shape.
- You want the object's whole shape and position while a hand turns it, rather than facts about one contact. Then NeuralFeels (Meta, 2024, MIT), which joins touch with a camera to rebuild the object as the hand moves it, and which the perception book describes.
Two tools are worth knowing although they are not models. TACTO and Taxim, both MIT, draw the picture a sensor would take for a given contact, so you can build and test everything around the model before a sensor arrives, as section 5 explains.
One thing should not change your choice, and it is the number in section 6.4. A tactile model loses almost all of its accuracy on a sensor it was not trained on, and the recovery is a labelling job. So decide which model you intend to use before you buy the sensor, and not the other way round.
7. Where this is going#
This section is about what changes next, and it is written on 4 October 2026. It uses the four kinds of claim that the frameworks book sets out in four kinds of claim. A demonstration worked once under conditions its publisher chose. A product announcement can be bought or downloaded, so you can check it, which makes it the most valuable kind. A research result is a measured number with a stated protocol. A projection is about a date that has not arrived, and it is the weakest. Where a sentence below is my own judgement rather than a report of somebody's claim, it says so.
7.1 How it got here#
Reading a tactile picture started with no learning in it at all. Shape from shading, which is section 4.1 and still what section 6.1 ships, works out the dent from the coloured lighting using the physics of the pad, and nothing trained beats it at that one job. Then convolutional networks took over the jobs the physics does not reach: where the contact sits, how hard it presses, what the object is. Then one pretrained backbone was trained across many sensors and given small heads for each job, which is section 6.4 and section 6.5. That is the same path image models took, with one piece missing. Image models had a corpus everybody shared, and touch does not.
7.2 Where it is used in industry today#
The industry here is a hardware industry, not a model industry. Nobody sells a tactile model, and the thing that got dramatically better in the last two years is the price of the sensor.
GelSight is the only maker in this area that has published a price continuously. Its own store lists the Mini system at $510.00, the robotics package at $560.00, and the DIGIT, which is Meta's camera-behind-a-gel design now manufactured by GelSight, at $355.00 with replacement gels at $42.00. Those are product announcements and you can check every figure on the page. Worth noticing for anyone planning around this company: its 2025 and 2026 announcements were about surface metrology rather than robots.
Underneath that, a manufacturing layer grew around the open academic designs. WowRobo's shop sells a WowSkin at $48, or $128 with the structural part, built on the open AnySkin and ReSkin designs, with mounts for the SO-100, SO-101 and Koch arms, and the eFlesh magnetometer board at $25 for one or $180 for ten. PaXini sells a three-axis tactile fingertip chip, 15 by 10 by 7 mm, at ¥499, about $70. Robotiq launched its TSF-85 tactile sensor fingertips in January 2026, 28 taxels at 1000 Hz on a production gripper fingertip, with no price published. All of those are product announcements with a page behind them.
The other route is to buy a hand that already senses touch. AgiBot states "150+ tactile points" for its OmniHand O12, Unitree states 33 tactile sensors for the Dex3-1, and Figure states fingertip sensing plus a palm camera for Figure 03. Set against those, the clearest cautionary case in this whole area is Meta's Digit 360, announced on 31 October 2024 with the statement that "GelSight Inc. will manufacture and distribute Digit 360, available for purchase in 2025". It was never sold, and the only distribution route, a free research programme, still shows proposals due on 20 January 2025. A specification on a page is not a product, and two years is long enough to be sure.
7.3 What is being worked on right now#
The whole front is cross-sensor transfer, and everything else is downstream of it. Sparsh in section 6.4 and Transferable Tactile Transformers in section 6.5 are both attempts to train one backbone that serves sensors it was not built for, and T3's claim of thirteen sensors is the broadest attempt published.
The most useful work is measuring how badly that currently fails, because it replaces an argument with a number. A September 2026 study reports that a frozen classifier built on Sparsh scores 6.86 per cent on a sensor it was not trained on, rising to 87.09 per cent once 10 per cent of the target sensor's data is labelled. That is a research result with a stated protocol, and section 6.6 already tells you what to do about it.
A second front joins touch to vision so that the answer is about the whole object rather than one contact. NeuralFeels rebuilds an object's shape and position while a hand turns it, using both channels together, and it is the clearest published example of touch being useful for something a camera cannot see.
A third front is making the sensor itself programmable in shape. eFlesh, under the MIT licence, lets you print a tactile sensor in an arbitrary shape from a printer, magnets costing a few dollars and a commodity magnetometer board. Alongside that, simulators let you build everything around a model before a sensor arrives: TACTO, which is MIT, and Taxim both draw the picture a sensor would take for a given contact.
The thing none of this adds up to is momentum on the scale other areas have. In submissions to the robotics category of arXiv, the share of abstracts containing "tactile" moved from 2.72 per cent in 2025 to 3.53 per cent in 2026 to late September, while "vision-language-action" went from 4.25 to 10.78 per cent, according to the counts in the frameworks book's measured research directions.
7.4 What is still unsolved#
The limit in this area is the hardware, and saying otherwise would be the most misleading thing this page could do. The sensors are fragile, they wear out, and no two makers build the same one.
Take wear first. GelSight's own product sheet for the Mini gives the gel's durability as 1,000 coin presses, with replacement gels at $57 against a $510 sensor, which makes the pad a consumable costing a ninth of the sensor each time it is replaced. Contactile's own specification sheet states that "temperature variations can cause drift in sensor readings" so that "bias removal in software prior to operation is necessary", and that its v2.0 sensor "does not yet have ingress protection". Magnetic skins drift with temperature as well and need re-zeroing. Set all of that against Robotiq's "Tested to over 2 million cycles" for a production gripper fingertip, and the gap is clear: a 1,000-press gel is a bench instrument, not a part that lives in a cell.
Take standardisation second, because it is the reason this page has no pretrained model to recommend. There is no standard tactile sensor, so there is no shared tactile dataset, and so there is no pretrained tactile model worth the name. Each link in that chain causes the next one. The 6.86 per cent above is the measured cost of it. Compare robot policies, which now have one default dataset layout carrying tens of thousands of published datasets, and the difference is not model architecture. It is agreement about what a recording looks like.
The third unsolved thing is licensing, and it stops this area being usable commercially.
Every piece of Meta tactile hardware and every Meta tactile model, which is digit360,
digit-design, digit-plexus and sparsh, is licensed CC BY-NC 4.0, read from each
repository's own licence file, and GitHub's licence detection reports all of them as
unclassified, which is why they are so often described as open source. They are
published and they are not usable in a product. Only Meta's TACTO simulator is
permissively licensed, under MIT. If
you sell anything, most of the strongest work in this area is closed to you, and section
6.6 routes you to T3 for that reason.
7.5 The next two to three years#
Everything in this part is my expectation with a reason attached, not an announcement by anybody.
The limit stays hardware, so no downloadable tactile model will work well on your sensor without labelling. This is the claim here I am most confident about and it is a judgement, not a report. The reason is that transfer fails because sensors differ, and sensors are diversifying rather than converging: every hand named in section 7.2 has its own taxel count and its own layout, and a hand maker has no reason to match a rival's. The research share above says attention is not arriving at the rate a breakthrough would need either.
Magnetic skin takes the volume and camera-behind-gel stays the measuring instrument. The reason is a design decision, and AnySkin's own paper states it: the sensing electronics are decoupled from the sensing surface, so the board stays on the robot and the skin slips over it like a phone case. The part that wears out is the cheap part, which is why a replacement is $48. Magnetometers are also a commodity made in the billions for phones, and the licences are MIT. Gel keeps the jobs where the picture itself is the point, because section 6.1 already beats anything you would train for shape.
Touch arrives bundled inside hands rather than bolted onto grippers. The reason is routing and commercial packaging. A hand maker can run thousands of channels through its own wrist, which an add-on cannot, and the tactile version is sold as a more expensive option on a hand you were buying anyway. If you want touch on a gripper you already own, the answer stays the open skins or the Robotiq fingertips. This is my expectation drawn from what the hand vendors already ship, not from any roadmap.
Durability becomes a published specification, and that matters more than a new model. Robotiq's two million cycles is the first number in this area a maintenance planner can use. My expectation is that once one vendor publishes a durability figure, buyers start asking the others for theirs, and the makers who sell to factories answer. A tactile sensor that survives a service interval changes what a cell will accept far more than another percentage point of accuracy does.
What would actually unlock the models is agreement, and I do not expect it within three years. The missing piece is a tactile field in the standard dataset layout plus an agreement on what one frame of touch is, because that is exactly what happened to images and then to robot actions. The obstacle is that the agreement has to come from competitors who each sell a different sensor, and nobody in section 7.2 gains from it. So the practical advice in section 6.6 stands unchanged for the whole of this period: decide which model you intend to use before you buy the sensor, and when somebody announces a tactile model that transfers, ask which sensors it was trained on and how many labelled samples from yours it needs.
8. Where to read next#
In this chapter:
- Force and slip models use the moving dots from section 4.3 to catch an object starting to slide.
- Collision and failure detection covers the failures that a tactile sensor cannot see.
- The overview compares all four kinds.
In this book:
- Image classification explains how a CNN reads an ordinary picture. A tactile picture is read the same way.
- Grasp quality models score a grasp before the fingers close. Touch models check it after.
In the other books:
- Measuring by touch in the perception book covers what touch can and cannot measure.
- Tactile sensing at the contact covers the sensors you can buy.