This chapter is about the models that make sense of touch, force and the arm's own body. Every other chapter in this book starts from a camera, but this one starts from the sensors in the fingers, in the wrist and in the joints. This page is the overview, so it says what this family of models is for, which question it answers for a robot arm, and which page to read for each kind.
It is written for a reader who has already read the first chapter of this book, what models are. Because that chapter explains what a model is, you should know that a model is a program that turns an input into an output, and that a neural network learns how to do that from examples. You do not need to know anything about touch sensors yet, because this page explains each one the first time it appears.
Contents#
- What this family is for
- The question it answers
- The three kinds of signal
- The four kinds of model
- The four kinds side by side
- When to use a model here, and when not to
- How this chapter connects to the others
- How this chapter writes size, machine and licence
- Where to read next
- Using it in Python
1. What this family is for#
Touch and body models make sense of touch, force and the arm's own body, and they exist because a camera on its own cannot report any of those things.
A camera sees the mug before the arm reaches it. However, once the fingers close, the camera sees much less. For example, the fingers hide the part of the mug they hold, and the camera cannot see how hard those fingers press. It cannot see that the mug has started to slide down between the pads, and it cannot feel the arm's elbow brush against a box.
But other sensors can do all of those things. A touch sensor on a finger pad measures the contact itself, and a force sensor at the wrist measures the weight and the push on the gripper. The motor in each joint reports its angle and how much electric current it is using. Between them, these sensors give numbers many times a second. However, those numbers are hard to read by hand, because they are noisy and they change quickly. So a model can learn to read them instead.
So this family of models turns the signals from touch, force and joint sensors into plain answers: is the grip in the right place, is the mug starting to slip, did the arm hit something, and how much turning force does each joint need to follow the planned path?
2. The question it answers#
The last section described the sensors, and this section states the one question they are all used to answer. The question this family answers for a robot arm is: what is happening at the contact, and in my own body, right now?
"At the contact" means where the fingers touch the object, and where any part of the arm touches anything else. "In my own body" means the arm itself: its joints, its motors, its weight and its friction. A robot arm does not come with a perfect description of itself. Instead, the numbers in its manual are close but not exact. So some of these models learn the difference between the manual and the real arm.
3. The three kinds of signal#
Before any model can answer that question, something has to measure it, and three kinds of signal do the measuring.
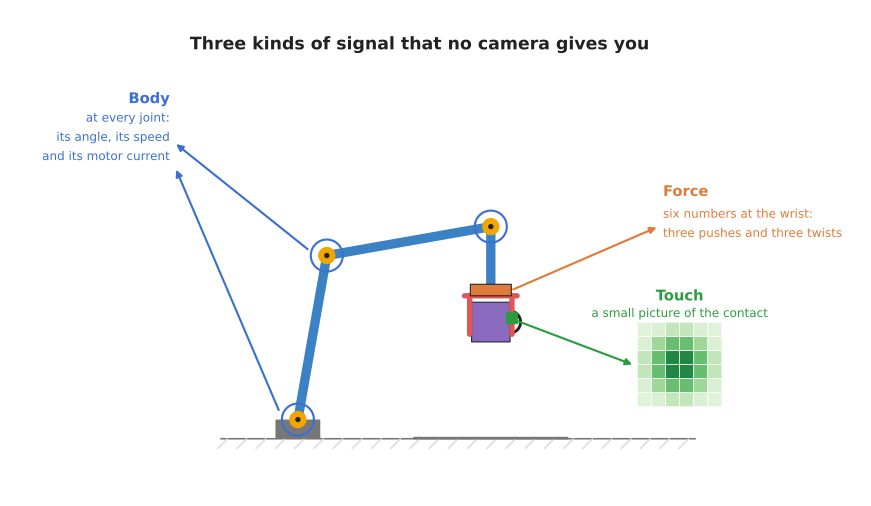
The picture shows the three places these signals come from: the pad of a finger, the wrist, and every joint.
The first is a touch signal, and it comes from a tactile sensor, where "tactile" means to do with touch. Many tactile sensors are a small camera behind a soft rubber pad. When the pad presses on something, the camera films the pad bending. So the signal is a small picture of the contact, many times a second.
The second is a force signal, and it comes from a force-torque sensor at the wrist. A force is a push or a pull, while a torque is a twisting force, such as the force you use to turn a key. That is why the sensor reports six numbers: a push along each of three directions, and a twist about each of three directions.
The third is a body signal, and it comes from the joints themselves. Each joint has an encoder, which measures its angle, and each motor also reports its electric current. That current tells you roughly how hard the motor is working. Some arms also have a torque sensor inside every joint.
4. The four kinds of model#
Each of those three signals needs a model to read it, and this chapter has four kinds of model, one page each.
- Touch sensing models turn a tactile picture into facts about the contact: where it is, what shape it has, and how hard it presses.
- Force and slip models read force signals over time and say whether a held object is starting to slide.
- Collision and failure detection notices when something has gone wrong: the arm has hit something, or a pick has failed.
- Learned arm models learn how the arm's own body behaves: how much torque each joint needs, and where the arm really is.
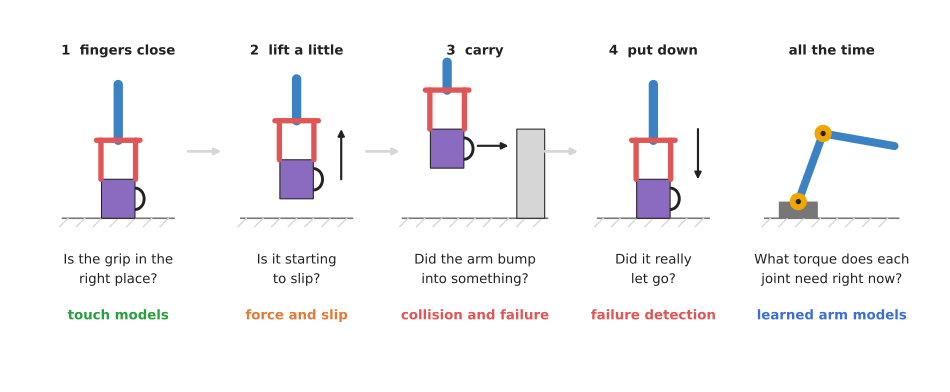
The picture follows one pick of a mug from left to right, and shows which kind of model answers the question at each moment.
The first three kinds work mainly during contact, while the fourth works all the time, because the arm always has a body, whether it touches anything or not.
Most used, and also used#
The pages of this chapter are in two groups, because some kinds need hardware that most arms do not have. The first group, most used, holds force and slip models and collision and failure detection, which work with the force and joint signals that most arms already have, so no extra hardware is needed. The second group, also used, holds touch sensing models and learned arm models. Touch sensors are still uncommon on robot arms. So a learned model of the arm itself is only worth building when the maker's own model is not good enough.
5. The four kinds side by side#
Now that all four kinds have been named, the table below compares them. Read each row across: what goes in, what comes out, which sensor it needs, and how ready it is for a working robot cell. "Ready" here means whether you can buy or download something that works, and not whether the research is exciting.
| Kind | What goes in | What comes out | Sensor it needs | How ready |
|---|---|---|---|---|
| Touch sensing | a small picture of the contact | where the contact is, its shape, the force | a tactile sensor on the finger | research code; few maintained tools |
| Force and slip | force readings over the last moment | "slipping" or "not slipping" | a tactile sensor, or a fast force sensor | research code; you usually write your own |
| Collision and failure | joint torques, currents or forces over time | "something is wrong", and sometimes where | the joint sensors the arm already has | the classic non-learned method ships in many arms |
| Learned arm models | joint angles, speeds and commands | torques needed, or where the arm will be | the joint sensors the arm already has | mature in research; used as a correction on top of physics |
Two things stand out in the table, and both of them matter when you choose a kind.
The first is that the kinds that need extra sensors are the least ready, because a tactile sensor is an extra part to buy, fit and replace. The holding on page in the frameworks book says it plainly: there is almost no maintained open-source slip-detection software.
The second is that the kinds that use the arm's own joint sensors are cheaper to try. Every arm already has encoders and motor currents, so a model that reads them needs no new hardware at all.
6. When to use a model here, and when not to#
The table said how ready each kind is, and this section says when a learned model is worth using at all. Many of the jobs in this chapter have a simple method that does not learn, and it is worth knowing that method first, because it is often enough.
- To tell whether the fingers are touching something, a threshold works: if the force goes above a set value, there is contact.
- To weigh a held object, the wrist sensor and some arithmetic work. The perception book shows how.
- To detect a collision, many arms compare the torque the physics predicts with the torque the motors measure, and if the gap is too big, the arm stops.
- To know the torque each joint needs, a physics model built from the arm's masses and lengths gets most of the way.
However, a learned model is worth it when the simple method misses something that the signal still contains. For example, a threshold cannot tell a slip from a jolt, and a physics model leaves out the friction inside the gearbox. A fixed collision limit that is low enough to catch a gentle bump also stops the arm every time it moves fast. In each of these cases, a model trained on examples can learn the pattern that the simple rule misses.
However, a learned model also costs you three things. First, it needs examples, and examples of failures are rare and sometimes dangerous to collect. Second, it gives no guarantee, so it cannot replace a certified safety function. Third, it is tied to the sensor and the arm it was trained on. The pages that follow return to these costs for each kind.
7. How this chapter connects to the others#
This family does not work alone, so this section places it next to the others. The book has seven families of model, and the map of models lists them all. Here is how this one fits with the other six.
- Seeing models turn a picture into names, boxes, outlines, poses or depth, and they work before contact. Touch models then take over when the fingers hide the object.
- 3D models work on 3D points and whole scenes instead of flat pictures. Some research joins touch with 3D shape to rebuild an object held in the hand.
- Grasp models decide where and how to hold an object, and touch and slip models check afterwards whether that grasp is holding.
- Movement models decide how the arm should move, moment by moment. Some of them take force and touch readings as an extra input, so they can react to contact.
- Language models understand words, and connect words to pictures and actions. A vision-language model can look at a picture after a task and say whether it worked, which is another kind of failure detection.
- World models predict what will happen next if the arm does something. A learned arm model is a world model with a very small world: the arm's own body.
8. How this chapter writes size, machine and licence#
Every model section in this chapter says three things about what a model costs you, and it says them in the same short words rather than explaining them again each time. This section is where those words are defined. The same three scales are used in every chapter of this book, so you only have to learn them once.
Size is the number of parameters, which is the count of numbers the network learned during training. It is a rough guide to how capable a model is and to how much memory it needs, and nothing more: a well-trained small model beats a badly trained large one.
| Size | Parameters |
|---|---|
| xs | under 10 million |
| s | 10 to 100 million |
| m | 100 million to 1 billion |
| l | 1 to 10 billion |
| xl | more than 10 billion |
Machine is what you need to run the model once, not to train it. Training needs more, usually several times more, and each model section says so where it matters.
| Machine | What it needs |
|---|---|
| laptop | an ordinary processor, with no graphics card |
| small card | a graphics card with less than 8 GB |
| big card | a graphics card with 8 to 24 GB |
| workstation | a graphics card with 24 to 80 GB |
| cluster | more than one card of 80 GB |
Licence is given as the name alone, such as Apache-2.0 or MIT. Two things about that name matter more than the name itself. The code licence and the weights licence are often different, so a model with permissive code can still forbid you from selling what you build, and each model section says when the two differ. And a name is not legal advice: read the project's own licence file before you ship anything, because this book records what those files said on the day they were read.
9. Where to read next#
Start with touch sensing models , because the slip page builds on the tactile pictures it explains. However, if your arm has no tactile sensor, you can go straight to collision and failure detection or learned arm models , because both of those use only the sensors an arm already has.
For the hardware behind these models, read the sensors that go on a gripper in the frameworks book. For what to do with the readings once you have them, read holding on.
10. Using it in Python#
The sections above said that this family has almost nothing to download, because a force reading from one gripper means nothing on another one. So for all four kinds the work looks much the same in code: you cut your own recordings into short windows and train a small network on them. This section shows that shared shape, so that afterwards you can tell which lines a library writes for you and which lines only you can write.
import numpy as np
import torch
from torch import nn

# Your own recording of one grip: six wrist force numbers per reading, and the
# right answer for each reading, worked out as the slip page's section 5 describes.
readings = np.load('grip_01_forces.npy')      # shape (number of readings, 6)
answers = np.load('grip_01_answers.npy')      # shape (number of readings,), 0 or 1

# Cut the recording into windows of 20 readings. Each window keeps the answer of
# its own last reading, because that is the moment the model is asked about.
windows = np.lib.stride_tricks.sliding_window_view(readings, 20, axis=0)
x = torch.tensor(windows.reshape(len(windows), -1), dtype=torch.float32)
y = torch.tensor(answers[19:], dtype=torch.float32).unsqueeze(1)

net = nn.Sequential(nn.Linear(6 * 20, 32), nn.ReLU(), nn.Linear(32, 1))
loss_fn = nn.BCEWithLogitsLoss()              # measures a yes-or-no answer
optimiser = torch.optim.Adam(net.parameters(), lr=1e-3)

for _ in range(500):
    optimiser.zero_grad()
    loss = loss_fn(net(x), y)
    loss.backward()                           # works out how to change each number
    optimiser.step()                          # changes them
PyTorch gives you the parts that are the same for every model of this kind, which is
why the network itself is only one line. nn.Linear holds a layer's numbers,
nn.BCEWithLogitsLoss measures how wrong a yes-or-no answer is, and loss.backward()
followed by optimiser.step() works out how each number should change and then
changes it. NumPy's sliding_window_view gives you the windows without copying the
recording, so it stays cheap even for an hour of readings.
What you have to collect yourself is everything above the network. Nobody publishes force recordings from your gripper, so you have to make the grips happen, record them, and work out the right answer for each window in one of the three ways that force and slip models lists. You also have to write the part that reads your own sensor, because that is different for every piece of hardware.
What you have to decide is the window length, the sensor you read, how many recordings are enough, and how you split them into a training set and a test set. That last decision is the one people get wrong, because the split must be by grip and not by window. Two windows one reading apart are almost the same numbers, so a split by window puts nearly the same example into both sets, and the test score then tells you nothing about a grip the model has never seen.