1. Introduction#
A push has two halves. One half is how to push a glass. Friction, tipping and the arm's clumsiness all belong to that half, and the seven solutions are about it. The other half is where to push it to. This page is about that half.
The target layout is the list of places where the glasses should end up. It is kept apart from the seven solutions because every solution needs it, and none of them differs in it. The camera work keeps its own shared step apart for the same reason, in looking again at what was hidden.
This page explains five things. Choosing the places is plain geometry, not a learning problem. Each condition on the answer has a picture. Four standard methods can solve that geometry. One layout is computed once and handed to all seven solutions. And the same computation gives the least movement the task can need, called the displacement floor. The page ends with what the layout does not tell you.
Read this page after the problem, which explains the
clear room the gripper needs. Also read what goes in and what comes
out, which explains what look()
reports.
Contents#
- Introduction
- The question, written out
- Each condition, drawn
- Four ways to place the discs
- Why this is shared and not a solution
- The displacement floor
- Two cautions
- What the layout does not tell you
- Where to go next
2. The question, written out#
This section states the question that the layout answers.
The task is finished when three things are true. Every glass has about 76 mm of clear room. Every glass can be photographed from the side. And nothing has been knocked over. This is a statement about where the glasses are. So before anything is pushed, someone must decide where each glass should go.
The decision has three conditions and one goal:
- every glass has its clear room;
- every glass stands inside the glass zone, so it is also within reach and away from the rack;
- every glass can still be seen from the side;
- and the glasses move as little as possible.
Now look at what these need to know. They need where each glass stands and how
wide it is. look() reports both. They need the gripper's clear room, the glass
zone, the rack and the reach. The cell gives all of these as fixed numbers.
They do not need friction, weight, or how a glass behaves when pushed.
Nobody here knows those things.
So each glass is a disc of known size at a known place on a flat rectangle. The question is where to slide the discs. No disc may enter another disc's clear room. No disc may leave the rectangle. And the total sliding must be as small as possible. This is a geometry problem with no unknowns. It can be solved fully before the arm touches anything.
A list of conditions is hard to picture, so the next section draws each one.
3. Each condition, drawn#
The section above listed the conditions. This section shows each one as a picture of a table that breaks it.
Every glass has its clear room#
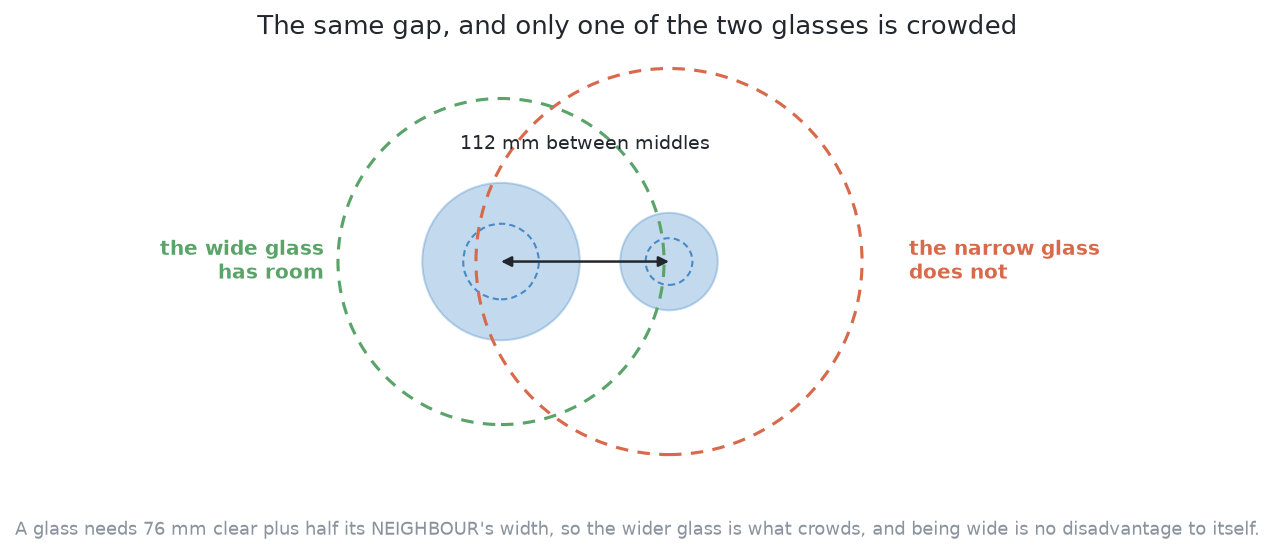
The picture shows a wide glass and a narrow glass, 112 mm apart. The dashed circle round each glass is the room it needs before the open jaw fits round it. Nothing is inside the wide glass's circle, so it can be gripped. The narrow glass's circle reaches into the wide glass, so the narrow glass cannot be gripped.
So one gap can crowd one glass and not the other. The room is measured from a glass's middle to its neighbour's edge. So a wide neighbour takes more of the gap. A check on the distance between the two middles would call this pair fine. So the layout checks every glass against the edge of every neighbour. The gap that matters explains where the room comes from.
Every glass stands inside the glass zone#
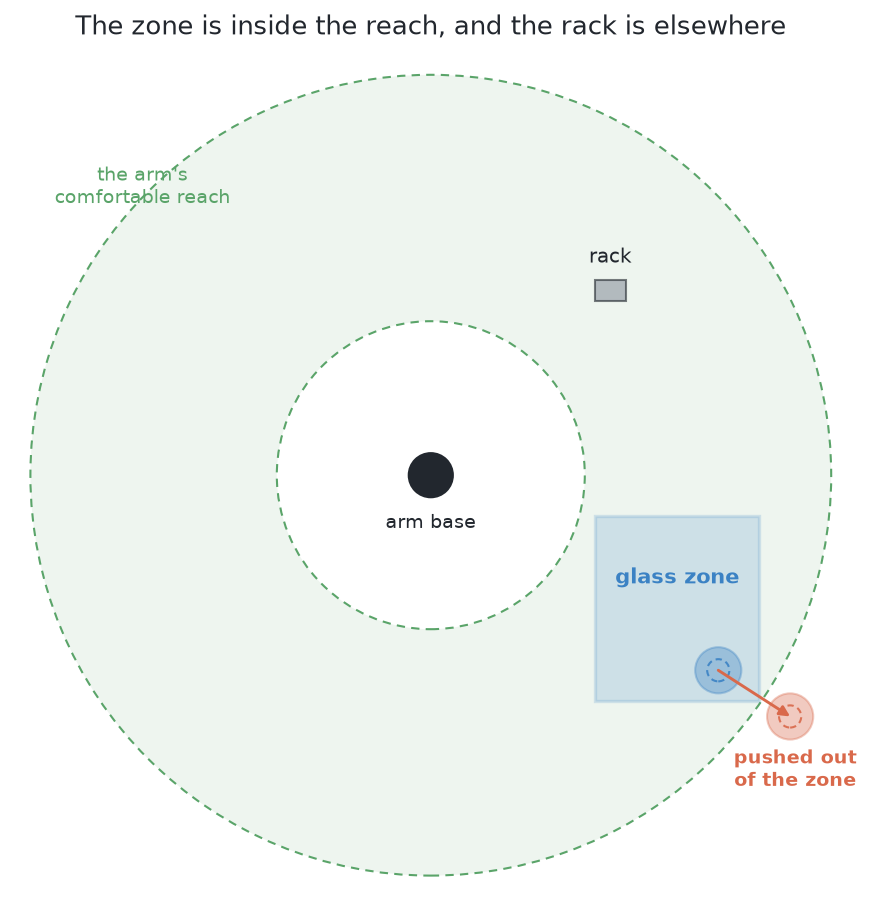
The picture shows the table from above, with the arm's base in the middle. The green ring is where the arm works well. The blue rectangle is the glass zone, the part of the table where glasses may stand. The small grey box is the rack, on the other side of the arm.
A glass must not be pushed where the rest of the job cannot follow it. The red glass has been pushed over the edge of the zone. It may have plenty of room there. But the examiner marks a glass outside the zone as a wrong ending. Leaving the zone is how a glass falls off the table or ends up near the rack.
One rectangle is enough here. Every corner of the zone is between 330 and 777 mm from the arm's base. So the whole zone is inside the reach ring. And the rack is never inside the zone. So a glass inside the zone is also within reach and away from the rack. The layout needs only this one test.
Every glass keeps a usable line of sight from the side#
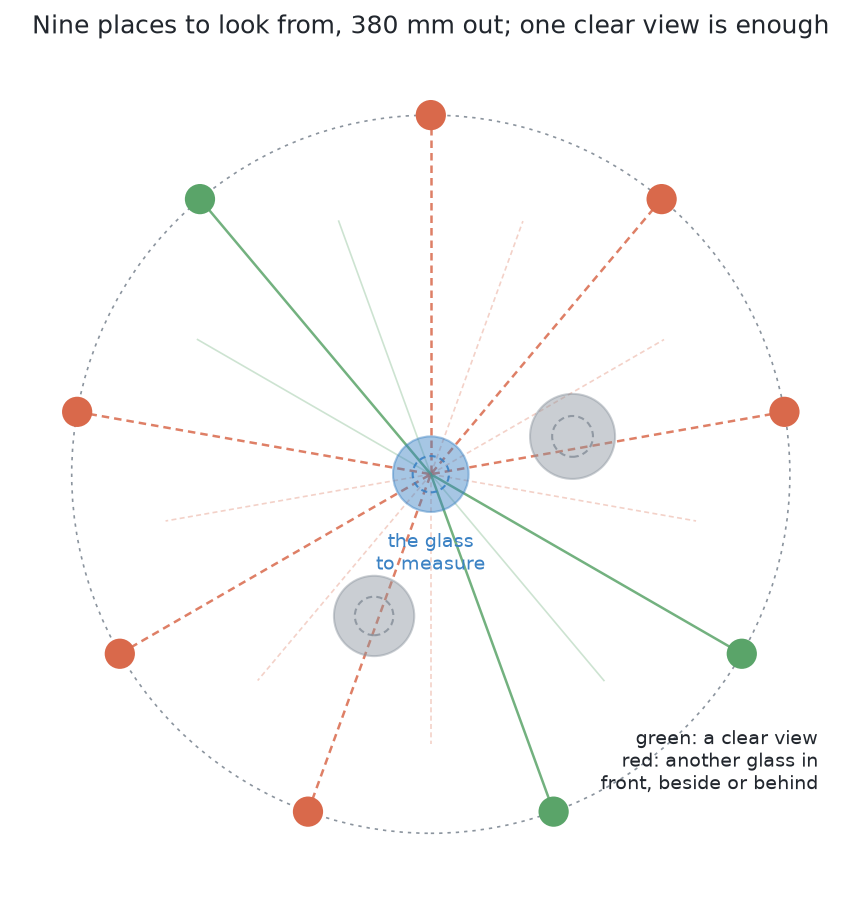
To measure a glass, the arm photographs it from the side. The camera can stand at nine places on a circle 300 mm from the glass, 40° apart. The picture shows those nine places round one glass, with two neighbours nearby. A place is green when the glass would be alone in the picture. It is red when another glass would also be in the picture, in front, beside or behind.
A glass must not be grippable but impossible to measure. When two glasses share a picture, they touch in the camera's view. The measurement then reads them as one wide glass. Here three of the nine places are clear. That is enough, because the measurement needs only one clear view. If all nine were red, the glass would have its room but could not be picked up properly.
The glasses move as little as possible#
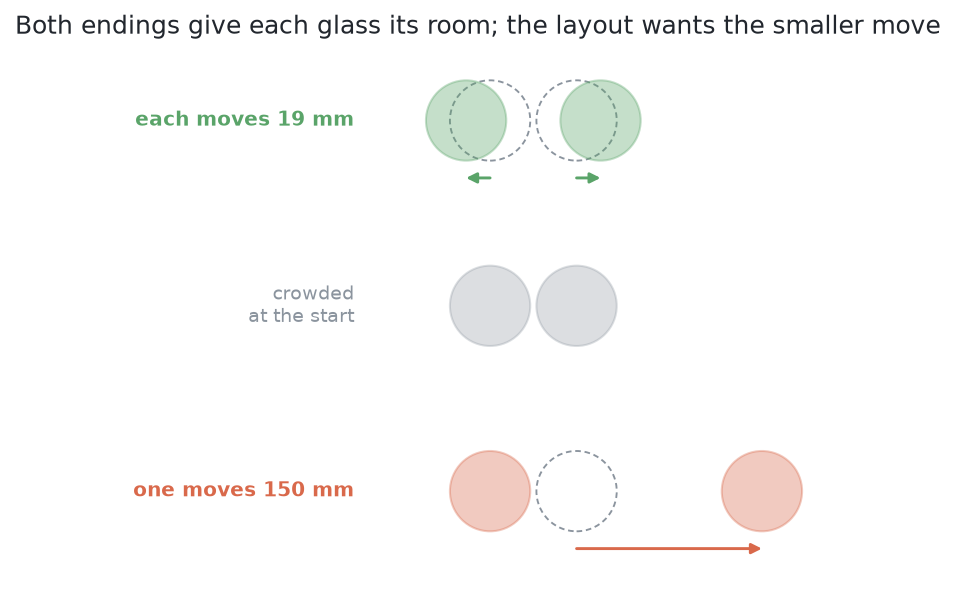
The middle row of the picture is a crowded pair. Two narrow glasses have only 5 mm of space between them. The top row parts them by moving each glass 19 mm. The bottom row parts them by pushing one glass 150 mm to open table. Both endings meet the three conditions above.
Many layouts are legal, but they are not equally safe to reach. A glass can be knocked over during every millimetre it is pushed. So the best legal layout is the one nearest to where the glasses stand now. Here that is the top row.
These pictures turn the conditions into an exact question. The next section gives four standard ways to answer it.
4. Four ways to place the discs#
The question is now exact, so this section gives four standard methods for solving it. Each one is good at something different. Two words come first, because all four methods use them.
An objective is the one number a method tries to make as small as possible. Here it is the total travel. For each glass, take how far it moved and square it. Then add these up over all the glasses. Squaring makes the number smooth, so a method can follow its slope downhill. Squaring also makes one long push cost more than several short ones.
A constraint is a condition the answer must not break. Here the constraints are the three conditions above. Two middles must be at least the required distance apart. Every glass must be inside the zone. And every glass must have one clear side view.
The table below sums up the four methods. Each row is one method. The second column says what it is good for, and the third says what it costs.
| method | what it is good for | what it costs |
|---|---|---|
| a constrained optimisation | being right: it is the one actually minimising the travel, so its answer defines the floor | needs a solver, slowest of the four, and can settle in a local optimum |
| repulsive relaxation | speed and simplicity, and it hands back the path as well as the destination | no guarantee it lands anywhere optimal |
| assignment to slots | certainty: the layout cannot come out illegal | the answer is as good as the slots somebody chose |
| Lloyd's algorithm | being almost nothing to write | a starting layout and a sanity check rather than an answer |
A constrained optimisation#
The first method gives the objective and the constraints to a solver. The solver finds the answer directly. Nothing is left out. It makes the total squared travel as small as possible, while every constraint holds.
The usual method is called sequential quadratic programming. The idea is simpler than the name. The real problem is hard because the clearance constraints are curved. The distance between two middles uses a square root. So the solver works in small steps. At the current layout, it replaces the objective with a simple curved copy. It replaces each constraint with a straight-line copy. This simpler problem is a quadratic program. Solvers can solve it exactly and fast. The solver moves to that answer, then builds new copies at the new layout. It repeats this until the answer meets the real constraints. The repeated steps are why it is called sequential.
This method is good because it is right. Its answer defines the floor, because it really does make the travel as small as possible. It has three costs. It needs a solver. It is the slowest of the four. And it can stop at a local optimum, an answer that is good nearby but not best overall. The first caution at the end of this page is about that.
Repulsive relaxation#
The second method uses no solver. It uses an idea from physics instead.
Give every pair of glasses a repulsive potential. This is a cost that is near zero when the two glasses are far apart. It rises steeply as they come close to the required distance. Give the zone's walls and the rack the same kind of cost. Add all these costs together. The layout now has one number. It is high when anything is crowded, and low when nothing is. Then move every glass a small step in the direction that lowers this number most. Repeat until nothing moves. The final state is an equilibrium, where the pushes on each glass from all sides cancel.
This is like letting a few charged balls loose in a box. They push each other apart, spread out, and stop. Nobody solves anything. The layout appears by itself.
This method is good because it is fast and simple. It is a few lines of arithmetic. For four to six glasses, it finishes almost at once. But it is rough. It does not try to keep the travel small. So it often spreads glasses further than the task needs, and its layout is not the nearest legal one.
Its real advantage is practical. It gives a whole series of layouts, one per step. Each one is a little less crowded than the one before, and none has an overlap. This series is a set of waypoints. A layout alone only says where a glass should finish. This method also gives a route to get there without passing through a neighbour. The other three methods do not give a route.
Assignment to slots#
The third method works in a different way from the others. It does not ask where the glasses should go. It fixes the possible places first. Then it asks only which glass goes to which place.
First, work out a set of places once. Each place is inside the zone. The places are far enough apart that any glass of this kind has its clear room at any of them. Each place is called a slot. The slots already meet the constraints. So any way of putting glasses into different slots is legal. Nothing is left to check. The only choice is which glass takes which slot. The cost of a choice is the total distance the glasses travel.
This is a well-known problem called the assignment problem. You have a cost for every pairing of a worker with a job. You choose a one-to-one pairing with the smallest total cost. The Hungarian algorithm solves it exactly. Its time grows with the cube of the number of items. For four to six glasses that takes no time at all.
This method is good because it is certain. The layout cannot be illegal. The answer is exact. There is no random seed and no local optimum. Every run gives the same slots, so two runs are easy to compare. The cost is extra travel. The nearest slot to a glass is rarely the nearest legal place. So this method moves the glasses more than a free layout would. Use it when a legal answer right now is worth more than the best answer.
Lloyd's algorithm#
The fourth method comes from another field. It answers a slightly different question: how to spread points evenly through an area. But it answers that question almost for free, so it is useful to know.
First, one idea. Take the middles of the glasses. Divide the glass zone so that each point of the table belongs to the nearest middle. The area that belongs to one glass is its Voronoi cell. A crowded glass has a small cell. A glass alone in a corner has a large cell. The cells cover the zone with no gaps and no overlaps.
Lloyd's algorithm repeats two steps. Work out every glass's Voronoi cell. Then move every glass to the middle of its cell. If a neighbour presses on one side of a glass, its cell is lopsided. So the glass moves away from that neighbour. In this way the crowding undoes itself. Each glass ends near the middle of its own fair share of the table.
This method is good because it is very easy to write. With a Voronoi routine it is a few lines. It rarely fails, and it spreads glasses more evenly than repulsion does. Its weakness is that even spreading is not what the task asks for. It does not keep the clearance or the travel small. It may move a glass across the table when a small nudge was enough. So it is best used as a starting layout for the constrained optimisation. It can also check that the zone has room for the glasses at all.
Which to use#
All four methods give the same kind of answer. So the choice depends on what the answer is for. The constrained optimisation defines the floor, so it must be run. Repulsive relaxation is worth keeping too, for its waypoints. Assignment to slots is the fallback when a legal layout is needed at once. Lloyd's algorithm gives a starting layout and a sanity check. One method must be chosen and then fixed, for reasons the cautions below explain.
None of this is written in code yet. The examiner exists. The programmed geometry also exists, and it picks a landing spot one push at a time. But that is different. It answers where can this glass go next, not where should every glass finish. The layout on this page is a design for shared code, not code that runs today.
The layout can be computed. The next section asks who should compute it.
5. Why this is shared and not a solution#
The section above showed the layout can be computed. This section explains why each solution must not compute its own.
Suppose every solution chose its own targets. Then two solutions could score differently for two reasons. One might really push better. Or one might simply have chosen easier targets. Targets far apart make the clearance easy to meet, so that solution looks good. Targets near the legal limit need much more accuracy, so that solution looks worse without being worse. The score would then measure the targets, not the pushing skill. The comparison would be useless.
So one layout is computed once, from the same measurements, and handed to all seven. Every solution that aims at a target then aims at the same places. The only thing left to differ is how well each one gets the glasses there. This is what the book compares. A solution may also ignore the layout and push a glass away from its neighbour instead. One of the seven does this. Its cost still shows on the same scale, as travel compared with the floor.
The camera work's examiner uses the same idea for its own shared step. In both books the rule is the same: the shared part is everything that is not being compared.
The layout is useful for aiming. The next section shows the more valuable thing that comes out of computing it.
6. The displacement floor#
Computing the layout gives something more useful than the targets: a measuring stick. This section explains it.
When the constrained optimisation finishes, it reports the layout. It also reports the value of its objective, which is the total movement that layout needs. The solver made exactly this number as small as possible, under exactly the task's conditions. So no layout that meets the task needs less movement than this. It is the least travel the task can cost. It is called the displacement floor.
This gives every solution a scale that means something. A solution does not just move the glasses some number of millimetres. It moves them some multiple of the needed movement. A solution at two times the floor used twice the travel the task needed. A solution at ten times the floor was wandering. And the floor exists before any solution exists. It comes only from the measurements and the fixed numbers of the cell. It uses no model, no training and no run. So it cannot favour any solution.
The bottom of the scale needs care. A solution close to the floor is not automatically a good solution. It means only that its remaining travel is not its fault. The task needed that travel, and no better choice of pushes could use less. So it is time to stop improving this part and look at something else.
The camera work has the same kind of measure: the best possible answer. The displacement floor plays that role here. It comes from perfect information, it does not depend on any method, and it makes all the other numbers readable.
The floor can only be trusted if two mistakes are avoided. The next section names them.
7. Two cautions#
The floor is useful only if two easy mistakes are avoided. This section describes both.
The solver and its seed must be fixed. Making the travel small under the clearance rule has more than one local optimum. A local optimum is a layout that no small change can improve, but that is not the best overall. For example, take two crowded glasses. Moving the left one left is a good answer. Moving the right one right is also a good answer. Which one a method finds depends on where it starts. So the solver, its starting layout and its random seed must all be fixed in advance. If they are not, two solutions could get different targets from the same measurements. That brings back the unfair comparison this page tries to remove. So the layout is computed once for each table, stored with it, and reused by every solution.
Success is judged on the clearance, not on the layout. A solution that gives every glass its 76 mm of clear room has done the job. This is true even if its final arrangement is very different from the computed one. There is more than one good way to uncrowd a table. So the check that ends a run must test the clearance wherever the glasses really are. It must never test the distance from each glass to its target. The computed layout is the reference and the floor, not the pass mark. Scoring the distance to targets would punish a solution for finding a different good answer.
The cautions say how to use the layout. The last section says what the layout leaves open.
8. What the layout does not tell you#
The layout says where the glasses should go. It says nothing about how to get them there. Everything it leaves open is the real work of the seven solutions.
A push is not a simple move. The layout asks for each glass to move a certain distance in a certain direction, as if it could be lifted and put down. But a pushed glass slides and turns at the same time. So the movement the layout asks for and the movement a push gives are different.
Which movements are possible depends on friction, and nobody knows it. What a solution is never told explains this.
A glass may tip instead of sliding. For some glasses the only correct answer is to refuse to push them, however clear their target is. Pushing without toppling gives the rule.
Reaching a target takes several pushes, and their errors add up. One push does not land exactly where it was aimed. So a glass reaches its target by being pushed, looked at and pushed again. Each push adds its own error. How a solution handles this is a large part of what makes the seven different.
Other glasses are in the way, so the order matters. The layout is the final arrangement, not a plan to reach it. A glass pushed first may need to pass where another glass still stands. A glass pushed to its target may block the next glass's route. Choosing the order is a planning problem. The layout does not solve it.
So the split is clear. Geometry says where. The seven solutions say how.
9. Where to go next#
- The problem — why dragging rather than lifting, the three distances that matter, and what "done" means.
- What goes in and what comes out — what every solution is handed and hands back.
- The examiner — the crowded tables, the physics and the marking, and where the floor sits on the scorecard.
- Pushing without toppling — how low a push has to be, why that is a property of the glass, and the refusal path.
- The seven solutions — what each one puts between the measurements and the pushes.