This page explains two related techniques that work on a mask. Morphology shrinks and grows a mask, so that specks go away, holes fill in and edges become smooth. The distance transform measures, for every pixel in a mask, how far that pixel is from the nearest edge.
The page answers four questions, and the first two are about morphology: how erosion and dilation work, and why they are almost always used in pairs, as opening and closing. The other two questions are about the distance transform. So the page also asks how the transform is worked out, and what a robot arm uses it for, such as finding the most central point of a part, or separating two parts that touch.
It is for a reader who already knows what a mask is, which is a grid the size of a picture. That grid holds 1 where a pixel belongs to the object and 0 where it does not. The page before this one, thresholding and colour masks, explains how a mask is made, so you do not need any background in algorithms. Every example uses a small mask you can check by hand, and every number on this page came from a real run of the diagram script.
Contents#
- The idea in one sentence
- How morphology works · Erosion and dilation · Opening and closing
- How the distance transform works · Two passes over the mask · The most central point · Separating objects that touch · The steps as pseudocode
- Where it is used on a robot arm
- Where it is useful, and where it is not
- Libraries that provide it
- Why these techniques, and what they cost
- The learned alternative
- Where to read next
- Using it in Python
1. The idea in one sentence#
Each technique fits into a single sentence, and the rest of this page only fills those two sentences in. Morphology slides a small shape over the mask, and it keeps or adds each pixel depending on what the shape covers there. The distance transform writes into each mask pixel the distance to the nearest pixel that is not in the mask.
The word "morphology" means "the study of shape", and the small shape it slides is called the brush on this page. Many books call it the structuring element or the kernel instead, and it is usually a 3 by 3 square, a small disc or a small cross.
An everyday example helps for each of them. Morphology is like trimming a hedge and then letting it grow back evenly, because the trimming removes the thin twigs that stick out. The regrowth brings the hedge back to its old size, but the twigs do not come back. The distance transform is like standing on a lawn and asking how many steps it is to the nearest flower bed. This means the middle of a big lawn is many steps from any bed, while a spot right next to a bed is only one step.
2. How morphology works#
Erosion and dilation#
The one-sentence description above becomes concrete as soon as you see that morphology has only two basic operations, and everything else in it is built from those two.
Erosion shrinks a mask, and it works by putting the centre of the brush on each pixel in turn. The pixel stays 1 only if every pixel under the brush is 1, so if the brush touches even one 0 the pixel becomes 0. This means erosion peels one layer off every edge, and anything thinner than the brush disappears completely.
Dilation grows a mask, and it puts the brush on each pixel in the same way. The pixel becomes 1 if any pixel under the brush is 1, so dilation adds one layer to every edge. This also means that gaps narrower than the brush get filled.
The picture below shows both on a real 9 by 11 mask, using a 3 by 3 square brush. That mask holds a 5 by 5 block, a thin arm one pixel wide sticking out to the right, and a single stray pixel above the arm.
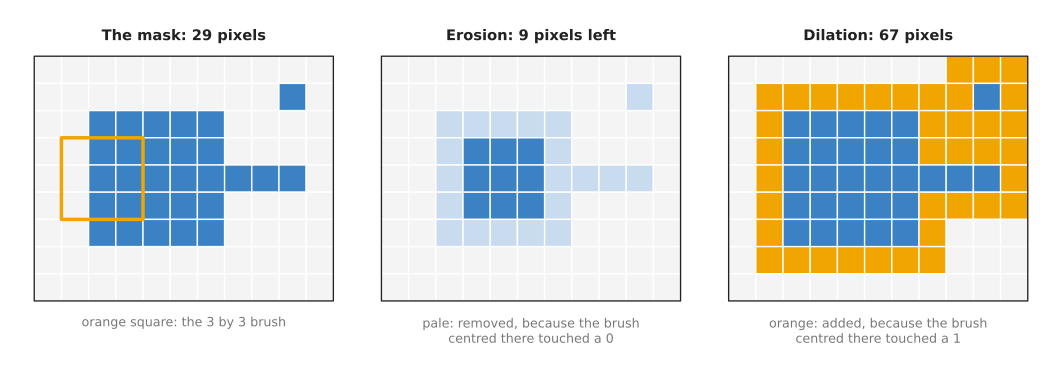
The mask has 29 pixels, and the orange square in the left panel shows the brush centred on a pixel at the block's left edge. That brush covers three 0 pixels, so erosion removes that pixel.
After erosion, 9 pixels are left, which is the 3 by 3 middle of the block, so the whole outer layer of the block has gone. The arm and the stray pixel are gone too, because they are only one pixel wide. After dilation, the mask has 67 pixels instead. Every part has grown by one pixel on every side, and the stray pixel has grown into a 3 by 3 square.
A bigger brush has a bigger effect, so a 5 by 5 square peels two layers at once. This means that running a 3 by 3 erosion twice has the same effect as one 5 by 5 erosion.
The brush does not have to be a square at all. A disc-shaped brush shrinks and grows the mask by the same distance in every direction, so round objects stay round. However, a square brush grows round objects towards a square shape. So in practice people use a disc when shape matters, and a square when speed matters.
Opening and closing#
Erosion and dilation on their own change the size of the object, so a robot that measures a part after an erosion finds it too small. This is why the two are nearly always used in pairs.
Opening is an erosion followed by a dilation with the same brush. The erosion removes everything thinner than the brush, such as specks, thin arms and small bumps, and the dilation then grows what is left back to its old size. However, the specks do not come back, because nothing of them survived the erosion.
Closing is a dilation followed by an erosion with the same brush. The dilation fills every hole and gap narrower than the brush, and the erosion then shrinks the object back to its old size. However, the holes stay filled, because the erosion only peels the outside edge.
The picture below shows both on a real 15 by 21 mask, which looks like the mask a colour threshold gives. It holds a 9 by 12 part with four specks around it, two small holes where a shiny highlight broke the colour, and a one-pixel bump on the top edge.
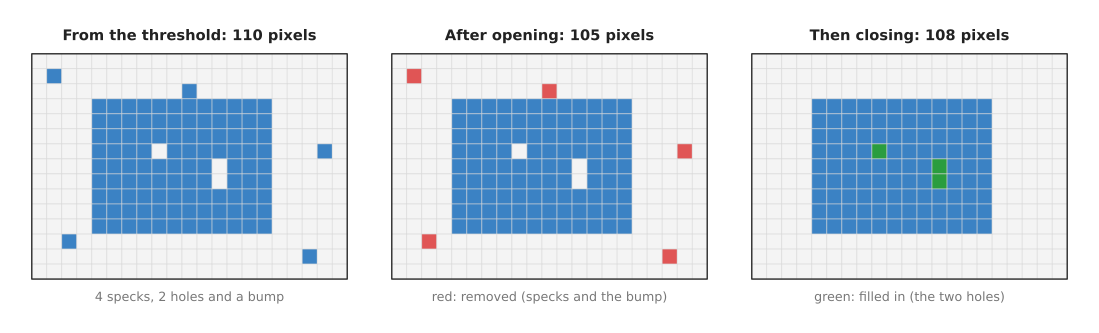
The mask starts with 110 pixels, and opening with a 3 by 3 square removes the four specks and the bump, which leaves 105 pixels. Closing then fills the two holes, which gives 108 pixels. That is exactly the 9 by 12 part, 108 pixels, with no pixel wrong.
The order matters here, because opening first removes the specks. If closing ran first, it would not remove the specks at all, and it could even join a speck to the part when the two lie close together. Book 2 uses the same order, opening then closing, in tidying the mask.
One more useful result falls out of erosion, because the mask minus its own erosion is the outer ring of edge pixels. That ring is the outline of the object, one pixel thick. The overview uses this to draw outlines, and the page on edges and contours traces such outlines into shapes.
3. How the distance transform works#
Morphology tidies a mask, whereas the distance transform measures one instead. It takes a mask and gives back a grid of the same size, in which each pixel outside the mask gets 0. Each pixel inside the mask gets its distance to the nearest pixel outside the mask. This means pixels on the edge get small numbers, while pixels deep inside get large ones.
There are three common ways to measure that distance.
- The city-block distance counts steps up, down, left or right, as a person walks along the streets of a grid-shaped town.
- The chessboard distance also allows diagonal steps, as a king moves in chess.
- The straight-line distance is the ordinary distance you would measure with a ruler. It is also called the Euclidean distance.
The worked examples below use the city-block distance, because its numbers are whole steps that you can count by hand. Libraries usually give the straight-line distance instead, but the ideas behind the two are the same.
Two passes over the mask#
A slow way to compute the transform is to take each mask pixel, measure its distance to every outside pixel, and keep the smallest. However, that takes a long time on a big picture. So the classic fast way needs only two passes over the grid, and it was published by Rosenfeld and Pfaltz in 1966.
- Give every mask pixel a very large number, and every outside pixel 0.
- First pass, from the top-left corner, row by row, to the bottom-right corner. For each mask pixel, look at the pixel above and the pixel to the left. Set the pixel to the smaller of its own number, (above + 1) and (left + 1).
- Second pass, from the bottom-right corner, backwards, to the top-left corner. For each mask pixel, look at the pixel below and the pixel to the right. Set the pixel to the smaller of its own number, (below + 1) and (right + 1).
After the first pass, every pixel knows the distance to the nearest outside pixel above it or to its left. After the second pass, it also knows about the outside pixels below it and to its right, so after both passes the number is the true distance.
Here is a worked example on a 5 by 5 square of mask pixels, with 0s all round it. After the first pass, the numbers grow towards the bottom-right, because that pass has only looked up and to the left:
after pass 1        after pass 2
1 1 1 1 1           1 1 1 1 1
1 2 2 2 2           1 2 2 2 1
1 2 3 3 3           1 2 3 2 1
1 2 3 4 4           1 2 2 2 1
1 2 3 4 5           1 1 1 1 1
The second pass then corrects the bottom and right sides, so the final grid has 1 on the edge, 2 one step in, and 3 in the very middle.
The most central point#
Those numbers are useful because the pixel with the largest distance is the point deepest inside the object, which is the point furthest from every edge. It is also the centre of the largest circle that fits inside the object, and that circle's radius is the distance itself.
This matters because the obvious alternative, the centroid, can be badly wrong. The centroid is the average position of all the mask pixels, so for a round or square part it lands in the middle. However, for a bent part it can lie outside the part altogether.
The picture below shows a real U-shaped bracket seen from above, and each number in it is the city-block distance to the nearest pixel outside the bracket.
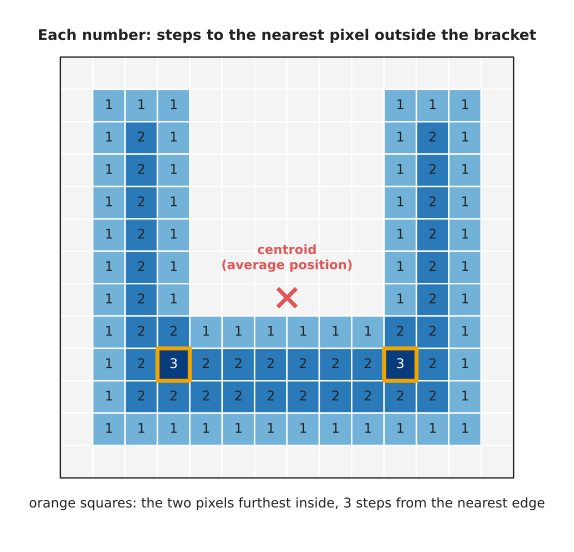
The bracket has 90 pixels, and its centroid, the red cross, lands at row 6.9 and column 6.5 of the grid. That is in the empty space between the two walls, so a suction cup sent there would touch nothing at all.
The largest distance is 3 steps, at two pixels where the walls meet the base, and the two tie because the bracket is the same on both sides. Either one is a safe place for a suction cup, because it is 3 pixels from every edge. This means a cup up to 3 pixels in radius fits there entirely on the part. On a real picture a pixel is often about 1 millimetre on the table, so the robot can read the largest cup that fits straight from the number.
Separating objects that touch#
When two objects of the same colour touch, a threshold gives one patch, so grouping the mask then finds one object where there are really two. However, the distance transform can split them again.
The idea behind that is simple, because where two round objects touch, the join between them is narrow. Pixels at the join are close to an edge, so their distance is small. However, the middle of each object is far from every edge, so its distance is large. So if you keep only the pixels whose distance is large, the join falls away, and what is left is one core inside each object.
The picture below does this on a real mask of two touching coins, each 8 pixels in radius, with their centres 14 pixels apart.
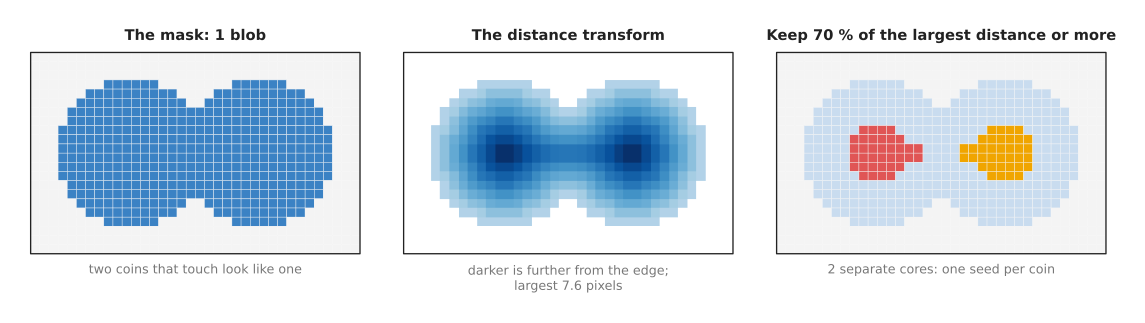
The mask has 404 pixels in one patch, and the largest straight-line distance is 7.6 pixels, in the middle of each coin. The pixels at the join have a distance of only 5.0. Therefore keeping the pixels with at least 70 % of the largest distance, which is 5.3, drops the join. This leaves two separate cores of 36 pixels each, one per coin.
The cores are not yet the full coins, because they are only seeds, one starting point per object. So a second step grows each seed back out to the edge of the mask, and draws a line where two seeds meet. The standard method for that step is called watershed, and it treats the distance picture as a landscape and floods it from each seed. Book 2 describes it in watershed and GrabCut.
The 70 % limit is a number you choose yourself, and it can go wrong in either direction. If it is too low, the join survives and the coins stay as one, and on this mask 60 % still leaves a single core. If it is too high, a small or oddly shaped object may lose its core entirely.
The steps as pseudocode#
The operations above are written out below as plain steps, in pseudocode that does not belong to any programming language. In these steps, "outside the picture" counts as 0.
function erode(mask, brush):
    out = a grid the size of mask, filled with 0
    for each pixel p:
        if every pixel under brush centred at p is 1 in mask:
            out[p] = 1
    return out

function dilate(mask, brush):
    out = a grid the size of mask, filled with 0
    for each pixel p:
        if any pixel under brush centred at p is 1 in mask:
            out[p] = 1
    return out

function open(mask, brush):  return dilate(erode(mask, brush), brush)
function close(mask, brush): return erode(dilate(mask, brush), brush)

function distance_transform(mask):             # city-block distance
    d = a grid the size of mask
    for each pixel p:
        d[p] = a very large number if mask[p] is 1, else 0
    for each row from top to bottom, each column from left to right:
        if mask[p] is 1:
            d[p] = min(d[p], d[above p] + 1, d[left of p] + 1)
    for each row from bottom to top, each column from right to left:
        if mask[p] is 1:
            d[p] = min(d[p], d[below p] + 1, d[right of p] + 1)
    return d

function most_central_point(mask):
    d = distance_transform(mask)
    return the pixel with the largest d, and that largest d

function seeds_for_touching_objects(mask, fraction):
    d = distance_transform(mask)
    cores = the pixels where d >= fraction * largest d
    return connected groups of cores     # one group per object
The last line uses connected components, which the page on clustering explains.
4. Where it is used on a robot arm#
Now that both techniques have been worked through, it is worth seeing where they turn up, because they appear wherever an arm works from a mask. The list below gives some concrete places.
- Opening and closing tidy a threshold's mask, so a small brush is run right after almost every colour or depth threshold. Without that step, a speck of the right colour on the table counts as an object, and a highlight on the part splits its mask in two.
- The distance transform chooses where to place a suction cup, because the most central point of a part's mask is the spot furthest from every edge. The distance there, turned into millimetres, says whether the cup fits. So if the largest distance is smaller than the cup's radius, the part is too narrow for that cup, and the program can say so before the arm moves.
- Erosion keeps a grasp away from the edges, because eroding a part's mask by the width of a fingertip leaves only the places where the fingertip can land fully on the part.
- Dilation grows obstacles by the size of the gripper, so on a top-down map of the table, dilating every obstacle by the gripper's radius gives the area where the gripper's centre must not go. A planner can then treat the gripper as a single point, and the planning and search chapter builds on this kind of map.
- The distance transform separates touching parts, which matters because coins, pills, fruit and nuts in a tray often touch. It gives one seed per part, and watershed then splits the mask.
- The distance transform measures thickness, since twice the largest distance is the diameter of the largest circle that fits inside a part. This means a part that must be at least 8 millimetres thick to grip can be checked with one number.
- Erosion cleans up a learned model's masks, and the glass-picking project in the robot-arm-projects repository erodes each region from a trained segmentation model before counting its doubtful pixels. The erosion removes the thin rim of doubt that every region has along its edge. So what is left in the middle points to a second glass hiding behind the first.
- Erosion also draws outlines, because the mask minus its erosion is the outline of each part, one pixel thick. This is a quick way to draw what the robot found on a screen for a person to check.
5. Where it is useful, and where it is not#
All of those uses rest on two conditions. Morphology works when the unwanted things are smaller than the objects you want, while the distance transform works best on compact objects such as discs and blocks. This means both fail in known ways, and the table below lists the common failures. Read each row as: this goes wrong, this is what you see, and this is what people use instead.
| What goes wrong | The sign you would see | What people use instead |
|---|---|---|
| The brush is bigger than a thin part of the object | A handle, a wire or a thin wall disappears; a part with a narrow waist splits in two | A smaller brush, or removing specks by size with connected components |
| Closing bridges the gap between two nearby objects | The object count drops by one when two parts come close | A smaller brush for closing, or splitting with the distance transform afterwards |
| Specks bigger than the brush | Small false objects survive opening | Throw away every patch smaller than a set area, using connected components |
| Holes bigger than the brush | A large hole stays; the most central point lands next to it | A bigger closing brush, or filling all holes inside the outer contour |
| Long thin objects standing side by side | Their distance transform has a ridge along each object, not a peak; two touching ridges join, so there is only one seed | A different cue, such as where each object meets the table, or a segmentation model |
| A part cut off by the edge of the picture | The most central point sits near the picture edge | Ignore parts that touch the picture edge, or move the camera |
| A mask with ragged edges from noise | The distance values near the edge jump about, and the central point moves between frames | Opening and closing before the distance transform |
The long-thin-objects row comes from a real project, because the glass-picking project tried the distance transform and watershed on standing wine glasses seen from the side. A glass is several times taller than it is wide, so the deepest part of its mask is a line up its middle rather than a single point. When two glasses overlap in the picture, their two lines join into one, and so watershed has only one seed to work with. The project measured this across every merged pair it could produce, and watershed split only a handful of them. Instead it used the row where each glass meets the table.
On a point cloud the same ideas have their own forms. Radius outlier removal deletes points with too few neighbours within a set distance, so it removes lone points in the way that opening removes specks. Growing an obstacle in 3D is usually done with voxels, which are small cubes that divide space into a 3D grid. Each cube near an occupied cube is also marked occupied, and that is dilation on a 3D grid.
6. Libraries that provide it#
Because both techniques are used so widely, they come ready-made in every image library. The table below lists well-known ones, and you read each row as the library, the languages you can call it from, the function or class to look for, and a note on what to watch.
| Library | Languages | Function or class | Note |
|---|---|---|---|
| OpenCV | C++, Python | cv2.erode, cv2.dilate | Pass the brush and, if you want, a number of repeats |
| OpenCV | C++, Python | cv2.morphologyEx with MORPH_OPEN or MORPH_CLOSE | Opening and closing in one call |
| OpenCV | C++, Python | cv2.getStructuringElement with MORPH_RECT, MORPH_ELLIPSE or MORPH_CROSS | Makes a square, disc-like or cross-shaped brush |
| OpenCV | C++, Python | cv2.distanceTransform with DIST_L1 or DIST_L2 | DIST_L1 is the city-block distance; DIST_L2 is the straight-line distance |
| OpenCV | C++, Python | cv2.watershed, cv2.connectedComponents | For splitting touching objects from seeds |
| SciPy | Python | scipy.ndimage.binary_erosion, binary_dilation, binary_opening, binary_closing | Works on masks of true and false, in any number of dimensions |
| SciPy | Python | scipy.ndimage.distance_transform_edt | The exact straight-line distance |
| scikit-image | Python | skimage.morphology (disk, binary_opening, remove_small_objects), skimage.segmentation.watershed | remove_small_objects removes patches below an area |
| Open3D | C++, Python | PointCloud.remove_radius_outlier, PointCloud.remove_statistical_outlier | The point cloud form of removing specks |
| PCL (Point Cloud Library) | C++ | pcl::RadiusOutlierRemoval, pcl::StatisticalOutlierRemoval | The same, in C++ |
OpenCV treats a mask as 0 and 255, while SciPy and scikit-image use false and true. Converting between them is one line, but forgetting it gives a mask that is all zeros or all ones.
7. Why these techniques, and what they cost#
With the libraries in hand, the remaining question is when to reach for these two techniques at all. So this section answers the four standard questions: what they are, what they do for you, why they rather than the obvious alternative, and what they cost.
Morphology shrinks and grows a mask with a small brush, so it removes specks, fills holes and smooths edges. It also keeps the object's size, because erosion and dilation are used in pairs. The distance transform gives every mask pixel its distance to the nearest edge. So it finds the most central point of a part, tells you how big a tool fits there, and gives seeds for splitting touching objects. Both run in about a millisecond on a camera picture, and both give exactly the same answer every time.
The obvious alternative to opening is to label the patches with connected components and throw away the small ones. That removes specks, and it does not change the shape of the real object at all. However, it does not fill holes, and it does not remove thin bumps attached to the object. That is why many programs use both: opening and closing with a small brush, then an area filter for anything larger that got through.
The obvious alternative to the distance transform's central point is the centroid, which is cheaper and smoother from frame to frame. It is right for round, square and other convex parts, which have no dents or gaps. However, it is wrong for U shapes, L shapes, rings and anything else with a gap or a hole, where it can fall off the part. This means the distance transform costs a little more, but it never chooses a point outside the mask.
The obvious alternative for splitting touching objects is a learned segmentation model, and Section 8 says when it is the better choice.
Against all that, you must choose the brush size, and that one number trades two errors against each other. A bigger brush removes more noise, but it also removes thin parts and joins close objects. Book 2 counts these two errors separately in merge and split are two failures. The distance transform also only knows about the mask, so if the mask is wrong, its central point is confidently wrong too.
8. The learned alternative#
That last alternative is worth a closer look, because Book 6 has models for both of the jobs on this page. A segmentation model gives one mask per object from the start, so it splits touching objects without the distance transform and watershed. It wins on long, thin and oddly shaped objects that defeat the distance transform, but it needs training pictures and a bigger computer. A suction model scores every pixel for where a cup would seal, which is the job the most central point does on this page. However, Book 6 says plain geometry is hard to beat for suction, and that a model pays off only when the geometry keeps choosing badly, such as on lumpy bags or surfaces that look flat but leak. There is no learned model that replaces opening and closing, because they are a cheap clean-up step that runs on any mask, including a model's own, as section 4 showed.
9. Where to read next#
- The next page is edges and contours, which traces the outline of a tidy mask and fits shapes to it.
- Clustering turns a mask into separate objects, and does the same for a point cloud.
- The page before this one, thresholding and colour masks, makes the masks that this page tidies.
- Nearest-neighbour search is how radius outlier removal finds each point's neighbours.
- The glass-picking project's notes on splitting a blob show in detail why the distance transform fails on tall thin objects.
10. Using it in Python#
Section 2 explained erosion, dilation, opening and closing, section 3 explained the distance transform and what its brightest point means, and section 6 listed the OpenCV calls for all of them. This section is those calls in order on one mask. After it you will be able to clean a mask and find the most central point of each patch, and you will know which of the numbers you have to choose from your own camera's geometry.
The program below starts from a mask of the kind the thresholding page produces, cleans it, and then asks the distance transform where the safest place to put a suction cup is. It uses OpenCV throughout, because OpenCV has both techniques and they work on the same kind of array.
import cv2
import numpy as np

mask = cv2.imread("mask.png", cv2.IMREAD_GRAYSCALE)      # 0 and 255

# The brush.  A disc-like brush is the usual choice, because a square brush
# leaves square corners on round objects.
brush = cv2.getStructuringElement(cv2.MORPH_ELLIPSE, (5, 5))

clean = cv2.morphologyEx(mask, cv2.MORPH_OPEN, brush)    # remove specks
clean = cv2.morphologyEx(clean, cv2.MORPH_CLOSE, brush)  # fill small holes

# How far every kept pixel is from the nearest edge, in pixels.
distance = cv2.distanceTransform(clean, cv2.DIST_L2, 5)
smallest, largest, _, most_central = cv2.minMaxLoc(distance)
On a made-up mask of two green blocks, the threshold left 8152 pixels, the opening and closing together leave 8136, and the distance transform's brightest point is 36.0 pixels from the nearest edge, at pixel (115, 125). That 36 pixels is the radius of the largest circle that fits inside the patch, so a suction cup narrower than 36 pixels across will land entirely on the block.
OpenCV does both techniques in one call each. morphologyEx with MORPH_OPEN
does the erosion and then the dilation that section 2 describes, and with
MORPH_CLOSE it does them the other way round, so you do not write the two
steps yourself. distanceTransform does the two passes over the mask from
section 3, and minMaxLoc finds the brightest pixel and where it is. The third
argument of distanceTransform is the mask size used for the approximation, and
passing 5 gives a more accurate result than 3 at almost no cost.
What you still have to write is the decision about which operation to use, and in which order. Nothing in the call knows whether your problem is specks outside the object or holes inside it, and section 2 is clear that opening and closing are not interchangeable: opening first and then closing removes specks and then fills holes, while the other order fills the specks into the object before it can remove them. You also have to convert between conventions if you mix libraries, because OpenCV works on masks of 0 and 255 while SciPy and scikit-image work on true and false, and section 6 explains what a forgotten conversion looks like.
What you have to decide or measure is the brush size and the meaning of a pixel.
The (5, 5) brush says that a patch narrower than about five pixels is noise,
and whether that is right depends entirely on how far your camera is from the
table: the same real speck is two pixels wide from 1 metre and ten pixels wide
from 200 millimetres. So you work the brush size out from the camera's
resolution and its distance, and section 2 explains why too large a brush eats
the thin parts of real objects. The same conversion applies to the distance
transform, because its output is in pixels and a suction cup is specified in
millimetres, so you need the millimetres per pixel at the table's distance
before the 36 above means anything. Finally you decide whether to use DIST_L2
or DIST_L1, and DIST_L2 is the straight-line distance you almost always
want, because DIST_L1 counts diagonal steps as two and so underestimates
clearance in a diagonal direction.