This page answers one question: how does a model look at a photo of an object and work out exactly where the object is and which way it is turned? A robot arm needs both of these facts before it can pick up a mug by its handle or push a peg into a hole.
It is written for a reader who has already read the earlier pages of this chapter, so you should know what a model is and how it learns from examples, from what a model is and how a model learns. You should also know what a detection box and a segmentation outline are, from object detection and segmentation. This page goes one step further than those two, because a box says only roughly where an object is, and an outline says only which pixels belong to it, so neither of them says which way the object is turned. That is the job of the models on this page.
Before this page, it helps to have read pose from points, which explains Perspective-n-Point (PnP), the geometry that section 3 uses to turn keypoints into a pose.
Contents#
- What it is
- What goes in and what comes out
- How it works inside
- How it is trained
- Following a pose over time: 6D pose tracking
- Well-known models
- Where this is going
- Where to read next
1. What it is#
The one-sentence idea is this: a keypoint model marks a few named points on an object in a photo, while a pose model works out where the whole object sits in 3D space and which way it faces.
Two of the words in that sentence need explaining before the rest.
A keypoint is one named point on an object, so the left end of a mug's rim is a keypoint, and so is the top of its handle. A person does this without thinking, because if you look at a photo of a mug you can put your finger on the handle straight away. A keypoint model does the same thing, and it gives each point a name.
A pose is the place of an object and the direction it faces, taken together. Think of a book lying on a desk, which you can slide to a new place on the desk, and which you can also turn so that the spine faces you. Both of those changes, the sliding and the turning, change its pose.
In 3D space, a pose comes to exactly six numbers. Three of them say where the object is: how far to the right, how far forward and how high. Three more numbers say how it is turned: how much it is turned left or right, tipped forward or back, and rolled onto its side. People call this a 6D pose, where 6D means "six numbers", and you will also see 6-DoF pose, where DoF stands for degrees of freedom, which means the same thing. Joints and degrees of freedom in Book 1 explains why six numbers are enough.
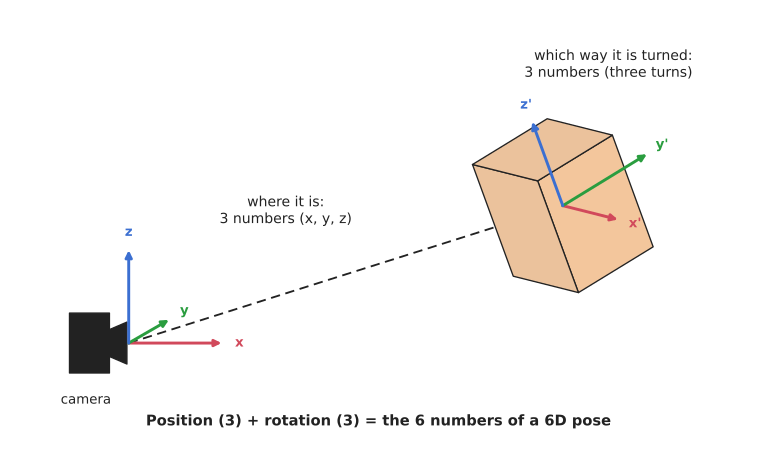
The dashed line gives the first three numbers, the box's position seen from the camera, and the turned arrows on the box give the other three.
Keypoints and pose are linked, because if a model finds enough keypoints on an object, and the robot knows where those points sit on the real object, then the robot can work out the object's pose from them, and many pose models work exactly this way.
2. What goes in and what comes out#
Since keypoints and poses are different answers, the two kinds of model also take and give different things. For a keypoint model, the input is one colour photo from the robot's camera, and the output is a list of points. Each point has a name, such as "handle, top", and two numbers, which are its column and its row in the photo. Many models also give a confidence number for each point, which says how sure the model is.
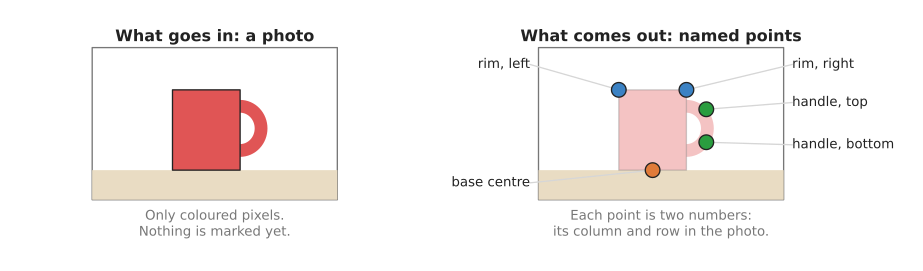
The left photo has only coloured pixels, and the right side shows the five points a keypoint model would mark on it.
For a pose model, the input is usually a colour photo, and often a depth image as well. This is a picture in which each pixel holds a distance instead of a colour, rather than the three colour numbers of an ordinary photo. Many pose models also need a CAD model of the object, where CAD stands for computer-aided design. A CAD model is a 3D drawing of the object's exact shape, of the kind an engineer makes before a part is built.
The output of a pose model is the six numbers for each object it finds. Then the robot software usually stores these as one transform, which is a way of writing a position and a rotation together. Book 1 uses the same idea for the arm's own joints.
The table below compares the two kinds of output, and you should read each row of it across.
| Keypoint model | Pose model | |
|---|---|---|
| What it gives | a few named points in the photo | where the object is and how it is turned, in 3D |
| Numbers per object | two per point, so ten for five points | six |
| Is the answer in the photo or in the room? | in the photo, in pixels | in the room, in metres and angles |
| Does it need a 3D drawing of the object? | no | often yes |
3. How it works inside#
Finding keypoints#
Most keypoint models use a convolutional neural network (CNN), which is a network that slides small pattern detectors across the picture. So the early layers find edges and corners, while later layers combine these into larger shapes, such as a curved handle.
The last layer does not output the points directly, because it outputs one heatmap per keypoint instead. A heatmap is a grey picture of the same shape as the photo, and it is bright where the model thinks the point is and dark everywhere else. So there is one heatmap for "handle, top", another for "base centre", and so on. Then the software picks the brightest pixel in each heatmap, and that pixel is the keypoint.
OpenPose, which section 6.1 describes, is the plainest example of this route, and it is on the shortlist to explain the idea rather than to be used. The two keypoint models the shortlist recommends instead, Ultralytics YOLO pose and RTMPose, hand you the same thing in the end: one named point for each keypoint, with a confidence number.
From keypoints to pose#
Once the robot has those keypoints in the photo, it can work out the pose, and the steps are these.
- The robot already knows where each keypoint sits on the real object, in millimetres. For example, it knows the handle top is 40 mm to the right of the mug's centre and 70 mm above its base.
- The model has found where each keypoint appears in the photo.
- The robot also knows how its camera turns a point in the room into a pixel in the photo, and Camera basics explains this.
- A short, ordinary program then searches for the one pose that would make all the known points land on the pixels the model found. This program is called Perspective-n-Point (PnP), and it is not a neural network at all, because it is a few lines of geometry that libraries such as OpenCV already include.
So the neural network does the hard part, which is finding the points in a messy photo, while plain geometry does the easy part, which is turning those points into six numbers.
DOPE is the model on the shortlist that runs these steps end to end,
and it is there for the same reason as OpenPose: it shows the route clearly. You
still hand it the object's real dimensions and the camera's numbers, which are
steps 1 and 3, and it does step 2 and step 4 itself. The two keypoint models above
stop at step 2, so step 4 is yours to write, and that is what the cv2.solvePnP
call in section 6.2 is doing.
Render and compare#
Newer pose models add a second method on top of that, and it is called render and compare. To render means to draw a 3D model as a picture, the way a video game draws a scene.
- The model makes a first guess at the pose.
- It renders the CAD model of the object at that guessed pose, which gives a picture of what the camera would see if the guess were right.
- A network then compares that rendered picture with the real photo, and outputs a small correction to the pose.
- The model applies the correction and goes back to step 2.
- After a few rounds the rendered picture and the real photo match, so the model stops.
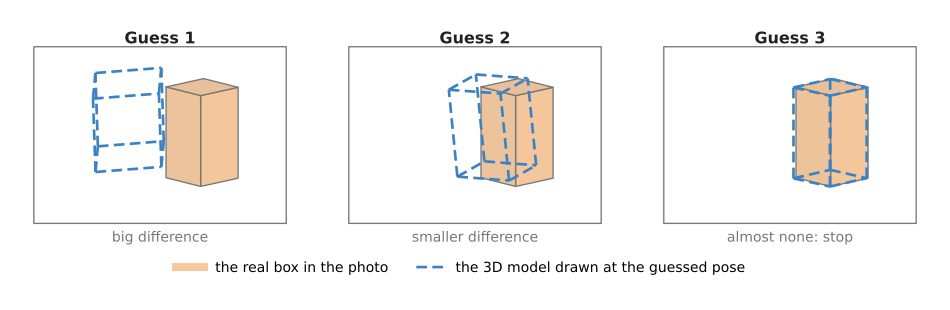
Each round the dashed drawing of the 3D model moves closer to the real box, and the model stops when the two line up.
Render and compare is slower than one pass of a network, because it runs the network several times. However, it is also more accurate, because every round is checked against the real photo.
Two of the three object-pose models on the shortlist work this way, while DOPE above uses keypoints and PnP instead. MegaPose is the one this page recommends when you intend to ship, and FoundationPose runs the same loop twice over: once with many guesses on the first frame of a video, and then with one guess on every frame after it, which section 5 describes.
4. How it is trained#
A pose model learns from photos where the right answer is already known, which means that for each training photo someone must know the exact pose of every object in it. This is hard to get by hand, because a person cannot look at a photo and type in a rotation to the nearest degree.
So most pose models learn from pictures made in a computer instead. A program places CAD models of objects in a virtual scene, at poses it chooses itself, and then renders a photo. Because the program chose the poses, it knows the right answer for every object with no human effort, and these pictures are called synthetic data. The page where the data comes from explains synthetic data in general.
However, a model trained only on clean computer pictures often fails on real photos, because real photos have messy light, shadows and camera noise. People fix this in two ways: the first is to render very realistic pictures, while the second is to change the lighting, colours, backgrounds and textures at random in every picture, so that the model learns to ignore them. That second trick has a name of its own: domain randomisation.
However, real photos with known poses do exist, and they are used mainly for testing. The best-known collection is YCB-Video, which contains videos of everyday objects from the YCB object set, such as a cracker box, a mustard bottle and a mug, with the pose of each object marked in every frame.
Keypoint models are easier to label than pose models, because a person can simply click on the handle of a mug in a photo. So a few hundred to a few thousand clicked photos are often enough to train a keypoint model for one kind of object.
5. Following a pose over time: 6D pose tracking#
So far this page has worked out a pose from one photo, but a robot arm often needs the pose many times a second, because the part may be on a moving conveyor, a person may be holding it out, or the arm itself may be moving the camera. This section explains how pose models follow an object's six numbers through a video.
The idea#
The one-sentence idea is this: work out the pose carefully once, on the first frame, and then on every later frame start from the last answer and correct it a little. The first step is called pose estimation, while the later steps are called pose tracking, and a frame is one picture from a video.
Here is an everyday example: when you first look for your keys on a cluttered desk, you search the whole desk. However, once you have found them and are watching someone slide them across the desk, you do not search again, because you keep your eyes on the keys and simply follow them.
Tracking here is not the same as the object trackers on the tracking and motion page, because those follow boxes or points in the picture. A pose tracker follows the full six numbers in the room instead: where the object is and which way it is turned.
How it works, step by step#
FoundationPose has both modes, and its demo script shows the steps clearly.
- First frame: estimate. The program needs the object's CAD model, a colour photo, a depth image and a mask of the object, often from a segmentation model. It makes many starting guesses of the rotation, spread evenly all round the object, and places each guess at the object's centre, found from the mask and the depth. Then it refines every guess with render and compare, and a second network scores the refined guesses, so that the best score wins.
- Every later frame: track. The program takes the answer from the frame before as its only guess, and runs render and compare on that one guess for a couple of rounds. The result is this frame's answer, and there is no scoring step, because there is only one guess to score.
- Repeat step 2 on every new frame.
In FoundationPose's code, the first step is a function called register and the
second is track_one, and the numbers below come from that code.
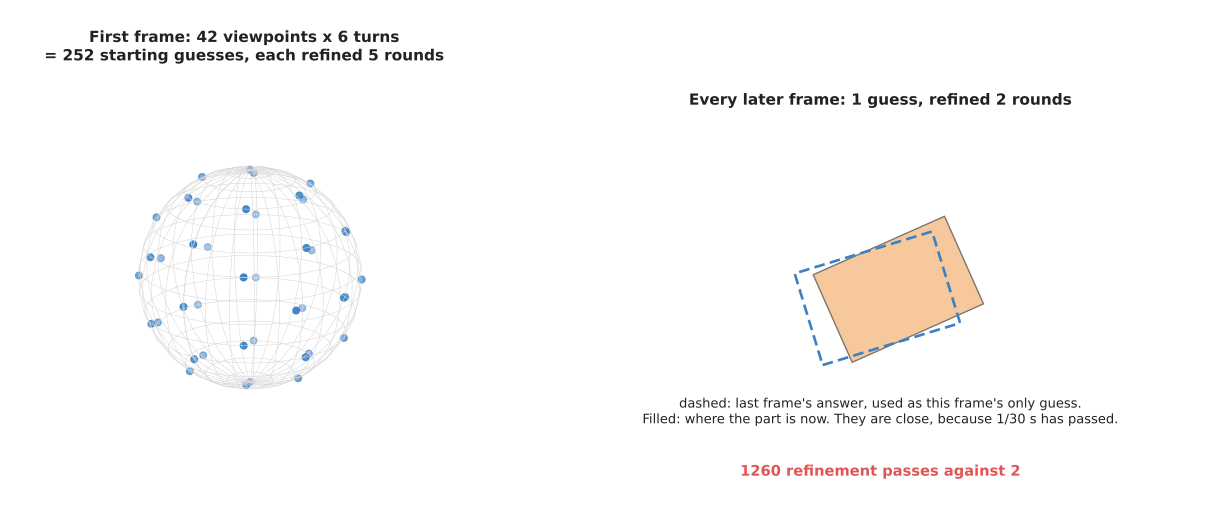
On the first frame, the guesses cover every direction. On later frames, the last answer is already close, because the object has moved only a little in a thirtieth of a second.
The starting guesses come from 42 viewpoints spread evenly on a sphere round the object, and 6 turns of the camera about each viewpoint, 60 degrees apart. The program then merges guesses that are nearly the same, so the count can end up a little lower. The worked count is:
first frame:  42 viewpoints x 6 turns = 252 guesses
              252 guesses x 5 rounds of refinement = 1,260 refinement passes
later frame:  1 guess x 2 rounds of refinement = 2 refinement passes
The FoundationPose paper reports the effect on speed, because estimation on the first frame takes about 1.3 seconds, while tracking runs at about 32 frames a second.
Why tracking is smoother#
Tracking is not only faster, because it is also steadier. When a model estimates the pose afresh on every frame, each answer has its own small error, so the answers jitter from frame to frame. Worse, some objects look almost the same from two directions, such as a box turned 180 degrees, so fresh estimation can pick the wrong one of the two on some frames. Tracking starts next to the last answer, so it only ever makes a small correction, which means it cannot jump to the far side.
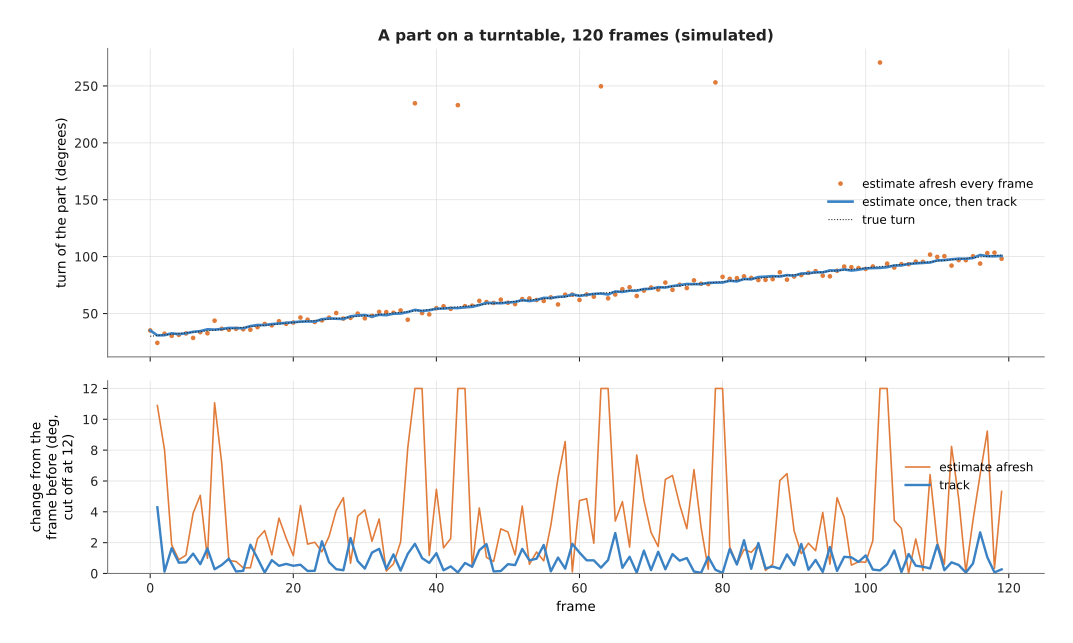
The top panel shows the estimated turn of the part over 120 frames, while the bottom panel shows how much the answer changed from one frame to the next.
This picture is a simulation made in the diagram script, not the output of a real model, so it uses made-up errors to show the pattern. The part turns 0.6 degrees each frame, while fresh estimation has a random error of a few degrees on each frame, and on 6 % of frames it picks the 180-degree look-alike. The tracker starts from the last answer and makes two corrections, each of which moves 60 % of the way to the truth, with a little error. In this run the results were:
| Way | Median change between frames | Median error | 180-degree flips |
|---|---|---|---|
| Estimate afresh every frame | 2.69 degrees | 1.74 degrees | 5 |
| Estimate once, then track | 0.68 degrees | 0.47 degrees | 0 |
Read the table by comparing the first column with the true change, 0.60 degrees a frame. The tracked answer changes by about the true amount, while the fresh answer changes by several times as much, because of its jitter.
Losing track, and finding it again#
Tracking has one serious weakness, because each answer is built on the last one, so if one frame goes badly then every frame after it starts from a bad guess, and this is called drift, or losing track.
It happens when a hand or another object covers the part, when the part moves too fast for a small correction to catch up, or when the part leaves the picture. Render and compare only corrects small errors, so once the guess is far off, the correction no longer pulls it back.
The fix is to watch a match score, which is a number that says how well the object, drawn at the current answer, matches the real photo. One way to get it is to run a scoring network, like the one FoundationPose uses on its first frame, on the tracked answer, while a simpler check is to count how many of the object's depth pixels agree with the drawn model. When the score stays low for a few frames, the program throws the track away and runs full estimation again, which is called re-detection, or re-initialisation.
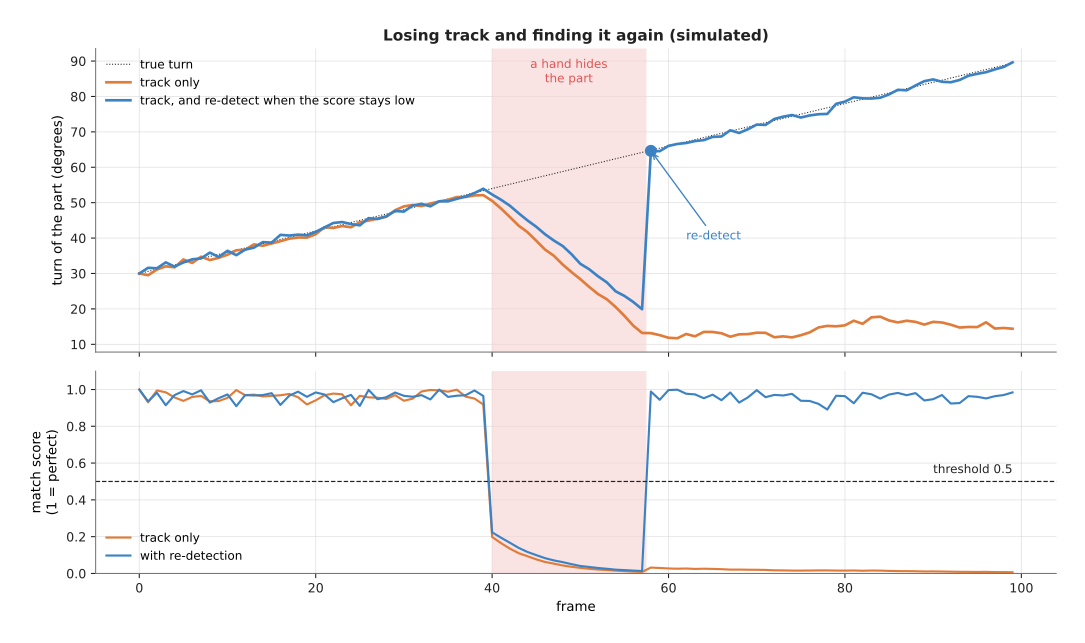
In the shaded frames a hand hides the part, and the tracked answer wanders off, while the lower panel shows the match score.
This is also a simulation from the diagram script, and the rule is to re-detect when the score has been below 0.5 for 3 frames in a row and the part is visible again. The tracker that re-detects is back on the true line at frame 58, and ends 0.2 degrees from the truth, while the tracker that never re-detects ends 75 degrees off, and its score tells you so.
Where it is used on a robot arm#
- Picking from a moving conveyor. The arm needs the part's pose at the moment the gripper arrives, so it tracks the part as it comes.
- Taking an object from a person's hand. The person's hand moves, so the pose must be updated all the time.
- Checking an insertion. A camera watches a peg as the arm pushes it towards a hole, and the tracked pose shows whether it is still lined up.
- Watching an object in the gripper. The pose of the object relative to the gripper shows whether it has slipped or turned.
Where it does not work well#
Tracking needs a steady frame rate and fairly slow motion between frames, so it fails with fast motion, with long periods hidden from view, and with motion blur. For symmetric objects, tracking avoids flips, but it can slowly slide round the symmetry, and that drift is hard to see. If you need the pose only once, before a single grasp, then tracking gives you nothing, because estimation alone is enough.
Models and libraries#
- FoundationPose estimates on the first frame and then tracks, as described above, and it needs a CAD model, or a few photos of the object from different sides. It needs an NVIDIA graphics card, and its licence allows research use only. NVIDIA's Isaac ROS also packages it for ROS 2.
- BundleSDF tracks the pose of an object it has never seen, with no CAD model, from a colour and depth video, and it needs a mask of the object in the first frame only. While it tracks, it also builds a 3D model of the object. Its authors describe it as "near real-time", and its licence also allows research use only.
- A Kalman filter, a small program that blends a prediction of where the object should be with each new measurement, is often put after a pose tracker, because it smooths the six numbers further and bridges a frame or two of bad readings. Tracking and motion describes the same idea for boxes.
6. Well-known models#
The models in this area come from two separate lines of work, and people confuse them constantly, so this section separates them before it names anything.
The human-pose line finds named points on a person: shoulders, elbows, wrists, knees. These models are the ones with the large communities, the easy packages and the pretrained weights, and they are trained on photographs of people. They return points in the picture, in pixels. They do not return a 6D pose of anything, so you get the six numbers only by adding depth or Perspective-n-Point (PnP), as section 3 describes. You use this line on your own objects by fine-tuning one of these models on your own photographs with your own points marked.
The object-pose line goes straight to the six numbers. These models expect a computer-aided design (CAD) model of the object, or a set of reference photographs of it, and they return where the object is and how it is turned. They are research repositories rather than packaged libraries, their licences are much worse, and most of them need an NVIDIA graphics card.
Read the table like this. The left column names the model and says how current it is. The right column is written as sentences, and the first of them says which of the two lines the model belongs to, because that is the part to read first: a human-pose model will never give you an object's rotation on its own. The sentences after it give the model's size, its licence, the job it is best at and when to pick it. Parameter counts are given where the project publishes them, from the Ultralytics documentation and from the RTMPose project's own table, and a row says that the count is not stated where the project publishes none. A parameter is one number inside the model that training chooses, so more parameters mean a larger download and a slower answer. Every licence was read from the project's own licence file.
| Model | What decides it |
|---|---|
| OpenPose, historical | OpenPose belongs to the human-pose line, so it returns points in the picture and never an object's rotation. Its parameter count is not stated, and its licence is a Carnegie Mellon University agreement for non-commercial research only. It is best at explaining how heatmap keypoint models work, so read it to understand the others and never pick it for a product. |
| Ultralytics YOLO pose, most used in 2026 | Ultralytics YOLO pose belongs to the human-pose line. Its sizes run from 2.9 million to 57.6 million parameters, and its licence is AGPL-3.0. It is best at being the easiest route to a keypoint model of your own, so pick it when you will fine-tune on your own points and can live with AGPL-3.0. |
| RTMPose, most used in 2026 | RTMPose belongs to the human-pose line as well. Its sizes run from 3.3 million to 27.7 million parameters, and its licence is Apache-2.0. It is best at fast keypoints on a processor with no graphics card, so pick it when the licence has to be permissive or when there is no graphics card. |
| DOPE, historical | DOPE belongs to the object-pose line, so it gives the six numbers itself. Its parameter count is not stated, and its licence is NVIDIA's, which permits non-commercial use only. It is best at showing keypoints and Perspective-n-Point on a rigid object, so pick it when you are reproducing a paper rather than shipping a product. |
| MegaPose, through HappyPose, most used in 2026 | MegaPose belongs to the object-pose line, and it gives the six numbers for an object it has never seen from that object's CAD model. Its parameter count is not stated. MegaPose is Apache-2.0 and HappyPose is BSD-2-Clause, so pick this pair when you have CAD models and you intend to ship. |
| FoundationPose, worth betting on | FoundationPose belongs to the object-pose line, and it gives the six numbers and then tracks them through a video. Its parameter count is not stated, and its licence is NVIDIA's, which permits non-commercial use only. Pick it when the work is research and you need tracking as well. |
6.1 OpenPose#
Historical: nobody should start a project with it, and its ideas are in the models below it.
Size not stated, a small card, and a Carnegie Mellon University agreement for non-commercial research.
OpenPose came from Carnegie Mellon University in 2017, and it was the first system
in wide use that found the keypoints of several people in one picture in real
time. It produces
one heatmap per keypoint, exactly as section 3
describes, plus a second set of maps that say which limb joins which pair of
points, which is how it decides whose elbow belongs to whose shoulder. Its output
order outlived it: the rtmlib package of section 6.3 still has a
to_openpose option that returns points in OpenPose's order.
The one idea is to find every body part everywhere in the picture first, and to work out only afterwards which parts belong to the same person. The paper calls this bottom-up, and its point is that the work does not grow when a second person walks into the frame.
The second set of maps is what makes that possible, and the paper calls them part affinity fields. For each limb there is a picture the size of the photo whose pixels hold a direction rather than a brightness, and that direction runs along the limb, from the joint at one end towards the joint at the other. To decide whether a particular elbow belongs to a particular shoulder, the program walks the straight line between the two points and checks whether the directions stored along the way agree with the direction it is walking; the pairs that agree best are matched up. So OpenPose asks two questions of the picture, where is each kind of part and which way does each limb run, and answers both with pictures of numbers. Neither of the two models below it keeps that second question. Ultralytics YOLO pose answers it by finding the object first, and RTMPose answers it by being handed a box.
What the idea buys is a cost that does not depend on the number of people, which is the claim in the paper's own abstract. What it costs is arithmetic spent where nobody is standing, because both sets of maps are produced for the whole picture whether it is crowded or empty, and a matching step that has to run between the network and the answer.
On a robot arm that property is worth knowing even though you should not run this model. An arm that shares a workspace with three or four people and must watch all of their hands is the one case where bottom-up is the better design, because RTMPose below runs its keypoint network once for every person it is given. For one object in front of one arm, which is nearly every real cell, the bottom-up design buys nothing and the licence rules it out anyway.
You would not pick it over RTMPose or Ultralytics YOLO pose, the obvious alternatives, for any new work. They do the same job faster, they install with one command, and their licences permit a product.
The costs are what rule it out. A commercial licence has to be bought from the university separately. You build the software from C++ source with Caffe and CUDA rather than installing it, and the repository has had no commit since August 2024.
There is no Python package. The demo is a built binary, and its own documentation shows this call:
# Writes one JSON file per picture, holding the keypoints it found.
./build/examples/openpose/openpose.bin --image_dir examples/media/ \
    --write_json output_jsons/
The JSON files are what you would read. What you supply is the build itself, and that is exactly the work the two packages below remove.
6.2 Ultralytics YOLO pose#
Most used in 2026, because it is the shortest path from your own labelled photographs to a keypoint model that runs.
Size xs for the smallest checkpoint and s for the largest, a laptop, AGPL-3.0 for the code and the weights.
Ultralytics publishes a pose version of each of its detectors, named with a
-pose suffix, and the current family is YOLO26. The downloaded weights find 17
joints on a person, because they were trained on the COCO keypoints dataset.
The one idea is to ask the detector that has already found the object to say where the points are as well, in the same pass, as plain numbers.
So there is no heatmap anywhere in this model. The pose head sits beside the box head, and for each object the detector reports it also reports the column and the row of each point, and a value saying whether the point is visible. Those numbers come out of the network directly, which means there is no brightest pixel to search for and no field of directions to walk along, and it also means the points arrive already attached to the object they belong to. That grouping is the entire job that OpenPose's part affinity fields exist to do, and here it falls out of the design, because a point is part of a detection rather than a bright spot somewhere in the picture.
What the idea buys is one network, one pass and one package. What it costs is the shape of the answer. A heatmap is a picture of where the point might be, so you can see that the model is torn between two places; a regressed number cannot show you that, and you are given one confidence value in its place. The other cost is that the points live inside a detection, so a part the detector misses has no points at all, where OpenPose would still have marked the joints it could see.
On a robot arm the difference shows up twice. The first time is when you train on
your own part, because here that is one dataset file and one call to model.train,
while RTMPose below means learning a configuration system. The second time is on a
tray holding four of the same part: each detection carries its own set of points,
so nothing in your program has to work out which handle belongs to which mug, and
that is work you would be writing yourself with a bottom-up model.
You would pick it rather than RTMPose, the obvious alternative, because training on
your own keypoints is one call to model.train with one dataset file, and because
the package is documented for people who have never trained a model. Pick RTMPose
instead when AGPL-3.0 is not acceptable to you.
The costs are these. AGPL-3.0 means that a product which uses the package must publish its own source or buy a commercial licence from Ultralytics. The pretrained weights are also worth less here than on the detection pages, because they find human joints: for your mug they are only a starting point for fine-tuning, so the labelled photographs of section 4 are work you will really do.
The library is ultralytics, and the second half of the code is the PnP step from
section 3, which OpenCV already provides.
import cv2
import numpy as np
from ultralytics import YOLO

# The checkpoint name follows the family, so yolo11n-pose.pt works with older
# versions of the package. These weights find 17 human joints; for your own
# object you fine-tune this model on your own photos with your own points marked.
model = YOLO("yolo26n-pose.pt")
result = model("photo.jpg")[0]

# One row per point: its column and its row in the picture, in pixels.
image_points = result.keypoints.xy[0].cpu().numpy().astype(np.float64)

# Where those same points sit on the object itself, in metres. You measure these
# once, from the part's drawing, and they never change.
object_points = np.array([[0.00, 0.00, 0.00],
                          [0.06, 0.00, 0.00],
                          [0.06, 0.09, 0.00],
                          [0.00, 0.09, 0.00]])

# The camera's lens numbers, from calibrating it once.
camera_matrix = np.array([[615.0,   0.0, 320.0],
                          [  0.0, 615.0, 240.0],
                          [  0.0,   0.0,   1.0]])

ok, rvec, tvec = cv2.solvePnP(object_points, image_points[:4], camera_matrix, None)
rotation = cv2.Rodrigues(rvec)[0]   # the 3 by 3 rotation matrix
print(ok, tvec.ravel())             # tvec is the object's position, in metres
The library gives you the network, the training loop and the drawing code, and
cv2.solvePnP gives you the geometry. What you supply is the list of points and
their meanings, because nothing in the library knows that your part has a handle
top and a base centre: you choose the points, mark them in your training pictures,
and measure where they sit on the real object in metres. You also write the check
on the answer, for example by projecting the object points back into the picture
with cv2.projectPoints and refusing the pose when they land far from the points
the model found.
6.3 RTMPose#
Most used in 2026 wherever the licence or the hardware rules out Ultralytics, which on a robot happens often.
Size xs for the smallest body model and s for the largest, a laptop, Apache-2.0 for the code and the weights.
RTMPose comes from the OpenMMLab project, inside the MMPose library. It is a keypoint model designed for speed on ordinary processors, and its own table reports its smallest body model at 3.20 milliseconds per picture with ONNX Runtime on an Intel i7-11700 processor, which is the measurement that puts it on this list.
The one idea is to keep what a heatmap gives you, a score for every position rather than a single answer, while paying for two thin lists instead of a whole picture.
The method is called SimCC, and it turns finding a point into choosing from a list. The horizontal axis of the crop is divided into equal-width numbered bins and so is the vertical axis, and for each keypoint the model scores every bin on each axis and picks one from each. So where OpenPose produces one grey picture per point, RTMPose produces two rows of scores per point, one along the width and one along the height. The backbone is CSPNeXt, taken from object detection, and before the bins are scored a gated attention unit refines the representation of each keypoint, which the paper chose because it is faster and uses less memory than a plain transformer layer. One more difference matters as much as the head. RTMPose is top-down: an off-the-shelf detector supplies the boxes first and the model then estimates the pose inside each box on its own, where OpenPose looked at the whole picture at once.
What the idea buys is fine positions at a small fraction of the cost of a flat heatmap, which is why it answers quickly on a processor with no graphics card, and a score per position that lets you refuse a point whose second-best bin is almost as good. What it costs is the detector in front of it, so there are two models to install and to keep fed, and the time grows with the number of objects, because the model runs once per box. The answer is also a bin rather than an exact pixel, so how finely you can locate a point is a setting rather than a property of the photo.
On a robot arm this is the model to reach for when the robot's computer has no graphics card and the licence has to be clean, which together describe most industrial cells. Where it loses to Ultralytics YOLO pose is on a tray of twenty identical parts, since RTMPose runs twenty times and YOLO pose runs once. Where it wins is one small part in a wide photo, because the crop is enlarged to fill the model's input, so the part arrives bigger than it was in the photo.
You would pick it rather than Ultralytics YOLO pose, the obvious alternative, for
two reasons. Nothing in its licence reaches into your own source, and there is a
small package called rtmlib that runs the published checkpoints through ONNX
Runtime with no MMPose installation and no graphics card. Pick Ultralytics instead
when your main job is training on your own points, which is easier there.
The costs are these. MMPose has had no commit since August 2025, so it is drifting
away from current versions of PyTorch, like the rest of the OpenMMLab libraries.
Training your own keypoints means learning MMPose's configuration system, which is
a real piece of study, because rtmlib only runs inference. The pretrained weights
are again human joints, not your object's points.
The library for inference is rtmlib, installed with pip install rtmlib, and
this follows its own quick-start example.
import cv2
from rtmlib import Body, draw_skeleton

# 'balanced' picks a middle-sized checkpoint; 'lightweight' and 'performance'
# are the other two. The files download on first use.
body = Body(mode="balanced", backend="onnxruntime", device="cpu")

img = cv2.imread("photo.jpg")
keypoints, scores = body(img)        # points in pixels, and a score for each

img = draw_skeleton(img, keypoints, scores, kpt_thr=0.5)
cv2.imwrite("drawn.jpg", img)
The library downloads the checkpoints, runs them through ONNX Runtime and draws the result. What you supply is the same as above: the meaning of the points, the training if you need your own, and the PnP step that turns points into a pose.
6.4 DOPE#
Historical: it is the clearest example on this page of keypoints turning into a pose, and there are better choices for new work.
Size not stated, an NVIDIA graphics card, and the NVIDIA Source Code License, for research or evaluation only.
DOPE (Deep Object Pose Estimation) came from NVIDIA in 2018. For each object it predicts nine keypoints, the eight corners of a box drawn around the object plus its centre, and PnP then turns those nine points into the six numbers. It followed PoseCNN, which was one of the first networks to predict a 6D pose directly and whose authors released the YCB-Video dataset that section 4 mentions. DOPE was trained only on pictures made in a computer, which showed that a network trained with domain randomisation can work on real photographs.
The one idea is that a network never has to understand 3D at all. If it can mark the eight corners of the box around the object in the photo, then geometry turns those marks into the six numbers, and the network's whole task is marking.
What is inside is OpenPose's design with corners in place of joints. The paper's network produces nine belief maps, which is their word for heatmaps, one for each projected corner of the box and one for the centroid, and alongside them eight vector fields giving the direction from each corner towards the centroid it belongs to. Reading the answer out is then the same two steps as OpenPose: find the local peaks in the maps that are above a threshold, and assign each corner to a centroid by comparing the direction stored at the corner with the direction towards each candidate centroid. A corner belongs to the object its arrow points at, which is how two of the same part lying side by side get two separate sets of nine points. PnP finishes the job with the camera's numbers and the object's measured size.
What this buys is one pass of a flat network per picture, with no rendering, no mesh and no depth image, so DOPE is cheaper per frame than either of the two models below it. What it costs is that the corners of the box are not visible things. No pixel of the photo is the corner of an imaginary box, so the network has to imagine where those corners would be, and on a symmetrical object two genuinely different rotations put the nine marks in almost the same places, which no amount of geometry afterwards can separate. The other cost is one network for each object, trained on synthetic pictures you generate for that object.
On a robot arm the difference shows up when the number of part types changes. One part, made in quantity, always the same shape, is DOPE's case: you pay for the training once and then every frame is cheap. A cell that handles a second part needs a second network and a second synthetic dataset, and that is the point at which MegaPose below becomes the cheaper answer, because it wants another mesh file rather than another training run.
You would pick MegaPose rather than DOPE, the obvious alternative, because DOPE needs one network trained for each object, while MegaPose takes any object whose CAD model you have. DOPE is worth reading to see the keypoint route done simply.
The costs are these. The readme carries a Creative Commons non-commercial badge while the licence file carries NVIDIA's licence, so the two do not agree in wording; the licence file is the one that counts, and both forbid commercial use. Training per object means generating synthetic pictures per object. The authors report testing on Ubuntu 20.04 and 22.04 only.
There is no package to install. You clone the repository and run its inference
script, which is documented in the repository's inference folder.
# --weights is a trained network for one object; --object names the class
# whose size is given in config_pose.yaml.
python inference.py --weights ../weights --data ../sample_data --object cracker
What you supply is the camera's projection matrix in camera_info.yaml and the
object's real dimensions in config_pose.yaml, because PnP cannot work without
both. Weights for the YCB and HOPE objects are published, and weights for your own
object are weights you train.
6.5 MegaPose, through HappyPose#
Most used in 2026 among object-pose models that a product may actually use, because it is the only strong one in this list whose licence permits it.
Size not stated, a small card, though it also runs on a processor, Apache-2.0 for MegaPose's code and BSD-2-Clause for HappyPose's.
MegaPose, from Inria and NVIDIA in 2022, estimates the 6D pose of an object it has never seen in training, as long as you give it the object's CAD model. It works by render and compare, which section 3 describes. HappyPose is a separate project that packages MegaPose and the older CosyPose behind one interface, with a documented path that does not need an NVIDIA card and a ROS 2 wrapper of its own.
The one idea is the reverse of DOPE's, and the two are worth holding side by side. DOPE asks the network where named points are and lets geometry work out the pose from them. MegaPose never names a point. It makes a guess at the pose, draws the object as it would look if the guess were right, and asks the network only how wrong that drawing is. Because the drawing comes from the mesh you supplied, the network needs to know nothing about your particular object, which is exactly why an object it has never seen is no harder for it than one it has.
There are two networks. The coarse one was trained to judge whether a rendering and an observed picture show the same pose, so MegaPose renders the object at many candidate orientations and keeps the one that scores best, which is how it gets a first guess with no keypoints and no prior pose. The refiner then runs the render and compare loop of section 3: it is shown renderings around the current guess together with the observed crop, and it outputs a correction. The way the refiner is told what your object looks like is worth stating plainly, because it is the heart of the design. The object's shape and coordinate system are passed to the network by rendering several synthetic views of it, so the knowledge of your object arrives as pictures at the time you ask, rather than sitting in the weights as it does in DOPE. The networks themselves were trained once, on a large synthetic dataset of photorealistic pictures of thousands of objects.
What this buys is a new object for the price of a mesh file and no training at all, and an answer that has been checked against the photo at every round rather than asserted once. What it costs is time, because each answer means several renderings and several passes of a network where DOPE needs one. It also costs you a detection box to start from, since the first guess at how far away the object is comes from the size of that box, and it costs you a correct mesh: the units are millimetres, and a mesh in the wrong units puts the object at the wrong distance without complaining.
On a robot arm the difference shows up in a cell that handles many different parts that all have engineering drawings. Twenty parts means twenty meshes and one model here, against twenty trained networks with DOPE. The cost appears again when the part moves, because several renderings per answer is not something you do on every frame, so MegaPose is run once before a grasp while the scene is still. That is the gap FoundationPose below closes.
You would pick it rather than FoundationPose, the obvious alternative, because FoundationPose's licence permits research and evaluation only. MegaPose's code is Apache-2.0 and HappyPose is BSD-2-Clause, so this is the pair you can put in a product. FoundationPose is stronger and it tracks, so pick that one when the work is research.
The costs are these. You must have a CAD mesh of each object, with its units in millimetres, and the camera's internal numbers. Render and compare runs the network several times per answer, so it is slow, and on a processor with no graphics card it is slow enough that you would run it once before a grasp rather than continuously. You install it from the Git repository with its submodules rather than from the Python package index.
The library is happypose, and these commands come from its own documentation.
# Fetch the MegaPose weights and the worked example that ships with the project.
python -m happypose.toolbox.utils.download --megapose_models
python -m happypose.toolbox.utils.download --examples barbecue-sauce

# Estimate the pose and write pictures of the result over the photo.
python -m happypose.pose_estimators.megapose.scripts.run_inference_on_example \
    barbecue-sauce --run-inference --vis-poses
The example folder shows exactly what you have to supply for your own object: a
colour photograph, an optional depth picture in millimetres, a camera_data.json
holding the camera matrix and the picture size, a mesh of the object in
millimetres, and a detection box for the object in object_data.json. The box
comes from a detector such as the ones on the object detection
page, and it only sets the first guess at the object's
distance, so the documentation says it does not have to be precise. The output is
one quaternion and one translation per object.
6.6 FoundationPose#
Worth betting on: taking any new object from a CAD model or a handful of photographs, and then tracking it, is where this field is going, and the reason it is not the default is its licence.
Size not stated, an NVIDIA graphics card, and the NVIDIA Source Code License, for research or evaluation only.
FoundationPose, from NVIDIA, estimates the pose of an object it has never seen and then follows that pose through a video. It takes either a CAD model or a few photographs of the object from different sides. Section 5 describes how its two modes work and what they cost in time.
The one idea is to keep MegaPose's render and compare loop and remove the one thing it cannot do without, which is a mesh to render.
The way out is a learned stand-in for the mesh. From a handful of photographs the model builds what the paper calls a neural implicit representation of the object, and the property that matters about it is that new views can be synthesised from it. So the loop still has something to render, and the paper's own claim is that this keeps the pose estimation modules that come afterwards unchanged, whichever kind of object description you started with. The comparison itself is done by a transformer, trained with a contrastive formulation, on synthetic data generated at scale with the help of a large language model. Tracking then falls out of the same machinery: once a pose is known on one frame, the next frame starts from it, so there is one guess to correct instead of many to score, which is the difference section 5 measures.
What this buys is the two things MegaPose cannot do: a pose for an object nobody ever drew, and a pose on every frame rather than once before a grasp. What it costs is a mask of the object on the first frame, because the loop has to be told which object it is tracking before it can correct anything, and the install described below, because rendering inside the loop is what pulls in the awkward parts. The photographs are a cost too, since the stand-in can only render the sides they showed it.
On a robot arm the difference shows up with a part that arrived from a supplier with no drawing, such as a casting. A set of photographs from around the part gives FoundationPose what it needs, while MegaPose has nothing to render and is out of the running. The second place it shows is a part held in a gripper and turned: the pose stays correct through the motion here, where MegaPose would be started again from nothing each time you asked. The licence is what keeps all of this in the laboratory.
You would pick it rather than MegaPose, the obvious alternative, for two capabilities: it tracks as well as estimates, and it can work from reference photographs when no CAD model exists. Pick MegaPose when you intend to ship anything, because this licence allows research and evaluation only.
The costs are these. Most people run it through the Docker image the repository
provides, because nvdiffrast and pytorch3d are awkward to install any other
way. The mask it needs on the first frame usually comes from a
segmentation model, so that is a second model to run.
There is no package, so you clone the repository and run its demo, which is the call its own readme gives.
git clone https://github.com/NVlabs/FoundationPose.git
cd FoundationPose
# Estimates the pose on the first frame of the bundled video, then tracks it.
# The paths are already set as defaults in the script's arguments.
python run_demo.py
What you supply for your own object is the mesh, the camera's internal numbers, a colour and depth video, and the mask of the object on the first frame. NVIDIA's Isaac ROS also packages the model for ROS 2, which is the easier route if your robot already runs ROS 2.
6.7 How to choose#
Decide first which of the two lines you are in, because that decides everything
else. If you have a CAD model of the object and want its rotation, you are in the
object-pose line, and MegaPose through HappyPose is the default, since it is the
one you may ship. If you have no CAD model but many slightly different objects of
one kind, such as mugs, you are in the human-pose line: fine-tune a keypoint model
on your own points and finish with cv2.solvePnP.
Four things change that.
- The licence must be permissive and there is no graphics card. Use RTMPose through
rtmlibfor the points, and HappyPose on the processor for a CAD-based pose. - You want the least work to train on your own points. Use Ultralytics YOLO pose, and accept that AGPL-3.0 means publishing your own source or buying a licence.
- The work is research and you need the pose on every frame of a video. Use FoundationPose, which section 5 covers in full.
- You are watching a person rather than an object, for example to learn from a recording of someone working. Stay in the human-pose line, where RTMPose has whole-body models and MediaPipe, which is Apache-2.0, finds hands in ordinary video.
One sentence is worth repeating, because it is the mistake this section exists to prevent. A model from the human-pose line gives you points in a picture and nothing more, so the six numbers always come from your own geometry afterwards, and pose from points is the page that explains that step.
7. Where this is going#
Everything above describes models you can download today. This section is about the direction, and it was written on 4 October 2026. Every company, product and number in it was checked against the page linked beside it on that day.
It also uses the frontier chapter's four kinds of claim, which carry very different weight. A demonstration is a recording of something working once. A product announcement is checkable, which makes it the most useful. A research result is a measured number on a stated task. A projection is about a date that has not arrived, and it is the weakest. Every claim below says which one it rests on, and where I give my own opinion the sentence says so.
How it got here#
The shape of the change is that the object stopped having to be in the training set. DOPE and PoseCNN trained one network for one set of objects, so a new part meant new data and a new network. MegaPose and FoundationPose train once on many objects and then take a new one at run time, as a CAD model or a handful of photographs, and find its pose by rendering it and comparing. The human-pose line did not change this way at all. It stayed a heatmap network on photographs of people and became easy to install instead, which is why the two lines in section 6 feel different to use.
Where it is used in industry today#
The industrial use of object pose is bin picking and machine tending, and the companies selling it sell a whole cell rather than a model. Photoneo sells Bin Picking Studio, built around CAD matching, offering CAD-based or AI-based localisation of parts, and running with Photoneo's own 3D scanners. Mech-Mind sells Mech-Vision with its own cameras, listed in Universal Robots' marketplace as something you can buy for a UR arm, and its own post about Automate 2026 names generalised picking of transparent objects, machine tending of sheet metal parts and picking from a moving conveyor as what it showed. Those are product announcements that need reading carefully, because the pose in such products usually comes from matching a CAD model to a point cloud rather than from a learned pose network, and that is iterative closest point rather than anything on this page.
Where learned models are shipped, two patterns are visible. Fizyr sells deep-learning vision for picking parcels and bulk goods, and what it predicts is a grasp for each item rather than the six numbers of a known object, which is how industry avoids the pose problem when every object is different. NVIDIA takes the other route and ships pose estimation as ROS 2 packages: Isaac ROS pose estimation contains FoundationPose, DOPE and CenterPose for Jetson Orin, Jetson Thor and desktop NVIDIA cards. Two things on NVIDIA's own model card for FoundationPose deserve attention. It states 4.6 queries per second for pose estimation and 746 for pose tracking on Jetson Orin, which is the first-frame-then-track split that section 5 describes. And it says the model "is fully trained and does not require additional training for commercial applications", with the licence covered by a Model End User Licence Agreement, which is not the non-commercial research licence on the NVlabs repository that section 6.6 describes. Read the licence of the copy you download, and note that a sentence about training is not a grant of permission.
The clearest evidence that this is an industrial problem is that industry now publishes the datasets. In 2025 the BOP benchmark added a group called BOP-Industrial, and its dataset page names where each one came from: XYZ-IBD from XYZ Robotics, ITODD-MV with 28 objects from MVTec, and IPD from Intrinsic. Three companies that sell industrial vision and robotics software now supply the test that the research is scored on.
What is being worked on right now#
The first front is pose for objects the model has never seen, and it has a measured answer. The BOP Challenge 2024 report states that the best 2024 method for model-based 6D localisation of unseen objects, FreeZeV2.1, is 22 per cent more accurate than the best 2023 method, GenFlow, and only 4 per cent behind the best 2023 method that was allowed to see the objects, while taking 24.9 seconds per image against 2.7. It also names Co-op at 0.8 seconds per image and 13 per cent more accurate than GenFlow. Those are research results under a stated protocol, and the direction is clear: not having seen the object has almost stopped costing accuracy and now costs time.
The second front is removing the CAD model as well. The 2024 challenge introduced model-free tasks, in which a method is given reference videos of an object instead of its 3D model. FoundationPose already accepts a few reference photographs, and Meta's SAM 3D Objects, published on 19 November 2025, turns one masked photograph into a textured 3D model with a pose, under a bespoke licence and a gated download. The reason this matters is commercial rather than scientific. A customer very often has no CAD model of the part, or has one that does not match what the supplier machined.
The third front is the kind of part that industry cares about and research used to avoid. The XYZ-IBD paper describes roughly 273,000 annotated instances across 75 multi-view real scenes of metallic and specular objects, and says a multi-stage, partly manual annotation pipeline was needed to reach sub-millimetre annotation accuracy. Read that last part as a statement about the field: producing ground truth at that precision is itself a research effort. BOP 2025 also added a multi-view setup, which matches how those datasets were captured and how real cells are built.
The human-pose line is being pushed somewhere else entirely. Its growth area is collecting demonstrations, by reading whole-body and hand keypoints from ordinary video of a person working, which is the subject of learning from human video.
What is still unsolved#
A marker on the object still beats every learned method for accuracy, and that deserves to be said plainly rather than left implied. Start with what the benchmark measures. BOP counts a pose as correct when the surface error is below a threshold, and its own evaluation methodology sets that threshold "ranging from 5% to 50% of the object diameter with a step of 5%", then averages the recall across those thresholds. For a part 100 mm across that is a tolerance of 5 mm to 50 mm, while pressing a bearing into a housing needs a fraction of a millimetre. So the number that ranks the whole field does not measure the accuracy assembly needs, and I could find no learned 6D pose estimator published with a millimetre-level error on an industrial part.
A printed marker is in a different position, and the clearest proof is where it is already used. AprilTag and printed boards are what you measure the camera with in the first place: calibration finds both the lens and the camera-to-arm transform from a printed target, and every learned pose estimator inherits whatever that step achieved. If a learned model were as accurate, you would calibrate with it. The repository's own case study makes the same choice and locates a rack with an AprilTag rather than with FoundationPose. A marker is not magic either, and the caveat is measured: Abbas, Aslam, Berns and Muhammad compared AprilTag with motion capture in Sensors in 2019, in Analysis and Improvements in AprilTag Based State Estimation, and report about 1.0 cm of error in one axis with the camera pointed at the tag centre, rising to about 16 cm at a camera yaw of 110 degrees. Those figures come from one study across a range of distances and angles, and they are not a figure for a marker 40 cm in front of a wrist camera. What to take from them is that somebody measured a marker's error against motion capture and published it, which has not happened for a learned pose estimator on an industrial part. So the claim is narrow: a marker's error can be measured, bounded and improved, and a learned estimator's has not been published at all. The marker's cost is equally plain. You cannot glue one onto a part arriving loose in a bin, onto food, or onto a customer's own product.
The rest of the list is shorter and older. Symmetric and textureless parts remain hard enough that the benchmark had to invent symmetry-aware error functions to score them at all. Transparent and shiny parts break the depth sensor before the model gets a chance, which is why Mech-Mind still presents transparent picking as a showcase rather than a feature. Speed is still traded against accuracy: against the same 2023 baseline, the most accurate 2024 method gained 22 per cent at 24.9 seconds per image, while the practical one gained 13 per cent at 0.8 seconds. And no vendor publishes a pick rate or an uptime figure, so the only way to learn what a cell achieves is to run one.
The next two to three years#
I expect onboarding a new part from photographs, rather than from a CAD model, to become the normal way a part enters a pose system. The measured reason is the BOP 2024 result above, where not having seen the object costs about 4 per cent against the previous year's best seen-object method. The commercial reason is stronger: the CAD model is what customers most often cannot supply, and a method that needs one puts a procurement problem in front of an engineering one. This is my expectation, not an announcement.
I expect bin picking to stay the application, and the research to keep following the vendors' data. The checkable part is that the 2025 industrial datasets came from companies rather than universities. A benchmark made of metallic, cluttered, specular scenes rewards methods that work in those scenes, and funding follows the benchmark. The inference is mine, and the datasets are a fact you can check on the BOP page.
I expect a second and third camera to become ordinary in a cell, and I expect this to deliver more than any model release in the same period. BOP added a multi-view setup in 2025 and the industrial datasets were captured that way, which came from the people who build these cells rather than from a research fashion. The reason is arithmetic rather than science: occlusion in a bin causes most pose failures, another camera removes occlusion, and a camera costs less than the engineering time spent making a model cope with not seeing. This is my expectation.
I expect markers and learned pose to be used together for years, with the marker keeping the accurate job. The gap above is a factor of ten or a hundred rather than a few per cent, and nothing on the current research front is aimed at closing it, because the benchmark does not measure it. So the arrangement I expect to see more of is a learned model finding the part roughly, and then a fixture, a marker or a force-controlled insertion achieving the final accuracy. This is my judgement, and what would change it is a published error bar in millimetres on a named industrial part.
I expect object pose to disappear from some robot stacks altogether, and this is the prediction I hold most loosely. A policy trained end to end never computes a pose, because it maps pictures straight to movements, and the frontier chapter's count of robotics papers shows vision-language-action work going from 0.52 per cent of robotics abstracts in 2024 to 10.78 per cent by September 2026. That is a measured shift in attention rather than in capability, and the distinction matters. Pose survives wherever a number has to be checked before the arm moves, which means assembly, inspection and anything that has to be proven correct rather than observed to work. My expectation is two stacks rather than one, with the models on this page living in the second.
8. Where to read next#
- Depth from pictures is the next page, and most pose methods need good depth, so that page explains where depth comes from.
- Tracking and motion explains how to follow boxes and points from one video frame to the next, while section 5 of this page does the same for a full pose.
- Segmentation is the page before this one, and a mask often feeds a pose model.
- 3D models work on 3D points directly, instead of on flat photos.
- Six-DoF grasps uses the same six numbers for the gripper instead of the object.
- For more depth, with licences and a list of methods, read models that measure.