This page opens the chapter on seeing models, which are the models that turn a picture into names, boxes, outlines, poses or depth. They are the first of the seven kinds of model in this book, and a robot arm with a camera almost always uses at least one of them.
The page answers four questions: what seeing models are for, what question they answer for a robot arm, what kinds there are and how they differ, and how they connect to the other kinds of model in this book.
It is written for a reader who has already read the first chapter, what models are, so you should already know that a model is a function learned from examples, and that a picture is only a grid of numbers to a computer. However, you do not need to know how any seeing model works inside, because each of the next seven pages explains one kind on its own.
Contents#
- What seeing models are for
- The question they answer for a robot arm
- The seven kinds
- How the seven kinds compare
- What they have in common
- How seeing models connect to the other kinds
- Which page to read first
- How this chapter writes size, machine and licence
- Where to read next
- Using it in Python
1. What seeing models are for#
A camera gives the robot a picture, and that picture is a grid of small coloured dots called pixels. A normal camera picture has hundreds of thousands of pixels, and each pixel is stored as three numbers: how much red, how much green and how much blue it has.
But the robot cannot use those numbers directly, because it does not need to know that pixel number 51,200 is dark blue. It needs to know instead that there is a mug on the table, where the mug is, and which way its handle points.
This is what a seeing model does: it takes a picture in and gives back something the robot can use, such as the name of the mug and the place where it stands. People also call these computer vision models, because "computer vision" is the name of the field that teaches computers to make sense of pictures.
Almost every seeing model in use today is a neural network, which is a model built from many layers of simple sums, as the page inside a neural network explains. The network learns those sums from many example pictures, and each example picture comes with the correct answer already written down by a person.
Before neural networks, people wrote the steps by hand, so a program could find every orange pixel and then call that area "the orange ball". Book 2 shows this method in finding an object in a picture. Hand-written steps of that kind still work well for simple cases. However, they stop working when the object has many colours, when the light changes, or when there are many kinds of object. A seeing model handles those cases, because it has seen thousands of examples of each.
2. The question they answer for a robot arm#
The previous section said that a seeing model turns pixels into something the robot can use. Whatever that something turns out to be, every seeing model answers some form of one question: what is in front of the camera, and where is it?
The different kinds of seeing model answer that question at different levels of detail. The simplest answer is just a name, a more useful answer adds a box around each object, and the most detailed answer gives the exact outline of the object.
The picture below shows the same mug, answered at those three levels of detail.
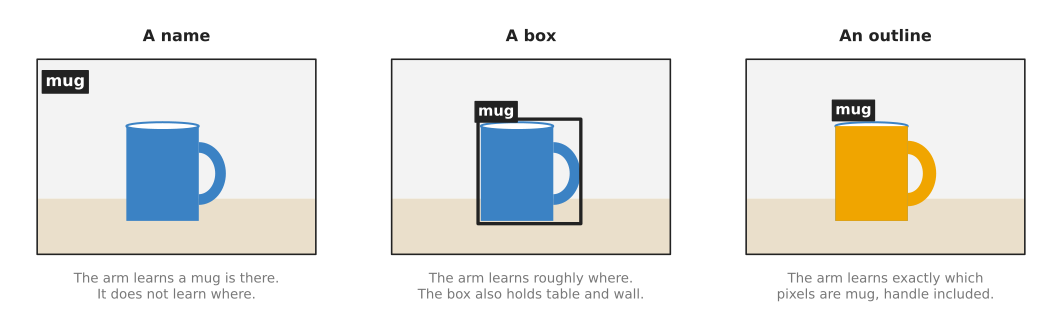
With only a name, the arm knows that a mug is there but not where to reach, and with a box it knows roughly where to reach. With an outline it knows exactly which pixels are mug, so it can then find the handle or the middle of the side.
More detail usually costs more, because a model that gives outlines is often slower than one that gives boxes. Its training pictures also take longer for a person to label, since somebody has to trace every outline by hand.
3. The seven kinds#
Because those levels of detail differ so much, this chapter splits seeing models into seven kinds. The picture below shows the answer each kind gives for the same photo of two mugs and a bottle on a table.
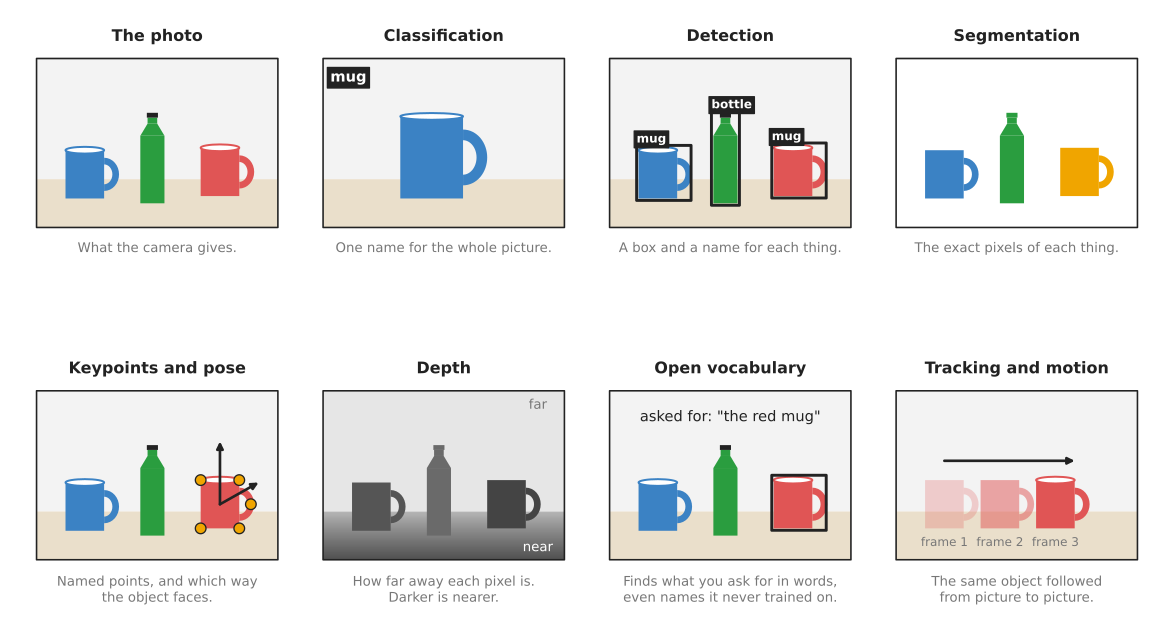
Each panel is one kind of model, so the top-left panel is the photo that goes in and the other seven panels show what each kind gives back.
Here is each kind in one line, with a link to its page.
- Image classification gives one name for the whole picture, such as "mug".
- Object detection draws a box around each object and names it.
- Segmentation marks the exact pixels that belong to each object or each kind of thing.
- Keypoints and object pose finds named points on an object, and works out which way the object faces.
- Depth from pictures works out how far away each pixel is.
- Open-vocabulary models find objects that you describe in words, or that you point at with a click.
- Tracking and motion follows objects and points from one picture to the next.
This is easiest to see in the first three kinds, which build on each other: a detector contains most of a classifier, and a segmentation model in turn often contains a detector.
Because some of the seven kinds come up far more often than others, the chapter puts the seven pages into two groups. The most used group holds the four kinds that almost every robot arm with a camera relies on: object detection, segmentation, open-vocabulary models, and keypoints and object pose. Together they answer "which object, exactly where, and which way is it turned", which is exactly what a pick needs. The pose page also covers following a pose through a video, called 6D pose tracking. The also used group holds the three kinds that are common but needed less often: image classification, depth from pictures, and tracking and motion. Those three are needed less often because a classifier gives too little detail for most picks, depth from pictures is mainly for when a depth camera fails, and tracking matters only when things move.
The list below shows the two groups, in the chapter's reading order.
- Most used: object detection, segmentation, open-vocabulary models, keypoints and object pose.
- Also used: image classification, depth from pictures, tracking and motion.
4. How the seven kinds compare#
Now that you have seen each of the seven kinds in a single line, the table below compares them side by side. Each row is one kind, so read across a row to see its group, what goes in, what comes out, and a typical use on a robot arm. The last column is a well-known example of that kind, which its own page explains.
| Kind | Group | What goes in | What comes out | A typical use on an arm | A well-known example |
|---|---|---|---|---|---|
| Object detection | most used | one picture | a box, a name and a score for each object | find each cup on a table | YOLO |
| Segmentation | most used | one picture | the exact pixels of each object | find the rim or the handle of a mug | Mask R-CNN |
| Open-vocabulary models | most used | one picture and some words, or a click | boxes or outlines of whatever the words describe | "pick up the red mug" | Grounding DINO, SAM |
| Keypoints and object pose | most used | one picture, sometimes with depth; or a video, for pose tracking | named points, and the object's position and turn in 3D, once or on every frame | line up a peg with a hole | FoundationPose |
| Image classification | also used | one picture | one name, with a score | check whether the gripper is holding something | ResNet |
| Depth from pictures | also used | one picture, or two side by side | a distance for every pixel | find the distance to a shiny object that a depth camera misses | Depth Anything |
| Tracking and motion | also used | a video, one picture after another | where each object or point moved | follow a part on a moving conveyor | CoTracker |
Two of those columns matter most when you choose, because the "what comes out" column tells you whether the answer is detailed enough for your job, while the "what goes in" column tells you what camera you need. A depth model, for example, can work from an ordinary camera, while a pose model often wants a depth camera as well.
5. What they have in common#
However, underneath the differences the table sets out, all seven kinds also share three things.
First, they all start the same way, because the first layers of the network turn the pixels into a smaller grid of numbers that describe edges, corners and shapes. This part of the network is called the backbone, and different kinds of seeing model often use the same backbone and change only the last layers. So the last layers, called the head, are what differ: a classification head gives a name, a detection head gives boxes, and a segmentation head gives outlines.
Second, they all learn from labelled pictures, where a label is the correct answer that a person wrote down for one picture. For a classifier the label is a name, for a detector it is a box and a name for each object, and for a segmentation model it is an outline for each object. The page where the data comes from explains how people collect these.
Third, they only know what they were trained on, so a model trained on kitchen photos may well miss a metal part in a factory. Instead of saying "I do not know", it usually gives a wrong answer, or no answer at all. The usual fix is to collect a few hundred pictures of your own objects and train the model a little more on them, which is called fine-tuning. The chapter-one page fine-tuning explains the ways to do it and what each costs, and each of the next pages says how it is done for that kind.
6. How seeing models connect to the other kinds#
Seeing models rarely work alone, because they usually come first in a robot's program, where they turn the camera picture into facts about objects. The other kinds of model then work on those facts rather than on the pixels themselves.
- 3D models work on 3D points and whole scenes instead of flat pictures, so a seeing model often picks out the pixels of one object first and the 3D model then works only on that object's points.
- Grasp models decide where and how to hold an object. Many of them take a mask from a segmentation model, so that they only look for grasps on the object the robot should pick.
- Movement models decide how the arm should move, moment by moment. Many of them contain a seeing model's backbone inside them, which turns each camera picture into numbers.
- Language models understand words, and connect words to pictures and actions, which is why the open-vocabulary models in this chapter sit on the border between seeing and language.
- World models predict what will happen next if the arm does something. Some of them predict future pictures, which is close to the tracking and motion models here.
- Touch and body models make sense of touch, force and the arm's own body, and because some touch sensors produce pictures, the same kinds of network read those pictures too.
The page the map of models shows all seven kinds of model together.
7. Which page to read first#
Since the seven kinds connect to each other in the ways just described, the order you read them in depends on what you already know. If you are new to seeing models, read the most-used pages in order, starting with object detection. If a word such as backbone or score is new to you there, read image classification first, because it is the simplest seeing model and it explains the parts that every other seeing model reuses.
If you already know what you need, the list below points to the right page.
- To find objects on a table and pick them up, read object detection, then segmentation.
- To put a part into a fixture at an exact angle, read keypoints and object pose.
- To follow a part's full pose while it moves, read 6D pose tracking.
- To measure distances with only an ordinary camera, read depth from pictures.
- To handle objects that no model was trained on, read open-vocabulary models.
- To follow objects that move, read tracking and motion.
8. How this chapter writes size, machine and licence#
Every model section in this chapter says three things about what a model costs you, and it says them in the same short words rather than explaining them again each time. This section is where those words are defined. The same three scales are used in every chapter of this book, so you only have to learn them once.
Size is the number of parameters, which is the count of numbers the network learned during training. It is a rough guide to how capable a model is and to how much memory it needs, and nothing more: a well-trained small model beats a badly trained large one.
| Size | Parameters |
|---|---|
| xs | under 10 million |
| s | 10 to 100 million |
| m | 100 million to 1 billion |
| l | 1 to 10 billion |
| xl | more than 10 billion |
Machine is what you need to run the model once, not to train it. Training needs more, usually several times more, and each model section says so where it matters.
| Machine | What it needs |
|---|---|
| laptop | an ordinary processor, with no graphics card |
| small card | a graphics card with less than 8 GB |
| big card | a graphics card with 8 to 24 GB |
| workstation | a graphics card with 24 to 80 GB |
| cluster | more than one card of 80 GB |
Licence is given as the name alone, such as Apache-2.0 or MIT. Two things about that name matter more than the name itself. The code licence and the weights licence are often different, so a model with permissive code can still forbid you from selling what you build, and each model section says when the two differ. And a name is not legal advice: read the project's own licence file before you ship anything, because this book records what those files said on the day they were read.
9. Where to read next#
The next page is object detection, the first of the most-used group, and it explains how a network draws a box round each object and then names it. If you want the simplest seeing model first, image classification opens the also-used group instead.
For practical detail on the models you can download, their licences and their speed, Book 2 has two deeper documents: models that find objects and models that measure.
10. Using it in Python#
The seven kinds above are described as ideas, and each one of them is also a file you can download and call. So this section runs the most used of the seven, an object detector, on a single picture. After reading it you will be able to get names and boxes out of a photo in about five lines, and you will know the shape that every later page in this chapter repeats: load a model, give it one input, and read a list of answers back.
from ultralytics import YOLO

# The trained numbers download themselves the first time, into a file of about 5 MB.
model = YOLO("yolo11n.pt")

# Calling the model gives one result per picture, and there is one picture here.
result = model("table.jpg", conf=0.25)[0]

for box in result.boxes:
    name = result.names[int(box.cls)]
    print(name, float(box.conf), box.xyxy[0].tolist())
Ultralytics is the Python package that holds the YOLO family of detectors, and it is used here because it needs fewer lines than any other way of running one. It does a lot inside those five lines, because it downloads the trained numbers, resizes the picture to the size the network expects, runs the network, removes the duplicate boxes, and gives the coordinates back on the original picture's scale.
What the downloaded model gives you out of the box is the 80 everyday classes of COCO, so it finds cups, bottles, bowls, chairs and people in an ordinary photo without any training from you. For those objects that really is most of the job, and it is worth saying so plainly, because a working detector in five lines surprises people who expect months of work.
What you still have to write yourself is everything that happens after the list of
boxes. The four numbers in box.xyxy are pixels, and a pixel is a direction from
the camera rather than a place on your table. So you read the distance at that
pixel from a depth camera, turn the pixel and the distance into a point in metres,
move that point from the camera's frame into the arm's frame, and only then can the
arm reach for it. None of those steps is in the library.
What you have to decide is the confidence threshold, which is conf=0.25 above,
and whether the 80 classes cover your own objects at all. A threshold that is too
low invents objects, and one that is too high misses real ones. If your parts are
not among the 80 classes then no threshold helps, because the model has never seen
them, and you have to train it further on your own pictures instead. The page on
fine-tuning
explains how.